Wednesday 13 November 2013

Glass Shifting on Mould


There are a number of things to investigate if your blank is shifting on the mould during firing.

Is there a heat differential?
Glass absorbs heat at different rates depending on colour and type meaning that one part may begin to move before another. The solution to this is to slow down the rate of advance to allow all the glass to gain heat at the same speed. It may also be useful to slump at a lower temperature.

There also may be a heat differential within the kiln. You need to run a check on the heat distribution of your kiln to be sure where the (relatively) hot and cold areas of your kiln are. Bullseye published Tech Note no.1 on how to do this.


Not perfectly balanced on the mould?
Glass can be placed just off square or level and that can allow it to start slumping unevenly. Measurements and observation can help to get the glass placed squarely on the mould. Also a small spirit level placed on the glass can tell you if the glass is level within the mould.


The mould may not be level.
The kiln, shelf and mould should each be checked for level in all directions. The kiln level can be established and can be assumed to be level until it is moved. The shelf level should be checked each time it is moved. The mould level should be checked each time it is used.


Is the glass overhanging the mould?
Glass overhanging the mould rim can hang up on some of the edges more than others. Check the rim of the mould for any rough areas and smooth them. If you do have glass overhanging, you should slow the rate of advance to allow the edge of the glass to tip up and begin to slide down into the mould. If the problem persists, make the glass blank smaller, or support the overhanging glass with a collar.


Is the glass heavier on one side?
The glass may be uneven thickness and so heavier on one side. The heavier area of the glass will begin to slump first and so promote movement of the whole glass in an asymmetrical manner. The solution to this is to fire slower and to a lower temperature.


Do you have a wonky mould?
The mould can be imperfect. So you need to check the mould for accuracy. I have a slumper that has one side lower than the other three. Being aware of this, I can place the glass so that it is still useable. Measuring the mould in all directions will help determine its symmetry.


If all these things have been investigated and the solution not found, it is possible to create a bevel on the bottom edge of the glass so that the edge sits in the mould at the same angle as the mould. This provides a larger contact point for the glass and mould than just a thin edge. This appears to allow the glass to move evenly during the slump.

Of course, a major solution is to observe the slump.  Peeking into the kiln at the beginning of the slump soak and frequent intervals after that will show if the piece is slumping evenly or not.  If it is uneven, you can put on the appropriate protective gear and with gloves on your hands, shift the glass to be set evenly in the mould.

The major solutions to avoid uneven slumping are:
  • Avoiding the hot and cool parts of the kiln
  • Making everything level
  • Careful placement on the mould
  • Slower rates of advance
  • Lower slumping temperatures
  • Observation

Wednesday 6 November 2013

Using Space on Shelves


Often there is unused space on the kiln shelves when you are firing a project. With a bit of planning, you can make use of the spaces for a variety of things.

Frits fired on fibre paper

Bowl made from frit balls

You can place piece of frit in the clear areas to make frit balls.


You can make colour tests on plaques of glass to see the results of strikers, powder combinations or results of various depths of colour.


Compatibility tests can be done with pieces of glass of which you are not certain.


simple stress testing set-up

Strip of fired glass samples for testing

Results - those with halo are stressed

In the same way, annealing tests can be conducted.


You can fire small pieces of jewellery at the same time as your larger pieces.


You can also prepare elements for incorporation into other fusing projects and lay them out in the open spaces on the shelf.  Your use of the spare space is related both to your imagination and to your future projects.


Wednesday 30 October 2013

Cleaning Blending Brushes


Cleaning badger brushes just before use, is easy. Flick, gently and rapidly, the very ends of the brush hairs against the side of your hand – but use respiratory protection and be careful not to inhale any dust. If you notice flecks of dust in your paint when you create a grisaille you’ll know it’s time for a thorough and wet cleaning again.


After each use, rinse out the brush tips in cool water. Gently rub the tips of the brush hairs to loosen any extra paint. Grasp he hairs above the tips to keep the water from the main part of the brush. Then wet the exposed ends of the hairs and rub them gently until the water runs clear. 


If you use a blender for oil, you will need to use a small amount of natural soap, if so, thoroughly rinse.


Flick the brush to remove excess water, smooth the hairs into shape and allow to completely dry by hanging the brush with the hairs pointing downward – this avoids water flowing into the brush base where the hairs are attached. If you have round-handled brushes, you can twirl the brush between your hands to remove excess water.


Wednesday 23 October 2013

Shape of Aperture Drops


The shape of an aperture drop can be controlled by the speed of the slump. The speed at which the glass drops is a combination of heat and size of the hole. Patience is required.

Rapid drops result from high temperatures. Rapid slumps cause a thinning of the glass at the shoulder where the glass turns over the inner rim of the aperture. The pattern is distorted and the colours are also diluted. And a relatively large rim is left around the fired piece.

A much slower rate of drop spreads the strain of the slump over the whole of the unsupported area of glass. This tends toward a bowl with a gentle slope toward the bottom, reduced distortion of the pattern, maintenance of the colour densities, and a more even wall thickness all over the piece.

The slumping temperature for a shallow angled slump is less than that used for normal slumps, and takes a lot longer – up to five hours typically. This means that observation is required at intervals, say every half hour.

A starting point for the slumping is around 100ºC above the annealing temperature for the glass. So for Bullseye and System 96 the temperature is about 615ºC. If after the first half hour, there is no movement, increase the temperature by 10ºC. Check again in another half hour and if the slump has begun, leave the temperature at that level and observe at the half hourly intervals until the desired slump is achieved. Otherwise, increase the temperature by another 10ºC with the check after half an hour, and repeat until the slump has begun. After you have done the first one of these with a particular size of aperture, you will know the temperature to start the slump.

The temperature you need to use is affected by the size of the hole. The smaller the aperture, the higher the temperature will be needed. But be patient. If the temperature is increased too much, you will get the thinning of the sides that you are trying to avoid.

Additional information on aperture drops can be found in this series.

Wednesday 16 October 2013

Lead Came with Alloys


Lead came is available in several hardnesses. One (soft) is almost pure lead, another is half hard and contains up to 5% antimony, and the third is hard, containing up to 10% antimony. The difference between these is hardness, or resistance to creep, not resistance to corrosion.

elemental lead

Lead with antimony as an alloy is subject to the same corrosion rate in atmospheric environments as chemical lead (99.9% commercial-purity lead). However the greater hardness, strength and resistance to creep of antimonial lead often makes it more desirable for use in specific chemical and architectural applications.

The ability of some antimonal leads to retain this greater mechanical strength in atmospheric environments has been demonstrated in exposure tests in which sheets containing 4% Sb [antimony] and smaller amounts of arsenic and tin were placed in semi-restricted positions for 3 years. They showed less tendency to buckle than chemical lead, indicating that their greater resistance to creep had been retained.
Handbook of Corrosion Data, by Bruce D Craig, p89ff

Antimony crystals

Thus, the use of softer leads in conservation or restoration, because they were used in earlier periods, is not indicated. It is known that lead came up to sometime in the early 19th century was melted and re-formed into came, incorporating tin from solder and other trace elements which made the lead “stiffer” than the more pure lead that began to be produced commercially and used widely at that time. This may be the reason that so many 19th century windows contain failing leads, while many earlier ones remain sound.

Wednesday 9 October 2013

Pink Confetti


Because confetti needs to be so heavily saturated with colour, some of the opalescent colours tend to devitrify. The pink is particularly prone to devitrification. There are several ways to prevent this: 

  • cap (which can lead to bubbles), 
  • add a devitrification spray, or 
  • cover with clear powder or frit.

Covering completely with a fine layer of powder gives the most even result. Using frit can provide a speckled appearance that is useful in some circumstances.

This tendency of pink opal to devitrification applies to all formulations – Bullseye, Uroboros, S96 and float.


Wednesday 2 October 2013

What is Viscosity


What is Viscosity?

An example of differing viscosities

There are a variety of definitions, but these two capture the main elements.

Informally, viscosity is the quantity that describes a fluid's resistance to flow. Fluids resist the relative motion of immersed objects through them as well as to the motion of layers with differing velocities within them.  Source

Viscosity is a measure of a fluid's resistance to flow. It describes the internal friction of a moving fluid. A fluid with large viscosity resists motion because its molecular makeup gives it a lot of internal friction. A fluid with low viscosity flows easily because its molecular makeup results in very little friction when it is in motion.  Source


A demonstration of the resistance of different viscosities of oil to a weight moving through the liquid.


Almost all liquids are viscous fluids having viscidity. For example, when rotating a drum container filled with water on its vertical central axis, the water that was at rest in the beginning starts moving as it is dragged by the container’s inside wall and then whirls completely together with the container as if it were a single rigid body. This is caused by the force (resistance) generated in the direction of the flow (movement) on the surfaces of the water and the container’s inside wall. A fluid that generates this kind of force is regarded as having viscosity.

Temperature is a very important factor for measuring viscosity. In fluids, as temperature goes up, viscosity goes down and vice versa. In the case of distilled water, if the temperature changes 1 centigrade, it produces a difference of 2 % to 3 % in viscosity.  Source

Viscosity is the measurement of a fluid's internal resistance to flow. This is typically designated in units of centipoise or poise but can be expressed in other acceptable measurements as well. Source


Why is viscosity important?

Near the strain point the expansion increases rapidly and sometimes erratically.” The links between the molecules has reduced in strength and so have a lesser role in the forces acting at higher temperatures. “In those upper ranges – the temperatures where glasses are formed and re-formed with heat – viscosity is a much more useful indicator of how glasses will behave.

“The combination of viscosity and COE are what make glasses more or less compatible, i.e., containing stress in amounts low enough to allow them to hold together without breaking at room temperature for extended periods of time under normal circumstances.

Bullseye found in the early 1980s in their efforts to mix coloured glasses in streaky colour combinations that the COE could not be used to predict compatibility. In trying to correct the compatibility of certain mixed glasses, the closer they brought together the COEs, the more incompatible became the mixes.

“The reason that we could not use COE to successfully predict whether a coloured glass would fit the base clear glass was/is because, as the base glass composition is altered with the addition of the necessary oxides to colour it, the viscosity is inevitably changed. This viscosity change causes the coloured glass and the clear base glass to strain themselves in the cooling cycle of the fusing process (a viscosity mismatch). Therefore once the two glasses reach room temperature they have undue residual strain that may lead to failure.

“In order to prevent this undue residual strain an equal but opposite strain must be introduced into the coloured glass to cancel out the strain induced by the viscosity mismatch. This is accomplished by introducing an expansion mismatch of equal but opposite strain. The two mismatches cancel each other out, leaving the two glasses nearly strain free.

“It is this phenomenon (viscosity mismatch cancelled out by an equal but opposite expansion mismatch) that enables glasses of very different compositions to be formulated to fit each other. The very fact that the expansion of a coloured glass has to be altered to make it fit a base clear glass implies that COE cannot be used as an indicator of compatibility. It is also why it only makes sense to describe these glasses as tested compatible to a specific manufacturer's base glass for a specific glass forming process.“ [L. MacGreggor]

Even different formulations of glass have different viscosities and different rates of softening with temperature increases.

How does viscosity apply to us?

Although viscosity is of major importance to the manufacturer, it does have some relevance to kiln formers too.

Understanding that glasses have different viscosities – most often referred to as hard and soft – can help in the choice of colours and styles of glass to combine. Some glass will spread more, and also allow other glass to sink deeper into the layer than others. It might help avoid combining extremely hard and soft glasses next to each other.

It should also help explain some results that were not planned. It may help in when thinking about uneven slumps.

It is important to recognise that glass chemistry is extremely complicated, and to see that the expansion characteristics have to be balanced with the viscosity characteristics as the two main elements in compatibility. There are others, of course, but these appear to the two main ones.

Wednesday 18 September 2013

Bubble Reduction in Casting


There are several things that can be done to reduce the number and size of bubbles in casting.

  • Fire higher - to 830ºC instead of 815ºC - and soak for at least four hours. This allows more bubbles to rise to the top and burst. If there are still more bubbles than wanted, increase the soak time.

  • Stack the glass in the centre of the mould, allowing a few centimetres from the mould walls. This allows the glass to spread and flow from the bottom and up the sides, reducing the likelihood of trapping air. If you have more than one stack, keep the same space between the stacks as the mould walls.

  • Make sure that the way you stack the billets or casting plates so there is a smaller space at the bottom of any cavity than at the top. The reverse allows the glass to soften and seal in the air in the space.

  • You can construct a mould to make billets of the general shape of the final object. This of course, is much more work, needing two moulds.

  • A major thing to avoid is the use of frit, especially at the bottom or deep in the mould as bubbles will collect around each piece and lead to a multiplicity of bubbles throughout the casting.

Wednesday 11 September 2013

Thinfire as a Separator on Moulds


"I was told that it was possible to put a piece of thinfire paper under a circular piece of glass that is to be draped over a mould....  Has anyone done this or heard of doing it?"

Yes this can be done. Some caveats are in order though.

It is important to put a separator on the mould -normally kiln wash - before using it. Once coated, it will not need to be re-coated unless the surface is damaged, scratched, etc., for a very long time. If the kiln wash seems to be rough you can smooth it in various ways as noted in this tip.  The advantage of kiln wash is that it does not cost much and lasts a long time. The thinfire or similar is a one-time-use product.
The binder in the thnifire burns away during the heat up and allows the now unbound separator to drift down to the mould before the glass begins to conform to the mould. In that way it is very similar to a fine dusting of kiln wash powder over the mould surface before firing.
I don't see the point of using Thinfire or similar during slumps (although I can see that there are occasions where this method would be useful). For drapes, placing a bit of thinfire over the mould - especially if it is metal – is an additional precaution.

My view is that you have to kiln wash the mould anyway. KIln wash is cheap and long lasting while thinfire needs to be replaced after each firing.

Wednesday 4 September 2013

Clearing Small Core Drill Bits


Core drill bits are very useful, as only a thin wall of glass is removed, leaving the main part of the hole as a single piece. This means that it is quicker than a solid drill bit through not having to remove so much glass. However with small diameter core drills they often jam up with waste glass. This is evident when the drill ceases to drill through the glass, leaving a broad circular mark as it moves around on the glass.

Inevitably, at one time or another, the glass core will get stuck inside the drill bit. This needs to be cleared before any further drilling can be successfully done. It seems to be more common with the smaller diameter drills – from 5mm down.

The broken off core needs to be cleared from the back of the bit, not the diamond coated end. So you need to take the bit out of the drill and use a thin nail or piece of wire into the hole to push the glass out.

My collection of core drills.  At the front you can see copper wire and a thin punch for clearing blocked drills

Core drills need a more accurate means of steadying the bit than your hands. Imagine that you are trying to get that core out of the glass in tact. Any wobbling as you drill will break that core. When the core breaks, it is inclined to jam the cylinder. So a drill press is almost essential when using a core drill.

They also need water like any other drilling of glass. Normally this is supplied through the hollow core of the bit, which is beyond hand held drill motors.

For something as small as 3mm, a solid drill that removes all the glass rather than a core is more likely to be most successful. You can get diamonds bonded to piano wire that will give you holes from a fraction of a mm up to 2 or 3 mm and these can be used in dremmel-like tools that take small diameter bits.

It is absolutely NOT recommended to use a core drill at an acute angle to start the hole. The wall of a 3mm core drill is very thin and easily damaged. It is ok to start a solid drill that way, but not a core drill.

There are a number of related posts beginning with this one which give advice on the many ways to drill holes in glass.


Wednesday 28 August 2013

Finger protection

Grinding lots of glass pieces often leads to a number of small cuts on the tips of your fingers. There are several things that can be done to reduce these cuts and the tenderness that comes from lots of grinding.

The first thing is to take the sharp edges off the glass. You can do a simple, light grind all the way around the piece. This removes the extra sharp edges that often remain after breaking the glass.


You can go a step further and do a light arris around the piece. This is just lightly holding the glass at about 45degrees to the grinding bit and going all the way around on all sides. This does not take off the shape of the piece, but gives a more rounded feel to the piece.

Illustration of the effect of holding the glass at an angle to the grinding head - not so much needs to be taken away as in the illustration to get the effect

It is not generally recommended that you wear gloves around rotating machinery. There is too much risk of injury, even on a small grinding machine. Some of the alternatives to gloves include plasters (band aids), masking tape, electrical tape.

Other purpose-made things you can buy include rubber finger protectors, finger tip pads, finger caps (as used in counting money).


Other tools are made to hold the glass such as the grinder cookie


and Nick's Grinder's Mate 


Wednesday 21 August 2013

Reclaiming Solder


Re-using solder can range from simply soldering the ends of the solder sticks together (if you are using blowpipe solder). This will then form a useable stick with solder blobs on its length.

If you have a number of blobs and splashes, don't throw them out. Collect them together and when you have enough you can make them into another stick of solder.


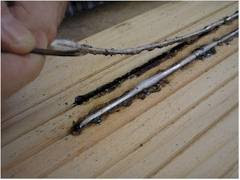
You can tape two narrow pieces of glass onto a length of marble or heavy steel about 3-4 mm apart. Put the pieces in the channel formed by these two pieces of glass and melt the pieces with your soldering iron. This will form a useable stick.

Lifting the new solder stick from the wood


The same can be done by cutting out a 3mm wide and deep channel in a piece of timber and doing the same as above. The wood will smoke a bit and blacken, but not ignite.  And you can use a blowtorch to melt the solder if you do it this way.


Using the (slightly irregular) solder stick


Thursday 15 August 2013

Assembling Foiled Pieces

Keeping foiled pieces together while assembling them prior to soldering is sometimes a problem.

If the panel is rectangular - or at least one with multiple straight sides - you can use short battens of the length of the sides. Nail or screw them down to a board so that about one half of the panel is contained. So if it is a rectangle, two sides will be enough. If it is six-sided ,three pieces would do.


An assembled piece illustrating the two battens - although with a leaded panel

For ease of assembly, a copy of the cartoon should be fastened to the board first and then the battens fixed on top of the cartoon. The pieces can then be placed against battens and held there with pins or nails until the next pieces are ready.
Illustration of the cartoon fixed by the surrounding battens

Some prefer to tack solder the pieces together as they foil. This can be done in combination with the use of battens. However, leaving the soldering iron idling while foiling and using it only occasionally is very hard on the iron's tip and your electricity bill. I prefer to assemble the whole and then solder all at once.

Illustration of placing pins all the way around an oval panel

For circular or irregular shapes a slightly different approach is required. You can use multiple pins or nails along the perimeter to hold the foiled pieces together. An alternative is to cut a piece of scrap window glass to the shape of the external perimeter of the panel. Hold it is place with nails or pins and proceed as with a rectangular shape.

Placing nails all the way around an irregularly shaped piece

Saturday 10 August 2013

Rates of Advance

There is a lot of literature about annealing and cooling rates, as they are the most critical elements in producing a piece with minimum stresses within it. But there is not so much information on initial rates of advance.

It is possible to break the glass in heating it up by going too fast during the initial temperature rise. How fast you can increase the temperature is dependent on how even the heat is within your kiln. So any suggestions have to be tested within your own kiln and setup rather than relying exclusively on others' experience. Some of the considerations relating to the kiln are given in this blog about initial rates of advance.

So with those precautions, I put forward a suggestion based on my experience and information gleaned from the Bullseye site, education section and from Graham Stone's work. These lead me to suggest that the initial rate of advance can be twice the actual or planned first cooling segment. This rate of advance applies up to the softening point of the glass.

So this theory implies that a piece of glass 6mm thick - that might be annealed at 80ºC per hour during the first cooling segment - can be taken up at rate of 160ºC/hour to the softening point. And by extension:

  • A 12mm thick piece could be taken up at 110ºC
  • A 19mm piece could have an initial rate of advance of 50ºC/hr
  • A 25mm thick piece of glass could be taken up at 30ºC/hour.

These all depend on a number of factors:
  • how the glass is supported,
  • the nature of the shelf,
  • the composition of the mould, and
  • the kiln characteristics as well as
  • the colour combinations and
  • whether the piece is tack fused or full fused.
If the glass is heated only from the top with no ventilation beneath the shelf, more caution is required.

Slower rates of advance are indicated if 
  • the glass is supported only at a few points, 
  • or if the kiln is side fired or has cool spots.
  • If the piece is tack fused, you need to slow the rates of advance. 
  •  Consider the rate of advance for the next thicker glass as your starting point as a minimum.

Remember that these numbers can only be used as a guide in conducting you own experiments.

Monday 5 August 2013

Fusing with Painting


Combining Painting and Fusing

Painted oyster catchers with frit and stringer

It is possible to combine glass painting with fusing. Tracing paints are generally powdered iron rust and fused to the glass by the glass powder that carries this pigment. So it is possible to paint and fuse a project at the same time without loosing the intensity of the paint.

In general it is best to work down from the highest to the lowest temperature in your firings. This does require planning of the firing sequence in addition to the usual design considerations.

This sequence of firing depends on the glass stainers' paint you are using. The tracing paints (blacks, browns, some whites, some blue greens) that fire at 650ºC and above can be fired up to around 800ºC without losing much of their intensity. If you use Debitus paints, they can be fired to 850ºC without loosing their depth of colour.

Fused, painted and slumped piece painted both at fusing and slumping operations
If the paint is under glass pieces or under frit, the paint will appear to spread and the lines thicken. This is due to both the lens effect of the covering glass and the weight of the glass over the lines. If you require the lines to be of consistent thickness, you probably should paint after fusing.

You can, of course, use low firing ceramic glazes as they mature in the region of 700ºC to 850ºC. These can be painted on to the unfired glass and taken to full fuse without any fading. You do need to make sure the glaze has time for any volatile materials to burn off, so a slow rate of advance up to the slumping temperature of the glass is advisable.

Painted and fused, then painted and slumped.  Note the paint lines and coloured glass do not always match or need to.

If you are using glass stainers' enamels, you need to fuse and shape before firing. You can fire in the mould for the enamel firing as the temperature range is in the 520ºC to 580ºC range and will not add more mould marks to the glass. Keeping the glass in the mould protects against any tendency for the glass to alter shape.


Tuesday 30 July 2013

Moulds for Bottles

One of the many styles of commercially prepared moulds


An alternative to buying moulds for slumping bottles is to use a sand bed. You can place the bottle into the sand and roll it a little from side to side to create a depression in the sand that then becomes the mould.

I use a fine sand (not builder's or garden) and coat it with alumina hydrate (slaked alumina). I use about 1 part alumina to 5 sand, but the mix is not critical, just enough alumina to coat the sand particles. It can go directly on your kiln floor if you have an easy way to pick it back up, as it is re-usable. Or you can put it in a stainless steel tray or any open topped box that will withstand the temperature.


Make your depressions and then sprinkle or sift a fine layer of alumina over the area - I use an old sock to hold some and dust it over the sand. Then lay the bottle in the depression.

The amount of sand impression you get is dependent on the temperature you use - the higher, the more sand texture you get. 

This way of slumping bottles eliminates the need for a mould and it is variable for different sized bottles.

Thursday 25 July 2013

Annealing a Stressed Piece


If a project has not been sufficiently annealed, it is possible to re-fire to do a good anneal.

You need to establish a slow rate of advance; one that is much slower than for the heat up of a fully annealed piece of the same thickness. This is because you can heat shock the glass much more easily than one which is adequately annealed. I suggest going at about half the rate of a normal firing for a piece of the same thickness.

You have to make sure all the glass is above the annealing temperature so it is advisable to go up to near the slumping or softening point of the glass to ensure all the stresses are removed before beginning the annealing process. If you want or need to retain the level of texture of the previous firing, you will need to go to about 20ºC above the annealing soak point of the glass and soak there for at least as long as you plan to soak at the anneal point.

Anneal at a rate (after the anneal soak) that is considerably slower than previously used. Look at the Bullseye annealing schedules for thick glass, or their project notes for annealing bowls to get some good guidance on the rates of cooling.

Monday 15 July 2013

Thin Glass Uses


  • Thin glass is often used in jewelery as it allows more layers of differing colours to be built up. It also is very useful when building a channel in the piece.
  • Thin glass allows more layers to be built up before going over the 6-7mm when the glass begins to expand due to the height overcoming the surface tension of the glass.
  • This also allows colours that are not present in the manufacturer's palette through combinations made from two or more colours.
  • Thin glass versions of dense colours provide a lighter tone which can fit in well with other lighter colours.
  • Thin glasses are also useful in tack fusing, as the height is not so great and so can be used over 6mm thicknesses without adding greatly to the volume.

Wednesday 10 July 2013

Seams on the Edges of Jewellery Pieces


Sometimes the edges of pieces can show the places where the glass layers join.

This happens when there is not enough heat to completely fuse the pieces together, as in a tack fuse.

It can happen to only some pieces, due to differences in temperature within the kiln. If this occurs take note of the cool spots, or better yet, run a test for the cool areas of your kiln as in this Bullseye Tech Note.  Then avoid those areas for full fused items.

If you run your kiln as fast as it will go, you can be left with seams at the sides if you do not soak for long enough at the top temperature. I usually try to achieve my desired results with a 10 minute soak. Going slower to top temperature can give you fully formed edges at a lower temperature.

You can also get visible seams if you are using iridescent glass, mica, metal or other inclusions that come to or near the edge of the piece. The solutions are to move the inclusions further in from the edges. With iridescent glass, you should remove two or three millimetres of the iridescence to allow the glass to stick together.

If you want to conceal the layers of colour used to build up the piece, you can cut your top piece - assuming it is not clear – 3mm larger all around. This allows the top layer to fold over and enclose the whole piece, concealing the different colour layers.

Fire Polishing Jewellery


Sometimes jewellery pieces come out of the kiln with imperfections that need to be ground away.

You can do a quick shaping on the conventional grinder and then fire polish. However, you will not get a fire polish at a low enough temperature to avoid distorting the piece. The way to get a fire polished surface or edge is to make the edge less rough before putting the glass into the kiln.

After you shape the pieces on the grinder, make sure you scrub them well to remove any particles created by the grinding process. Dry them and then cover the rough areas with a white paint marker. This will indicate when you have removed the scratches caused by the previous rougher grinding.

Get out your wet and dry sandpapers. Start with the most coarse (about 200) and work the ground area until the paint has been removed. Keep the sandpaper and the area being worked damp. When all the white paint has been sanded away, wash, dry, paint and go to the the next finer grit. Repeat this with progressively finer grits – normally use the grit number twice the previous grit (larger numbers indicate finer grits).

Normally, going down to 400 or 600 grit will be enough to enable a fire polish at a low enough temperature to avoid distortion of your piece. This heat range will be at a low temperature tack fuse.

This smoothing process does not take very long and is much cheaper than buying several finer grinding bits - most grinder bits are 60 to 80 grit, although it is possible to get bits up to 600 grit.