Showing posts with label Cementing. Show all posts

Wednesday 31 March 2021

Darkening leads

There are several ways to darken the leads in leaded panels. Three are to:
use patina on the leads,
brush with on stove blackening with a soft brush, and
simply brush after cementing.

A certain number of people use black patina to darken the leads after cementing and cleaning the panel.  This certainly gives a black result, but it introduces an acid to the panel. I do not do this, nor do I recommend it.

Another method of darkening is to apply stove blackening or black oil paint to the panel to make the leads dark.  I recommend that you put very small amounts on a soft brush and then brush over the leads.  It might have to have a little more colour added for a large panel, but that is better than having to clean up large areas of smudged black over the glass, especially with painted glass.

credit: PicClick UK

But...
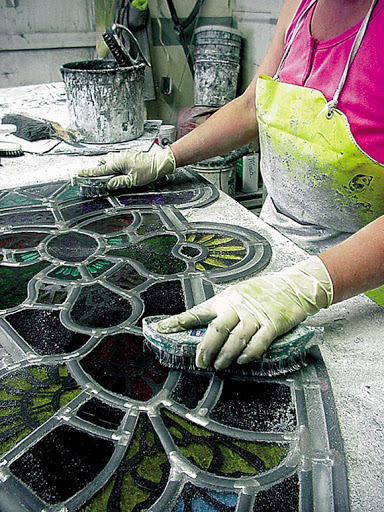
You can darken lead came without patina or black colour.  You finish the panel with the scrubbing brush to push whiting against the fillet of lead light cement against the leads as normal.  This has the effect of cleaning the glass as well as stiffening the cement at the edge of the cames. Remove the excess whiting as normal.

But, before picking out all the excess cement once the scrubbing brush process is finished, use a soft brush, such as a shoe brush, over the whole panel.  This can be mechanised by using a soft bristled mop in a drill motor on a slow to medium speed.  This will pick up colour from the cement and spread it evenly over the lead and solder joints. It will give a dark grey appearance to the whole of the leading and solder joints as well as polish up the glass. 

The degree of shine will be dependent on the amount of time you wish to spend, but can be a polished to a very dark grey to black colour.  This will last longer than simple black colour brushed onto the leads, as it is bound by the linseed oil in the cement to the surface of the leads. Also, it quickly dries so that not so much black is transferred to your hands as you handle it.


Making lead cames black during the finishing of a leaded panel is as simple as brushing over the cames before picking out all the excess lead light cement.

Sunday 29 March 2020

Cementing Leaded Panels, part 3

Polishing Lead Cames

Use a soft brush to polish lead came. Don't pick out the cement until the polishing is done, as it provides the colour for darkening and polishing the lead and solder joints. The action with the polishing brush should be gentle and rapid, much like polishing shoes. If the shine does not come, you can use a very little stove blackening (carbon black mixed with a little oil) If you use a lot, you will have a big clean up job. A little stove blackening spreads a very long way.


realglasspainting.com


Before turning the panel a final time, put down paper or cloth, to avoid scratching the solder joints while polishing the other side. The result should be shiny a black came and solder joints that does not come off the way a final buffing with stove blackening does.


Finally, pick out any remaining cement.


Rest horizontally with weather side down for traditional installations. If the panel is going into a double or secondary glazed unit, you may want to reverse this. The reason for having the smallest exposed cement line on the outside is to allow the water to run off the window with the minimum of area to collect. In a sealed unit or for secondary glazing, you may want to have the smallest amount of cement showing inward for appearances, as there is no weathering reason for the traditional method.


Rest for a day. Pick out the cement again. If the cement was stiff enough, there should be no need to do any more picking at the cement after this.

Cementing Leaded Panels, part 2

Part 2: Setting Up the Cement

After the pushing the cement under the cames on both sides, flip the panel over and begin a firm rubbing to push addidional cement into the gaps between the lead and glass on this side. Sprinkle the used dust from the bench top over the panel and rub in all directions. This begins to set up the cement by helping to provide a stiff skin over the more fluid cement. Brush until the whiting is largely off the panel. Turn the panel and do the same for the other side. Several applications of whiting/sawdust are required to give a sufficiently thick skin to reduce the amount of spreading, leaking or weeping cement.


Once both sides have been done a couple of times, begin to concentrate the brush strokes along the lead lines rather than across. This will begin the cleaning phase and also begin to darken the came. Repeat this on the other side.


After a few turnings, most of the cement will be cleaned from around the leads. Don’t try to get all of it away, you will need that colour for polishing. The glass will be shining, and any felt tip marks you made on the glass will have gone too. Clean up the dust from the panel and bench in preparation for polishing.


Part 3

Cementing Leaded Panels, part 1

Part 1: The Start

Cementing panels is as old as leaded glass - about 1,000 years - so it is a time-proven process using simple materials. The object of cementing is to make a leaded panel weather/water tight and sturdy. It can be messy and dusty, so putting on an apron and a dust mask are a good idea.


Start on the side that is already facing up after soldering. This normally will be the rough side. This way you do not have to move the panel much until it has stiffened with the addition of the cement.


Cover all open bubbles, rough glass (waffle, ice, etc.) and all painted glass with masking tape. Put the tape over all the relevant areas of the panel, then use a sharp knife (X-acto, scalpel) to cut the tape at the edges of the came. The cement will go under the came, but not into the texture of the glass. This will make the clean up of the glass much easier after cementing.


You can purchase commercially made lead light cement or you can make your own.

With the panel on the bench, put a dollop of cement on the glass and rub it in all directions with a stiff, but not hard, bristle brush to force it under the lead. 


Bovardstudio.com

When the cement has been pushed under all the cames, but with a slope of cement showing, spread a little fresh whiting or sawdust on the panel and gently push it against the cement under the leads. This begins the setting process and keeps the spreading cement from sticking hard to the glass or bench.


bovardstudios.com


Turn the panel over to cement the second side the same way as the first. If the panel is a large one, you may want to use a board to support it in these early turning stages. No gaps can be tolerated in the cementing. Cement leaking out the other side is good evidence that all the gaps between the glass and the came are filled. Again, after cementing, sprinkle new whiting/sawdust over the second cemented side and rub it gently into the exposed cement.


Part 2
Part 3

Monday 24 February 2020

Lead Light Cement

You can make your own lead light cement as the materials are fairly common and safe to use.  I have altered the original recipe through experience.  Too much of mineral spirits dries out the mix so quickly that the linseed oil cracks early in its life.  This results in the possibility of water leaking through the cracked cement.  One third or less of the dryer (mineral spirits) reduces the chance of too rapid drying.  I no longer use a drier at all.  This is my modified recipe.

Recipe

7 parts whiting/chalk
2 parts boiled linseed oil
(measured by volume)
1-2 Tablespoons colorant
This can be lamp black (carbon), black poster paint, concrete colorant powders, or black oil paint in sufficient quantity to give a black or dark gray colour to the otherwise off-white colour of the whiting and linseed oil.  

Do not use water based colorants, such as acrylic paint.  This does not mix with the linseed oil. Instead it forms a collodial mixture that interrupts the formation of the long linseed molecular chains that make it so good as a long term sealant.

The mixed leaded light cement


Method

Add the whiting (reserving about one quarter) to the linseed oil. Mix this well, by hand or with a domestic mixer capable of mixing bread dough. When these are mixed thoroughly, check the consistency. It should be like molasses on a cold morning - barely fluid.  At this point, add the colorant, so you will know the current colour and can adjust to make it darker.

Add more whiting as required to get the consistency you want. Experiment a little to find what suits you best. If you have to deliver the panel quickly, for example, you need to increase the proportion of whiting to make it stiffer. 


Comment

You should make only what you will be using on the current project, as the whiting separates from the linseed oil and sinks to the bottom in only a few days. The commercial cements have emulsifiers to keep the whiting from settling and so extend the life of the product. Since making your own is cheap and quick to make, there is no saving in making a lot.


Lead light cement is a simple, inexpensive sealant for leaded glass that you can make for yourself.

Wednesday 5 September 2012

Old Cement

Removing Old Cement from Glass

Composition of old cement
Old cement can have a variety of components. One is red lead, another is portland cement. Both create different problems, but both require that all removal of old cement should be done with breathing protection.

Mechanical removal
Removal of old cement can be attempted first with mechanical means. Stand the glass on edge and use a lead knife almost parallel to the surface of the glass to knock off the old cement. This works most of the time. But if the bond is too strong and begins to cause chipping of the glass, you need to switch to another method.

First consider whether the whole panel needs to be re-leaded. It may be that only portions require re-leading and so the remainder should be left in its original leads. This is especially true where there is painted glass, as you do not want to loose the original painting.

Chemical removal
If mechanical removal is not working you need to consider chemicals.
Lye will dissolve linseed oil but perhaps also the paint and so should be used locally only and with extreme care and caution. Testing on unobtrusive areas is required.

Another way to soften the linseed oil is with heat and for this a steam generator works particularly well turning hard putty into the consistency of soft cheese which can be scraped off.

If it actually is Portland cement creating the bond then hydrochloric acid is what bricklayers use to dissolve and remove mortar stains from brickwork. Carefully paint it on the old cement and it should start fizzing and dissolving straight away.

Precautions
What ever you decide to do, test first with some of the glass that will be discarded and confine your chemicals to the cement only and don’t spread them over the entire piece of glass. Wear a respirator at all times during the removal process.

Monday 20 August 2012

Encapsulating Glass


Points to note when making panels for encapsulating leaded panels in double glazing units.

In building a new panel, the perimeter should be of “Y” came. This allows the double glazing spacers to be placed on either side of the leg of the “Y”, incorporating it into the structure of the whole unit.

The tolerances for double glazed units are much less than for single glazed wooden units.

If you decide to use mastic, it must not be linseed oil cement, as the oxidisation process produces a condensate that fogs up the interior. Use a butyl putty instead.

It is also possible to finish the panel without any mastic under the leads, as the double glazed unit will provide the structural support. You do need to dress all the flanges of the lead to the glass to avoid light showing around the edges of the glass.

Finishing the leads should be with a polishing brush only to avoid introducing chemicals in a closed atmosphere. The polishing brush will bring up a dark colour on the leads and solder joints with repeated light brushing. This also is an indication that the solder jointing should be as neat as possible with small flat joints.

Friday 25 May 2012

Removing Cement

Sometimes life gets in the way and a partially cemented panel is left for days. When you come back to it the lead light cement is hard. Removal requires a material hard enough to shift the cement but not cut into or damage the lead or glass.
The best tool is a rectangular stick of hard wood. It should be at least 6 mm thick to stand up to the pressures of cleaning, but not much more than 12 mm - 15 mm wide to enable you to get into corners. It should be 200 mm – 250 mm long for ease of handling. Shape one end in a chisel or wedge shape. I prefer the wedge shape, but the chisel shape can be re-formed more quickly than the wedge because there is only one edge.
Use the stick by running it along the lead with some downward force, but remember you can break the glass with too much pressure. This should break the adhesion between the cement and the glass. To get all the cement off the glass, you will need to use the stick in localised areas almost as a kind of pick. This is the kind of tool that I use in conjunction with a stiff brush for the final clean up of each panel before polishing.

Friday 27 May 2011

Cementing Panels

I recently had the occasion to repair a panel made by a friend of the clients several decades ago. It was cemented by pushing commercial putty under the leaves of the leads. It illustrates very well why lead light cement should be brushable to completely fill the space between the glass and the came.

This photo shows how the putty filled the space above and below the glass but not between the glass and the heart of the came.


This photo shows the putty missing from the corners of the glass. There has been a little chipping of the putty in the dismantling process, but not much.


The question may be asked about what is so important about a bit of putty missing from the edges of the glass, it is sealed along the leaves of the came. Yes, this style of cementing will seal the panel from the weather for a time. But had this glass been in a window instead of hung inside, it is questionable whether it would have begun to leak only about 20 years after being made. Certainly as the putty begins to break down, the moisture will rapidly find its way into the inside.

The only way to be certain that the panel is completely weather proofed is to use brushable cement. The cement is pushed under the leaves of the lead with a stiff brush. You know the fill is complete by the cement oozing out of the other side.

It is possible to make up a brushable cement from commercial putty. You simply add some white spirit to the putty. I make a depression in a fistful of putty and add white spirit. Fold over the sides into the well and gradually, the white spirit is mixed into the putty. Continue adding white spirit until you have a very thick molasses that can be pushed around with a brush.
Of course, while you are doing this mixing, you can add a blackening agent - powdered or oil based black pigments are best.