Showing posts with label Kiln Firings. Show all posts

Saturday 6 May 2023

Re-firing


A frequently asked question is “how many times can I re-fire my piece?”
This is difficult to answer as it relates to the kind of glass and the firing conditions.

Kind of glass

Float glass is prone to devitrification. This often begins to appear on the second firing. Some times it may be possible to get a second firing without it showing. Sandblasting the surface after getting devitrification will enable another firing at least.
Art glass is so variable that each piece needs to be tested.
Fusing glasses are formulated for at least two firings, and experience shows may be fired many of times. The number will depend on the colours and whether they are opalescent. Transparent colours on the cool side of the spectrum seem to accept more firings than the hot colours. Both of these accept more firings than opalescent glasses do.
Firing conditions

Temperature

The higher the temperature pieces are fired at, the fewer re-firings are possible. So if multiple firings are planned, you should do each firing at the lowest possible temperature to get your result. This may mean that you have relatively long soaks for each firing. The final firing can be the one where the temperature is taken to the highest point.
Annealing
You do have to be careful about the annealing of pieces which have been fired multiple times. A number of people recommend longer annealing soaks. However, I find that the standard anneal soak for the thickness is enough. What is required is cooling rates directly related to the anneal soak.  This is a three-stage cooling as described in the Bullseye chart Annealing Thick Slabs.  The slump firing can be annealed at  the standard. 

Slumping

In general, slumping is at a low enough temperature to avoid any creation of additional stress through glass changes at its plastic temperatures.  But any time you heat the glass to a temperature above the annealing point, you must anneal again at least as slowly as in the previous firing. Any thing faster puts the piece at risk of inadequate annealing.  Of course, having put all this work and kiln time into the piece, the safest is to use the cooling rate as for a piece one layer thicker.  My research has shown that this gives the least evidence of stress.

Testing

Testing for stress after each firing will be necessary to determine if there is an increase in the stress within the piece. In the early stages of multiple firings, you can slow the annealing and if that shows reduced stress, it will determine your previous annealing schedule was inadequate. When reducing the rate of annealing does not reduce the stress, it is time to stop firing this piece at fusing temperatures.
Revised 6 May 2023

Wednesday 6 April 2022

Calibrating your new kiln


My new kiln fires differently than my existing one(s).

Each kiln will be different in minor or major ways.  Suggested schedules are only starting points, even though they worked in your previous kiln. You need to learn about your new kiln’s characteristics in the same way you did with your first kiln. There are a number of ways to do this.

Many people recommend making test tiles for the different levels of fusing that you use and at different temperatures to determine which is the best for your new kiln.  Additionally, you need to note the rate(s) at which you fired these samples to make the test tiles accurate representations of firings.  Yes, these will be good references.  And yes, they are valuable if you have the time for all these firings.

 Idle Creativity


Observation during the firing of test tiles is the best and quickest way to discover how your new kiln is performing at various temperatures.  In one firing you can note the temperatures at which the various tack levels occur, and the contour and full fuse temperatures.  You can even take pictures through the peep hole of your kiln (as long as you don’t put the camera too close to the kiln!).  This procedure will make knowing your kiln much quicker and accurate than unobserved multiple firings.

To make use of the notes of the temperatures where the results were achieved in the test firing, back off 10°C (or 20°F) from the observed temperature and add 10 minutes processing time.  You may find after a few uses of these temperatures you may want to adjust the temperature a bit more, but you will have done the major experimental work in one firing.

It is a good idea to set up other test tiles and run the experiment again at a slower rate of advance.  This will give you information about how the different rates of advance affect the processing temperature and the look and texture of the piece, especially on the bottom.  The texture imparted at different processing temperatures becomes more important in slumping and draping processes.

In another firing you can set up various moulds and observe when the slumps or drapes are complete. Recording this information lets you know slump temperatures for various styles and spans of moulds.  Make sure you record the temperatures that the pieces slump fully into the mould. You can then back off 20°C from those points and add 30 minutes as a starting point for you actual slumping firings.


New kilns require experience to know what the appropriate temperatures are.  Buy setting up test tiles you can observe in one firing the various levels of fuse from tack to full fuse, so saving lots of firing time.

Further information is available in the ebook: Low Temperature Kiln Forming.

Friday 27 August 2021

Characteristics of Some Glasses

This information has been taken from various sources. Some manufacturers may change the composition of their glasses or the published information about them from time to time. Therefore, this information can only be used as a guide. If the information about strain, annealing, and softening points is important, contact the manufacturer for the most accurate information.

The temperature information is given in Celsius.
Strain point – the temperature below which no annealing can be done.
Annealing point – the temperature at which the equalisation soak should be done before the annealing cool.
Softening point – the temperature at which slumping can most quickly occur.


Armstrong – Now made by Kokomo

Typical Borosilicate – nominal CoE 32
Strain point – 510 - 535C / 951 - 996F
Annealing point – ca. 560C/1041F
Softening point - ca. 820C/1509F

Blackwood OZ Lead – nominal CoE 92
Annealing point - 440C/825F

Blenko – nominal CoE 110
Annealing point – 495C/924F

Bullseye – nominal CoE 90

Transparents
Strain point - 493C/920F
Annealing point - (532C)  Note that Bullseye has changed this to 482C/900F for thick items
Softening point - 677C/1252F

Opalescents
Strain point - 463C/866F
Annealing point – (501C)  Note that Bullseye has changed this to 482C900F for thick items
Softening point - 688C/1272F

Gold Bearing
Strain point - 438C/821F
Annealing point - (472)   Note that Bullseye has changed this to 482C/900F for thick items
Softening point - 638C/1182F

Chicago – nominal CoE 92

Desag  Note that this glass is no longer produced
Artista – nominal CoE 94
Strain point – 480 - 510C / 897 - 951F
Annealing point – 515 - 535C / 960 - 996F
Softening point – 705 – 735C / 1302 - 1356F
Fusing range – 805 – 835C / 1482 - 1537

Float Glass (Pilkington UK)
Optiwhite
Strain point – 525 - 530C / 978 - 987F
Annealing point – 559C/1039F
Softening point – 725C/1338F

Optifloat
Strain point – 525 - 530C / 978 - 987F
Annealing point – 548C/1019F
Softening point – 725C/1338F

Float Glass (typical for USA) nominal CoE 83
Strain point - 511C/953F
Annealing point - 548C/1019F
Softening point – 715C/1320F

Float Glass (typical for Australia) nominal CoE 84
Strain point - 505-525C / 942 - 978F 
Annealing point – 540 -560C / 1005 - 1041F

HiGlass “GIN” range – nominal CoE 90
Annealing point - 535C/996F

Gaffer colour rod – nominal CoE 88

Gaffer NZ Lead – nominal CoE 92
Annealing point - 440C/825F

HiGlass
Annealing point - 495C/924F

Kokomo – nominal CoE 92 - 94

Cathedrals
Strain point - 467C/873F
Annealing point - 507C/946F
Softening point - ca. 565C/ca.1050F

Opal Dense
Strain point - 445C/834F
Annealing point - 477C/891F
Softening point – ca. 565C/1050F

Opal Medium
Strain point - 455C/834F
Annealing point - 490C/915F
Softening point – ca.565C/1050F

Opal Medium Light
Strain point - 461C/863F
Annealing point - 499C/931F
Softening point – ca.565C/1050F

Opal Light
Strain point - 464C868F
Annealing point - 502C/937F
Softening point – ca.565C/1050F

Kugler – nominal CoE
Annealing point - 470C/879F

Typical lead glass – nominal CoE 91

Lenox Lead – nominal CoE 94
Annealing point – 440C/825F

Merry Go Round – nominal CoE 92

Moretti/Effetre – nominal CoE 104
Strain Point: 448C/839F
Annealing Range: 493 – 498C / 920 - 929F
Softening Point: 565C/1050F

Pemco Pb83 – nominal CoE 108
Annealing point – 415C/780F

Schott Borosilicate (8330) nominal CoE 32
Annealing point - 530C/987F

Schott “F2” Lead – nominal CoE 92
Annealing point - 440C/825F

Schott “H” & “R6” rods - nominal CoE 90
Annealing point – 530C/987F

Schott “W” colour rod – nominal CoE 98

St Just
MNA
Strain point - ca.450C/843F
Annealing point – ca. 532C/ca. 991F

Spectrum
System 96 – nominal CoE 96
Transparents
Strain point – 476C  +/- 6C  /  890F +/- 11F
Annealing point – 513 +/- 6C  /  956C +/- 11F
Softening point – 680 +/- 6C  /  1257F +/- 11F
Opalescents
Annealing point – 505 -515C  /  942 - 960F

Spruce Pine 87 – nominal CoE 96
Annealing point – 480C/897F

Uroboros system 96 – nominal CoE 96

Transparents
Strain point - 481C/899F
Annealing point - 517C/964F

Opalescents
Strain point - 457C/855F
Annealing point - 501C/935F

Uroboros - nominal CoE 90

Transparents
Strain point - 488C/911F
Annealing point - 525C/978F

Opalescents
Strain point - 468C/875F
Annealing point - 512C/955C

Wasser - nominal CoE 89
Annealing point – 490C/915F

Wissmach
Wissmach 90
Annealing point - 483C/900F
Softening point - 688C/1272F
Full Fuse - 777+

Wissmach 96
Annealing point - 
483C/900F
Softening point - 688C/1272F

Full Fuse - 777+ / 1432+


Wednesday 7 April 2021

Firing Records

Bullseye Glass Company


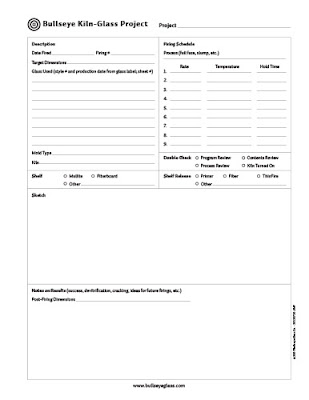
To develop your fused glass practice, you need to record lots of information about your firings.  This tells you what has gone well and not so well.  It hones your expectations about how you should be preparing, scheduling, and analysing your experiences.  It becomes your detailed memory bank of results and gives directions for the future.  This should be done whether fired in your own kiln or someone else’s.

Categories of information for the record
There is quite a bit of information that needs to be included in such a record.  This is my view of what needs to be included  in your logbook for future reference.

Date
Record the date of the firing as that will give you historical information on similar projects.  It can show you what you have changed over time and the variations you have introduced.

Glass used
This is not only the type of glass (Bullseye, Float, Oceanside, Wissmach, Youghiogheny, etc), but the colours used.  This should include the manufacturer’s code numbers to enable you to replicate the glass used.

Lay up
This can be a description, a drawing or pictures of the set-up of the piece prior to firing.  This is vital to later understanding what you did in this firing.  Record any glues or stabilising elements you use. Any frits or powders used should be recorded. The placement in the kiln is important - centred, one corner or another, level/ height in kiln, etc., can affect the results.  You can make a sketch or take a photo to attach to the record rather than writing separate descriptons. How it comes out is recorded later.

Dimensions
The dimensions (h x w x d) including any variations in height are needed to compare with other projects.  This might be included in the lay-up diagrams or pictures, but it is most useful to have the dimensions and their variations recorded as numbers too.  You might think in terms of layers, but remember to record the thickness of each layer/piece (e.g., 2mm, 3mm, 4mm, 6mm, etc)

Kiln used
This is especially important if the kiln is not yours. Every kiln has variations and it is important to compensate for that in scheduling and placing of the piece in the kiln.

Process
This is essential in gaining an understanding for planning any modifications.  The process can be described by standard terms - e.g.,  sinter, slump, tack, contour, full fuse, casting, melt – or by your own terminology (if it is consistent).

Description
A statement of your project and aims is very useful for the future.  It is a reference point to use in comparing what you wanted with the results of the firing.

Support system
This includes essential information affecting the firing – shelf type (e.g., fibre, mullite, ceramic tile), mould type (e.g., ceramic, fibre, steel), and a description or sketch including any reference codes.

Kiln furniture. The kind and quantity of kiln furniture (dams, stilts, posts, etc) can affect the firing results, so need to be recorded.

Separators
This includes kiln wash (type, whether new or the number of uses), fibre paper type and amount, mould coatings, and anything else you may use to keep the glass from sticking.

Schedule
This is the thing most everyone remembers to record.  You need to record it each time you use it – even if you have used it many times before.  You need to record each step of the program.

So many times, people report that “it [the schedule] has always worked before”, only to discover that some element had been intentionally or accidentally altered from past firings.  I normally write the schedule in a logbook and then enter it into the programmer. I use the written record to check against what I have entered into the controller.  Then I know I have programmed what I intended.  I can also check on earlier, similar firings to see the variations I have used in the past.

Results
Drawings or pictures of the finished item are essential.  A description of the results is also needed as a picture does not tell the whole story.

Comments on results
You should also give a commentary on the results of the firing.  This should include successes as well as disappointments.  Thoughts for future similar firings should be written down.  They will be forgotten soon, if you don’t.

How to keep all this information
As you can see there are many elements that need to be recorded as they each can affect a firing. I see these as a minimum, and you will add elements important to you for this list.

It does not matter much in what form you keep the information.  It can be a ledger, spreadsheet, database or your phone or tablet that you carry with you always.  There are several apps for recording the kiln firings that can be used.  What is important is that you can record the information immediately, or as you prepare the work for the kiln, into the chosen form of recording.  I use a logbook and convert that in my leisure moments to a spreadsheet (usually at new years day).  This allows me to compare information over time and especially the kinds of firings that I rarely do.  It also allows me to search by various processes.

It is important that you back up any electronically held information to the cloud or other device to protect against loss or corruption. 

Forms
It is useful to have a form for compiling this record.  A number of elements of the records can be reduced to tick boxes to ease the recording.  It helps to remind you of the information you need to log for each firing.  Bullseye have an excellent form that you can use or adapt to your needs. There are a few apps that can be used on phones or tablets which are useful for those who record everything on their phone.  Remember to back it all up to the cloud for preservation in case of loss or damage.

Wednesday 29 April 2020

First Firing of your New Kiln


First Firing of your New Kiln

I have just been reviewing information on kiln elements. I have discovered the reason you need to do your first firing with the kiln empty of everything. No kiln wash, no kiln furniture, nothing. Vacuum the kiln to take out any dusts from travel.


The element forms a protective layer of aluminum oxide during the first firing. If there are elements of kiln wash, dusts, or glass, this will inhibit the ability of the oxide coating to be uniform. The uniform coating of the elements is important to the long life of your elements. There are other things of course, but this is the initial, essential element of preparing you kiln for use.

After this first firing you can add the other elements of kiln wash, furniture, and even glass.


In summary, fire your kiln clean and bare. No kiln wash, no furniture.


Sam Smith adds: [This] applies to kilns made with Kanthal A1 elements. Those are the good ones which last pretty much forever. Cheaper quality kilns can have nichrome elements which do not develop the coating. The firing the kiln empty allows the oxide coating to form. If you do a firing where combustion takes place such as firing fibre paper or shelf paper you should realize those combustion products are attacking your element coatings and it may be worth while venting the kiln and or firing the kiln up empty after the firing in order to protect or allow the development of a new layer of coating covering the kanthal. Kiln wash us is cheaper and safer for the long term life of your kiln elements. Smart people only purchase kilns with Kanthal elements.

Wednesday 20 November 2019

Pot Melt Schedule

I usually use a schedule like this for either S96 or Bullseye:

100C/hr to 220C for 20 minutes; this is approximately the crystobalite inversion temperature – to be kind to the pot.

220C/hr to 570C for 20 minutes; this is approximately the quartz inversion temperature – again to be kind to the pot.

220C/hr to 677 for 30 minutes; this is a bubble squeeze temperature to allow larger bubbles to escape from the pot before melting begins.

330C/hr to 850C for 120 minutes; this is to ensure there is plenty of time to empty pot.

AFAP to 805C for 30 minutes; this is to allow thickness equalization and also to allow bubbles to pop and seal.

AFAP to 482 for 90 minutes; this is for Bullseye, but is applicable to other glasses too.

55C/hr to 427C no soak (for 6 to 8mm thickness)

99C/hr to 370C no soak.

120C/hr to 150 end.

Allow to cool to room temperature 

Saturday 2 November 2019

Schedules for Steep Drapes

I have been asked for a schedule for draping in the context of a tip on steep straight sided drapes.

What you are trying to do with a steep drape is two things. One is to compensate for the heat sink that the glass is supported by, and the second is to compensate for the relative lack of weight at the outer edge of the glass.


The supported glass transmits its heat to the support, leaving it colder than the unsupported glass. This often leads to breakage due to heat shock at much lower temperatures and slower rates of increase than glass supported at its edges. My experience has shown that - contrary to what I recommend for other kinds of firings - a slow rise with short soaks at intervals up to the working temperature works best. The reason for these slow rises and soaks is to try to get the support and the glass to be as nearly as possible at the same temperature throughout the rise in temperature. The soaks help ensure the mould is gaining heat without taking it from the glass.


The other problem with steep drapes is that the edges of the glass begin to drop more quickly than the area between the support and the edge. This leads to the development of an arc that touches the mould side near the bottom before the glass between the edge and the and the support. Extended soak times are required to allow the glass to stretch out and flatten. If this is done at high temperatures, the glass will thin - possibly to the extent of separating.


So the requirements for a firing schedule on this kind of drape are slow increases in temperature with soaks to avoid thermal shock, and an extended soak at the (low) forming temperature.


Whether using steel or ceramic moulds, I use a slow rise in temperature to 100C with a soak of 15 minutes. I then increase the rate of rise by 50% for the next 100C and give a 15 minute soak there. For the next 200C I raise the temperature at twice the original temperature rise, again with a 15 minute soak. The glass and mould should now be at 400C. This is still at the point where the glass could be heat shocked, so I only increase to 2.5 times the original rise rate but use this rate all the way to forming temperature.


Each kiln has its own characteristics, so giving schedules is problematic. 


  •  A side fired kiln will need slower heat rises than a top fired one. 
  • The closer the glass is to the elements, the slower the rate of increase needs to be. 
  • The kind of energy input - electric or gas - has an effect. 
  • The thickness of the glass is also a factor in considering what rate to use. 
  •  The size of the glass in relation to the size of the support is important - the greater the differential, the slower the heat rise should be. 


So in making a suggestion on heat rises, it is only a starting point to think about what you are doing and why you are doing in this way.

I have usually done this kind of draping in top fired electric kilns where the elements are about 250mm above the shelf, and about 120mm apart. In the case of a 6mm thick piece about three times the size of the support area, I use 50C/hr as my starting point. This is one third of my usual rate of temperature rise. However you must watch to see what is happening, so that you can make adjustments. You should observe at each of the soaks, so you know how the glass is behaving. It will also help you to pinpoint the temperature range or rate of advance that may be leading to any breakages.


On steep slumps, the temptation is to use a high temperature to complete the drape. This is a mistake as the glass will be more heavily marked and tends toward excessive stretching and thinning. What you really need is a slow rate of advance to a relatively low temperature. If you normally slump at about 677C, then you want to do this steep, straight sided drape at 630C or less. It will need a long soak - maybe up to an hour. It will also need frequent observation to determine how the drape is progressing. So plan the time to make yourself available during this forming soak.


Annealing is done as normal, since the mould and glass are more closely together and will cool at the same rate.


The original tip on the set up of a steep straight sided slump is here.

Sunday 27 October 2019

Slow and Low

Low and Slow Approach to Kilnforming

We are often impatient in firing our pieces and fire much more quickly than we need. After all, our computerised controllers will look after the firing overnight. So there is no need to hurry more than that.

The concept of heat work is essential to understanding why the slow and low method of firing works. Glass is a poor conductor of heat which leads to many of our problems with quick firings. The main one is stressing the glass so much by the temperature differential between the top and the bottom that the glass breaks. We need to get heat into the whole mass of the glass as evenly and with as smooth a temperature gradient as possible. If we can do that, the kiln forming processes work much better. If you add the heat to the glass quickly, you need to go to a higher temperature to achieve the desired result than if you add the heat more slowly to allow the heat to permeate the whole thickness of the piece.

Graphs of the difference (blue line) between upper and lower surfaces of glass of different thicknesses against cooling time


However, this slower heating means that the glass at the bottom has absorbed the required heat at a lower temperature than in a fast heat. This in turn means that you do not need to go to such a high heat. This has a significant advantage in forming the glass, as the lower temperature required to achieve the shape means that the bottom of the glass is less marked. The glass will have less chance of stress at the annealing stage of the kiln forming process as it will be of a more equal temperature even before the temperature equalisation process begins at the annealing soak temperature.

Applying the principles of low and slow means:
  • heat is added evenly to the whole thickness of the piece
  • there is a reduction in risk of thermal shock
  • the glass will achieve the desired effect at a reduced temperature

The alternative - quick ramps with soaks – leads to a range of difficulties:
  • The introduction of heat differentials within the glass. Bullseye research shows that on cooling, a heat difference of greater than 5ºC between the internal and external parts of glass lead to stresses that cannot be resolved without re-heating to above the annealing point with a significant soak to once again equalise the heat throughout the piece.
  • It does not save much if any time, As the glass reacts better to a steady introduction of heat. Merely slowing the rate to occupy the same amount of time as the ramp and soak together occupy, will lead to fewer problems.
  • It can soften some parts more quickly than others, e.g., edges soften and stick trapping air.
  • Quick heating, with “catch up” soaks, of a piece with different types and colours of glass is more likely to cause problems of shock, bubbles, and uneven forming.
  • Pieces with uneven thicknesses, such as those intended for tack fusing, will have significant differences in temperature at the bottom.
  • Rapid heating with soaks during slumping and draping processes can cause uneven slumps through colour or thickness differences, or even a tear in the bottom because the top is so much more plastic than the bottom.
However there are occasions where soaks during the initial advance in heat are useful:
  • for really thick glass,
  • For multiple - 3 or more - layers of glass,
  • for glass on difficult moulds,
  • for glass supported at a single internal point with other glass free from contact with mould as on many drapes.

Of course, if you are doing small or jewellery scale work, then you can ignore these principles as the heat is gained relatively easily. It is only when you increase the scale that these principles will have an obvious effect.

Slow, gradual input of heat to glass leads to the ability to fire at lower temperatures to achieve the desired results, with less marking and less risk of breaking.

Further information is available in the ebook Low Temperature Kiln Forming.


Thursday 13 July 2017

Quartz Inversions and Conversions

You need to know about this in both casting and when using ceramic pots in the kiln.

Quartz
Crystalline solids are rather temperamental and quartz is no different. Quartz is a crystalline form of silica in that it has a three dimensional regular pattern of molecular units. These form naturally in nature because lengthy cooling times allow arrangement. Quartz is made of a network of triangular pyramid (tetrahedron) shaped molecules of silicon combined with four oxygens.

Unfortunately, the quartz delights in changing the orientation of the tetrahedron shaped molecules with respect to each other, thus loosening or tightening the whole mass (and thus changing its total size). It exhibits twenty or more “phases”. A change to another phase is called a “silica conversion”. The most significant phases are quartz, tridymite, crystobalite, and glass.

Inversions
Changes which occur between these are reversible, that is, the change which occurs during heat-up is inverted during cool down. These changes are thus called “quartz inversions”. These inversions, unfortunately, often have associated, rather sudden, volume changes. That means that quartz conversions are something to consider when optimizing the fired properties; quartz inversions are something to consider when firing to prevent cracking losses. There are two important inversions you need to know about because of their sudden occurrence during temperature increase and decrease.


Quartz
The first is simply called ‘quartz inversion’ and it occurs quite quickly in the 570°C range (1060°F). In this case, the crystal lattice straightens itself out slightly, thus expanding 1% or so. This is therefore an important temperature in casting as it is an expansion on the heat up and a contraction, “grabbing” the glass on the way down. This is the reason for various modifiers when silica or flint is used as the strengthener.


Crystobalite
The second is crystobalite inversion at 226°C. This is a little nastier because it generates a sudden change of 2.5% in volume. This material has many more forms than quartz, so it is complex to say the least. However, while all bodies will have some quartz, you won’t have a problem with crystobalite inversion unless there is crystobalite in your body. Crystobalite forms naturally and slowly during cooling from above cone 3 (1104-1149°C). It forms much better if pure crystobalite is added to the body to seed the crystals or in the presence of catalysts (e.g. talc in earthenware bodies). Thus, this element exists in most ceramic moulds and moving slowly around 226°C should be observed when firing containers made of ceramic materials.

Wednesday 18 January 2017

Assessing Pre-programmed Schedules


Many kiln manufacturers are shipping their kilns with a set of programs already entered and saved into the controllers. 

You might think that all these pre-set schedules would all be the same, as the range of glass to be considered is relatively small. Yet, the range of schedules for the same glass varies from one manufacturer to another.  Yes, you may respond, but every kiln is different.  Well, I’d say, the variation is within a product line as much as between kiln manufacturers.


Assessing the installed schedules

What this means is that you need to assess the schedules that come with your kiln, rather than simply accepting what has been placed there.  There are a few things that can be looked at to assess whether you wish to rely on these pre-set schedules or not.

Differences between fast and slow fuses. 
  • ·         What are the initial rates of advance, are they different?
  • ·         Where is the bubble squeeze, is there one?
  • ·         Are there different rates of advance from bubble squeeze to top temperature?
  • ·         If you can compare their larger and smaller kilns, is there a difference in schedules?


Differences between tack and full fuses
  • ·         Are the top temperatures different for tack and fuse?
  • ·         Is there more than one tack fuse temperature to allow for various levels of tack from lamination to fully rounded?
  • ·         Is there a difference in soak times at the target temperatures?


Differences in slump temperatures
  • ·         Are there low and high temperature slumps?
  • ·         Is there a difference in temperature or time between various slumps?
  • ·         Is there any allowance for span or size of mould?
  • ·         Does depth of the mould make any difference to the schedule?
  • ·         Is a difference for the depth of the mould offered?


Differences for different manufacturers’ glasses
  • ·         Are there different schedules for Spectrum, Wissmach, Bullseye, etc. fusing glasses?
  • ·         Are float glass schedules any different for rates, soak times, annealing points?


Printed schedules
  • ·         Are the schedules printed in the kiln handbook or manual?
  • ·         Are you given clear instruction on when to alter the programs?
  • ·         Are you given clear instruction on how to alter the programs?


The more “no” answers you get to these questions, the less you can rely on the installed schedules.

Wednesday 28 December 2016

Making Your Own Schedules

Starting out with your own schedules is a bit frightening as you don’t yet know the capabilities of your kiln and the problems that might occur. This note attempts to give you some pointers on how to go about making your own schedules.

Start with the glass manufacturer’s recommendations.  Picking something from the internet or a discussion list may seem easy, but you cannot assess the quality of the posted schedules.  Many odd practices have crept into the kiln forming community. The manufacturers know their glass, so you should start there. They are the quality control standards for kiln forming.  Modifications will of course be required for your particular practice as it develops.

Enter the manufacturer’s schedule for the project you are working on and then watch while firing.  Watching does not mean staring into the kiln.  This would damage your sight after a while. This watching consists of quick peeks into the kiln to see what is happening.  These peeks will be at above 580C.  It is only then that there is enough light in the kiln to see what is happening.  At first the peeks will be at possibly only 30 minute intervals.  But as you near the target temperature, you will need to peek at possibly 5 minute intervals. The progress of the glass forming will be much quicker, so to know when the right temperature has been achieved, frequent peeks will be needed.

This observation will let you know if the glass is achieving what you want. If it is not, you can change the schedule while firing.  E.g., advancing to the next step in the schedule, extending the soak time, changing the working temperature to a higher point.  Be sure to read your controller manual to ensure you know how to do these changes during the firing.

If you have achieved the look you want before the target temperature has been achieved, advance the schedule to the next segment or ramp.  Record this temperature, as the next time you fire this set up you will want to be 5°C -10°C lower than this time.  You are aiming to achieve your look with a 10 minute soak.  So, depending on temperature, rate of advance and your kin, this lower temperature with a 10 minute soak should achieve your desired look.  Record this schedule. You will need to observe the next firing just to be sure the temperature and time combination you choose works. 

If the desired look has not been achieved by your top temperature and soak, you can raise the temperature 5°C -10°C, even if you have to interrupt the firing to change the temperature.  The controller will recognise which ramp is required to complete the ramp to the new top temperature without going through all the segments of the schedule.  Even if it does not, you can advance to the ramp you need.  The effect of these changes will be minimal in relation to the full and uninterrupted schedule and can be relied upon to work well on future firings.  Record the new schedule for future use.

An alternative to the change of the top temperature, is to extend the soak when the temperature has not achieved the effect.  You will need to keep peeking until the sought for profile is achieved.  Record this new soak time and the results for future firings.

As you can see it is important to record schedules, layup and results every time you fire.  This enables you to compare results and learn.  A log provides a good reference when you want to reproduce something that was successful.  It also records what did not go well and can remind you of what to avoid.


This process of observation, amendment on the fly, and recording actions and results helps you to get to your ideal schedule much quicker than by putting a schedule in and coming back the next day to see what has happened.