Side rebates
One side of the rebate (or raggle) in stone should be deeper than the other. This allows the panel to be slotted in and then slid back into the shallower rebate. Which side the deep rebate is on is not important, but you must determine which is the deeper and its minimum depth all along the raggle.
Adjusting the placement of the panel
To help move the panel from side to side stiff oyster knives and lead knives are important. This allows you to get behind the edge and slide the panel to the side, especially when it is sitting on top of another panel to make the fine adjustments to get the lead lines flow correctly.
In some circumstances, especially when installing a single panel, it is necessary to bend the leaves of the lead toward the installation side. After placing the panel, you then fold the leaves out one at a time into the raggle slot.
Top and bottom rebates
For the top and bottom rebates it is important that the top is the deep one. You insert the panel up into the slot a the top and let it settle into the bottom rebate. The panel should be completely covered by the stone.
Extra came
In all installations into stone, you should carry extra came of at least 12mm (1/2”) to solder round the panel when the stone work is not as accurate as it should be, either through workmanship or weathering.
Wedges
Have some little blocks of wood and some whittling tool to hand to wedge the panel in till mortared. It is possible to use little scraps of lead for the purpose. These wedges don't need to be that robust, they are just there to hold the panel in place until the mortar is in.
Mortars
Mortars for stone should be of lime cement, or sand mastic. Don't use silicon, you'll never get it out again! Also don't use putty as this stains some types of stone and the oils leech in to the stone, causing the putty to dry and therefore the window ceases to be watertight.
Sunday, 24 November 2013
Wednesday, 20 November 2013
Brushes for Painting
A
quality paint brush will have hairs that form a point and have a good
spring to them - they bend while painting but return quickly to their
original shape. A good brush will also hold lots of paint and deliver
that paint evenly throughout the stroke. Brushes
usually have a number to indicate their size - the larger the number,
the larger the paintbrush. The larger the brush the wider the line
that can be produced, although with a light touch a fine long line
can be made because of the pointed nature of the brush.
The
best brushes are made from natural hairs, although there are brushes
made from a combination of natural and synthetic materials which are
adequate.
Sable
hair brushes are considered to be the best for painting. The hair
comes from a variety of pine martin and the Kolinsky sable from
Siberia is considered the best. These brushes are more expensive
than others, but are soft and flexible, hold their paint well and can
make an expressive thick to thin line.
Ox
hairs are normally used for making rigger brushes. This is a round
brush with long hairs, said to be used to paint the lines of ships'
rigging in the past. The hair is strong and springy making it useful
for long lines and thicker paints.
Squirrel
hair brushes are useful for applying paint in broad, thin layers for
matting.
Goat
hair brushes are normally known as hake brushes. These are a
traditional, oriental style brush. It lacks spring, but forms a good
point and so is useful to cover larger areas quickly with a gentle
touch.
Pony
hair is made into short round brushes used as soft stipplers.
Hog
hairs
are made into hard, very economical brushes. They come in flat and
round shapes. They are most used for stippling and can be trimmed,
shaped, used, and abused for years.
Badger
hairs
are thicker at the end and thinner at the root, creating a conical
shape. These soft brushes are used to blend paint once it has been
spread on the glass. The brush is swept across the surface of the
paint to blend or move paint and remove stroke lines.
Wednesday, 13 November 2013
Glass Shifting on Mould
There
are a number of things to investigate if your blank is shifting on
the mould during firing.
Is
there a heat differential?
Glass
absorbs heat at different rates depending on colour and type meaning
that one part may begin to move before another. The solution to this
is to slow down the rate of advance to allow all the glass to gain
heat at the same speed. It may also be useful to slump at a lower
temperature.
There
also may be a heat differential within the kiln. You need to run a
check on the heat distribution of your kiln to be sure where the
(relatively) hot and cold areas of your kiln are. Bullseye published Tech Note no.1 on how to do this.
Not
perfectly balanced on the mould?
Glass
can be placed just off square or level and that can allow it to start
slumping unevenly. Measurements and observation can help to get the
glass placed squarely on the mould. Also a small spirit level placed
on the glass can tell you if the glass is level within the mould.
The
mould may not be level.
The
kiln, shelf and mould should each be checked for level in all
directions. The kiln level can be established and can be assumed to
be level until it is moved. The shelf level should be checked each
time it is moved. The mould level should be checked each time it is
used.
Is
the glass overhanging the mould?
Glass
overhanging the mould rim can hang up on some of the edges more than
others. Check the rim of the mould for any rough areas and smooth
them. If you do have glass overhanging, you should slow the rate of
advance to allow the edge of the glass to tip up and begin to slide
down into the mould. If the problem persists, make the glass blank
smaller, or support the overhanging glass with a collar.
Is
the glass heavier on one side?
The
glass may be uneven thickness and so heavier on one side. The
heavier area of the glass will begin to slump first and so promote
movement of the whole glass in an asymmetrical manner. The solution
to this is to fire slower and to a lower temperature.
Do
you have a wonky mould?
The
mould can be imperfect. So you need to check the mould for accuracy.
I have a slumper that has one side lower than the other three.
Being aware of this, I can place the glass so that it is still
useable. Measuring the mould in all directions will help determine
its symmetry.
If
all these things have been investigated and the solution not found,
it is possible to create a bevel on the bottom edge of the glass so
that the edge sits in the mould at the same angle as the mould. This
provides a larger contact point for the glass and mould than just a
thin edge. This appears to allow the glass to move evenly during the
slump.
Of course, a major solution is to observe the slump. Peeking into the kiln at the beginning of the slump soak and frequent intervals after that will show if the piece is slumping evenly or not. If it is uneven, you can put on the appropriate protective gear and with gloves on your hands, shift the glass to be set evenly in the mould.
The
major solutions to avoid uneven slumping are:
- Avoiding the hot and cool parts of the kiln
- Making everything level
- Careful placement on the mould
- Slower rates of advance
- Lower slumping temperatures
- Observation
Wednesday, 6 November 2013
Using Space on Shelves
Often there is unused space on the kiln
shelves when you are firing a project. With a bit of planning, you
can make use of the spaces for a variety of things.
 |
| Frits fired on fibre paper |
 |
| Bowl made from frit balls |
You can place piece of frit in the
clear areas to make frit balls.

You can make colour tests on plaques of
glass to see the results of strikers, powder combinations or results
of various depths of colour.
Compatibility tests can be done with pieces of glass of which you are not certain.
 |
| simple stress testing set-up |
 |
| Strip of fired glass samples for testing |
 |
| Results - those with halo are stressed |
In the same way, annealing tests can be
conducted.

You can fire small pieces of jewellery
at the same time as your larger pieces.

You can also prepare elements for
incorporation into other fusing projects and lay them out in the open spaces on the shelf. Your use of the spare space is related both to your imagination and to your future projects.
Wednesday, 30 October 2013
Cleaning Blending Brushes

Cleaning badger brushes just before use, is easy. Flick, gently and rapidly, the very ends of
the brush hairs against the side of your hand – but use respiratory
protection and be careful not to inhale any dust. If you notice
flecks of dust in your paint when you create a grisaille you’ll
know it’s time for a thorough and wet cleaning again.

After
each use, rinse out the brush tips in cool water. Gently rub the tips
of the brush hairs to loosen any extra paint. Grasp he hairs above
the tips to keep the water from the main part of the brush. Then wet
the exposed ends of the hairs and rub them gently until the water
runs clear.

If you use a blender for oil, you will need to use a small amount of natural soap, if
so, thoroughly rinse.
Flick
the brush to remove excess water, smooth the hairs into shape and
allow to completely dry by hanging the brush with the hairs pointing
downward – this avoids water flowing into the brush base where the
hairs are attached. If you have round-handled brushes, you can twirl
the brush between your hands to remove excess water.

Wednesday, 23 October 2013
Shape of Aperture Drops
The shape of an aperture drop can be controlled by the speed
of the slump. The speed at which the glass drops is a combination of heat and
size of the hole. Patience is required.
Rapid drops result from high temperatures. Rapid slumps
cause a thinning of the glass at the shoulder where the glass turns over the
inner rim of the aperture. The pattern is distorted and the colours are also
diluted. And a relatively large rim is left around the fired piece.
A much slower rate of drop spreads the strain of the slump over the whole of the unsupported area of glass. This tends toward a bowl with a gentle slope toward the bottom, reduced distortion of the pattern, maintenance of the colour densities, and a more even wall thickness all over the piece.
The slumping temperature for a shallow angled slump is less
than that used for normal slumps, and takes a lot longer – up to five hours
typically. This means that observation is required at intervals, say every half
hour.
A starting point for the slumping is around 100ºC above the
annealing temperature for the glass. So for Bullseye and System 96 the
temperature is about 615ºC. If after the first half hour, there is no movement,
increase the temperature by 10ºC. Check again in another half hour and if the
slump has begun, leave the temperature at that level and observe at the half
hourly intervals until the desired slump is achieved. Otherwise, increase the
temperature by another 10ºC with the check after half an hour, and repeat until
the slump has begun. After you have done the first one of these with a
particular size of aperture, you will know the temperature to start the slump.
The temperature you need to use is affected by the size of
the hole. The smaller the aperture, the higher the temperature will be needed.
But be patient. If the temperature is increased too much, you will get the
thinning of the sides that you are trying to avoid.
Additional information on aperture drops can be found
in this
series.
Wednesday, 16 October 2013
Lead Came with Alloys
Lead
came is available in several hardnesses. One (soft) is almost pure
lead, another is half hard and contains up to 5% antimony, and the
third is hard, containing up to 10% antimony. The difference between
these is hardness, or resistance to creep, not resistance to
corrosion.
 |
| elemental lead |
Lead
with antimony as an alloy is subject to the same corrosion rate in
atmospheric environments as chemical lead (99.9% commercial-purity
lead). However the greater hardness, strength and resistance to
creep of antimonial lead often makes it more desirable for use in
specific chemical and architectural applications.
The
ability of some antimonal leads to retain this greater mechanical
strength in atmospheric environments has been demonstrated in
exposure tests in which sheets containing 4% Sb [antimony] and
smaller amounts of arsenic and tin were placed in semi-restricted
positions for 3 years. They showed less tendency to buckle than
chemical lead, indicating that their greater resistance to creep had
been retained.
Handbook
of Corrosion Data, by Bruce D Craig, p89ff
 |
| Antimony crystals |
Thus,
the use of softer leads in conservation or restoration, because they
were used in earlier periods, is not indicated. It is known that
lead came up to sometime in the early 19th century was melted and
re-formed into came, incorporating tin from solder and other trace
elements which made the lead “stiffer” than the more pure lead
that began to be produced commercially and used widely at that time.
This may be the reason that so many 19th
century windows contain failing leads, while many earlier ones remain
sound.
Wednesday, 9 October 2013
Pink Confetti

Because
confetti needs to be so heavily saturated with colour, some of the
opalescent colours tend to devitrify. The pink is particularly prone
to devitrification. There are several ways to prevent this:
- cap (which can lead to bubbles),
- add a devitrification spray, or
- cover with clear powder or frit.
Covering completely with a fine layer of powder gives the most even result. Using frit
can provide a speckled appearance that is useful in some
circumstances.
This
tendency of pink opal to devitrification applies to all formulations
– Bullseye, Uroboros, S96 and float.
Wednesday, 2 October 2013
What is Viscosity
What
is Viscosity?
 |
| An example of differing viscosities |
There
are a variety of definitions, but these two capture the main
elements.
Informally,
viscosity is the quantity that describes a fluid's resistance to
flow. Fluids resist the relative motion of immersed objects through
them as well as to the motion of layers with differing velocities
within them. Source
Viscosity
is a measure of a fluid's resistance to flow. It describes the
internal friction of a moving fluid. A fluid with large viscosity
resists motion because its molecular makeup gives it a lot of
internal friction. A fluid with low viscosity flows easily because
its molecular makeup results in very little friction when it is in
motion. Source
 |
| A demonstration of the resistance of different viscosities of oil to a weight moving through the liquid. |
Almost
all liquids are viscous fluids having viscidity. For example, when
rotating a drum container filled with water on its vertical central
axis, the water that was at rest in the beginning starts moving as it
is dragged by the container’s inside wall and then whirls
completely together with the container as if it were a single rigid
body. This is caused by the force (resistance) generated in the
direction of the flow (movement) on the surfaces of the water and the
container’s inside wall. A fluid that generates this kind of force
is regarded as having viscosity.
Temperature
is a very important factor for measuring viscosity. In fluids, as
temperature goes up, viscosity goes down and vice versa. In the case
of distilled water, if the temperature changes 1 centigrade, it
produces a difference of 2 % to 3 % in viscosity. Source
Viscosity
is the measurement of a fluid's internal resistance to flow. This is
typically designated in units of centipoise or poise but can be
expressed in other acceptable measurements as well. Source
Why
is viscosity important?
“Near
the strain point the expansion increases rapidly and sometimes
erratically.” The links between the molecules has reduced in
strength and so have a lesser role in the forces acting at higher
temperatures. “In those upper ranges – the temperatures where
glasses are formed and re-formed with heat – viscosity is a much
more useful indicator of how glasses will behave.
“The combination of viscosity and COE are what make glasses more or less compatible, i.e., containing stress in amounts low enough to allow them to hold together without breaking at room temperature for extended periods of time under normal circumstances.
“The combination of viscosity and COE are what make glasses more or less compatible, i.e., containing stress in amounts low enough to allow them to hold together without breaking at room temperature for extended periods of time under normal circumstances.
Bullseye
found in the early 1980s in their efforts to mix coloured glasses in
streaky colour combinations that the COE could not be used to predict
compatibility. In trying to correct the compatibility of certain
mixed glasses, the closer they brought together the COEs, the more
incompatible became the mixes.
“The reason that we could not use COE to successfully predict whether a coloured glass would fit the base clear glass was/is because, as the base glass composition is altered with the addition of the necessary oxides to colour it, the viscosity is inevitably changed. This viscosity change causes the coloured glass and the clear base glass to strain themselves in the cooling cycle of the fusing process (a viscosity mismatch). Therefore once the two glasses reach room temperature they have undue residual strain that may lead to failure.
“In order to prevent this undue residual strain an equal but opposite strain must be introduced into the coloured glass to cancel out the strain induced by the viscosity mismatch. This is accomplished by introducing an expansion mismatch of equal but opposite strain. The two mismatches cancel each other out, leaving the two glasses nearly strain free.
“It is this phenomenon (viscosity mismatch cancelled out by an equal but opposite expansion mismatch) that enables glasses of very different compositions to be formulated to fit each other. The very fact that the expansion of a coloured glass has to be altered to make it fit a base clear glass implies that COE cannot be used as an indicator of compatibility. It is also why it only makes sense to describe these glasses as tested compatible to a specific manufacturer's base glass for a specific glass forming process.“ [L. MacGreggor]
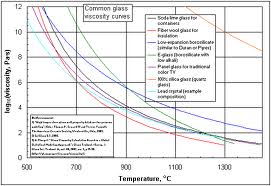 |
| Even different formulations of glass have different viscosities and different rates of softening with temperature increases. |
How
does viscosity apply to us?
Although
viscosity is of major importance to the manufacturer, it does have
some relevance to kiln formers too.
Understanding
that glasses have different viscosities – most often referred to as
hard and soft – can help in the choice of colours and styles of
glass to combine. Some glass will spread more, and also allow other
glass to sink deeper into the layer than others. It might help avoid
combining extremely hard and soft glasses next to each other.
It
should also help explain some results that were not planned. It may
help in when thinking about uneven slumps.
It
is important to recognise that glass chemistry is extremely
complicated, and to see that the expansion characteristics have to be
balanced with the viscosity characteristics as the two main elements
in compatibility. There are others, of course, but these appear to
the two main ones.
Wednesday, 18 September 2013
Bubble Reduction in Casting
There
are several things that can be done to reduce the number and size of
bubbles in casting.
- Fire higher - to 830ºC instead of 815ºC - and soak for at least four hours. This allows more bubbles to rise to the top and burst. If there are still more bubbles than wanted, increase the soak time.
- Stack the glass in the centre of the mould, allowing a few centimetres from the mould walls. This allows the glass to spread and flow from the bottom and up the sides, reducing the likelihood of trapping air. If you have more than one stack, keep the same space between the stacks as the mould walls.
- Make sure that the way you stack the billets or casting plates so there is a smaller space at the bottom of any cavity than at the top. The reverse allows the glass to soften and seal in the air in the space.
- You can construct a mould to make billets of the general shape of the final object. This of course, is much more work, needing two moulds.
- A major thing to avoid is the use of frit, especially at the bottom or deep in the mould as bubbles will collect around each piece and lead to a multiplicity of bubbles throughout the casting.
Subscribe to:
Posts (Atom)