Showing posts with label Glass Cutting. Show all posts

Wednesday, 15 July 2020

Adjusting Cut Running Pliers

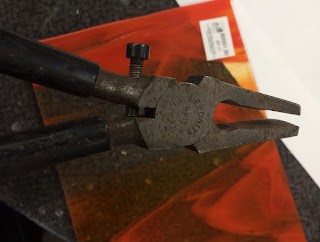
Typical cut running pliers


Cut running pliers are very useful tools if used correctly.  The pliers must have the curve in a “frown” rather than a “smile” to operate properly.  The knurled screw at the top and the scored line on the top jaw help place the pliers the right way up. They must be placed directly in line with the score. They should be only a centimetre or so onto the glass.  Holding them at the end of the handles, apply gently increasing pressure until you hear a click or see the score running.  If it does not run completely, turn the glass around and apply the pliers to the other end of the score.

Use of the Adjustment Screw

It is important to make use of the adjustment screw to get the best from the pliers.  If this is not adjusted properly, it is possible to crush the glass, or at the other extreme, not run the score at all.


The jaws need to be adjusted for the thickness of the glass.  The method I use for this is to place the edge of the runners on a corner of the glass to be scored.  


Loosen the screw until the glass is gripped by the jaws.  
Gradually tighten the screw until it resists your gentle pressure on the handles.  This gives you the correct opening of the jaws for that piece of glass.


When the pliers are properly adjusted to the thickness of the glass, you will not crush the glass and it is easy to use the pliers without cushions.

Tuesday, 4 February 2020

Breaking Apart the Last Two Thin Strips

For multiple thin strips of even widths, score all the strips first. Then break all the scored strips off the remaining sheet as one piece. Start the breaking process by breaking the scored sheet in the middle, then in the middle again, until there are only two to break apart.

Cut running pliers are most useful until the last two thin strips are to be divided.


At that point use two breaking pliers to hold each side of the two pieces of glass. The noses of the pliers should almost touch on either side of the score line. Apply pressure in a downward pivoting motion to break the pieces apart.

Breaking Tapered Pieces

Breaking thin pieces of glass can be tricky, but there are a few things you can do to help direct the break the way you want it to go.

Relieving scores made alongside curved and tapering pieces make the breaking more certain. A relieving score is one that is in addition to the primary score. This additional score will allow you to break the thin or tapering piece from the larger sheet safely, and then go on to break out the delicate piece.


The object is to always be breaking away less glass than is retained. The use of two breaking/grozing pliers, one on each side of the narrow pieces gives more even pressure than fingers or cut running pliers with wide jaws.


When breaking tapering pieces of glass you should normally grasp the thin end in fingers or pliers and run the score toward the  thick end and ease the run of the score. When the score opens an initial distance, turn the glass end for end and run the score back to the opened one. 

Breaking Pieces from Large Sheets

Breaking a piece of glass from a large sheet is often a frightening prospect. It doesn't have to be. It is easier to cut a straight line piece from your larger sheet than it is to try to cut a curve. This describes a straight line cut from a large sheet of glass.

Use a cutting square or other non-slip straight edge to guide the cutter. You can push as in normal stained glass cutting, or you can draw the cutter toward you as glaziers do. In either case, the pressure needs to be even and the speed consistent.


When moving large scored sheets, avoid pulling the sheet by one end. The score may run suddenly and not always along the line. Instead, move the sheet with support on both sides of the score. After the glass is scored, you have choices about how to run the score.


One easy way to break off large pieces is to move the sheet so the scored line is just inside the edge of the bench. The biggest piece will be on the bench and the smaller piece in your hands. Give a quick, sharp downward push with both hands on the overhanging glass. This action will separate the piece from the main sheet. Having the glass score inside the bench edge gives you a place for the broken off piece to rest, rather than pivoting toward the floor.


Or you can slide the straight edge under the glass on one side of the score, and press firmly, but not sharply on each side of the score. The glass will break evenly along the score line. This is a more gentle method of breaking the glass. A variation on this is to place a couple of matchsticks or glass painting brushes at each end of the score and apply the pressure.


If the glass sheet is of a size that you can hold it in both hands with the score between, you can draw it off the bench, let it hang vertically, and bring your knee up briskly to hit the score line, and it will break easily. This is a showman’s way of breaking glass sheets when the score line is approximately centred on the sheet.


Cut running pliers often do not work very well for long straight scores on large sheets of glass. However, if you use this method, tapping at the start and at the end the score line before squeezing the running pliers will help the score to run the way you intend. This is sometimes the only way to achieve the break of the score.  A note on the adjustment of cut running pliers is here.


Revised 30.12.24

Breaking glass with your fists

No, this is not about punching the glass – a dangerous approach. But it is a two-fisted approach to holding glass to break it.

For scores with significant, but not necessarily equal, amounts of glass on each side of the score this is a quick simple approach to breaking glass. After scoring, raise one edge of the glass and put your fingers under the glass on each side of the score. Curl you fingers into your palm, and put your thumbs on top of the glass. Turn your wrists outward and the glass will break cleanly.


With practice, the initial part of a curved score can be run by applying light pressure. Then you can turn the glass around and run the score from the other end to the opened score. This avoids lots of tapping and gives clean edges to the cut glass. It is just as simple as using cut running pliers and avoids the flare often associated with using cut running pliers.


This technique works best with glass that has at least 50mm each side of the score and on gently curved lines. For tight curves and narrow strips other methods need to be used.


Revised 30.12.24

Wednesday, 25 December 2019

Cutting Opalescent Glass


People often find cutting opalescent glass more difficult than transparent. My observation is that many people exert too much pressure in scoring opalescent glass by listening for the creaking/scratching sound. 

Not all glass is made the same, even by the same manufacturer.  Scoring different glasses sounds different with the same pressure applied.  But no more pressure should be applied to opalescent glass than to transparent.  Only about two to three kilograms (5 to 7 pounds) of pressure is required to score opalescent glass sufficiently to create the weakness that we exploit when running the score.

If you concentrate on keeping the pressure on both types of glass the same, you will hear different things.  On transparent glass you normally hear a creaking or light scratching sound and you do not get a whiteness along the score line.  If you hear same sound on opalescent glass, and a white appearance showes that too much pressure is being applied. 

The same pressure (2-3 kilograms) on opalescent glass gives only a rumble of sound - no creaking or scratching is heard.  You can test this 
  • Place a piece of glass on kitchen scales. 
  • Zero the scales with the transparent glass on it and 
  • Score without touching the glass with your other hand. 
  • Note the pressure you used.  
  • Zero the scales with a piece of opalescent glass on it. 
  • Score to the same pressure as on the transparent glass by looking at the readout on the scales.
Just as excessive pressure on transparent glass leads to erratic breaking of the glass, so it does on opalescent glass.  You may need some practice to stop listening for a sound and begin to feel the pressure you are applying to the glass. Once you do apply the same pressure to opalescent as to transparent glass, your success in scoring and breaking opalescent glass will increase.

Scoring and breaking opalescent glass successfully is the same for both transparent and opalescent glass.  Use moderate pressure and don’t listen for the sound.

Feel the pressure. Ignore the sound.


Revised1.1.25

Wednesday, 27 November 2019

Using Cut Running Pliers Without Cushions


There are a wide variety of cut running pliers for different purposes.  A description of some of them is here.

This post is to describe maintenance and use of this kind of cut runner.


The plastic covers that come with these cut runners eventually wear out.  The replacements are hard to find. There are things you can do other than buying a new pair just for the shields.

You can dip the jaws in tool coating compounds such as Plastidip.  This does not last as long as the plastic, but is easy to re-do.

You can wrap the jaws in tape.  Electrical tape, duct tape or even self-adhesive elastic bandage will do the job. Again, not long lasting, but easy to replace.

Or

You can use the cut running pliers without any covering on the jaws.  “You can’t do that. You will crush the glass!” is the response I hear.  You can use them bare. I do, and so can you.


The key is in the adjusting screw.  It is there not just to tell you which is the top of the pliers; it has a function too.  That screw adjusts the opening of the jaws to the thickness of the glass. 


A simple way to ensure you have the correct opening is to put one corner of the jaw on the edge of the glass with the jaw opening less than the glass is thick. Then tighten the screw until you feel the handles of the pliers begin to open.  Then you have the right opening for the thickness of the glass. 


It ensures you cannot crush the glass, as the jaws will not close at the centre to be less than the glass thickness. 

You also have a more direct feel of the glass without the spongy connection of the plastic. You can sense the glass beginning to bend just before the score runs due to the gentle pressure of the jaws of the cut runners on either side of the score.

Whether you use the cut runners with or without cushions on the jaws, it is important to keep the adjustment screw lubricated so you can adjust the width of the jaw opening for different thicknesses of glass.


Wednesday, 31 October 2018

Lubrication for cutters


You can cut glass without oil.  It has been done for a long time.  But it has been found that there are advantages to using oil on a score line.

The purpose of oil:

The kind of oil
  •        Mineral oil does not oxidise to gum up the scoring wheel.
  •        Any light mineral oil - from sewing machine oil to WD40 - is acceptable. Some use very light oils such as turpentine or white spirits.
  •         There are cutting oils that are synthetic and easier to clean than the standard oils and spirits, in that less residue is left when the oil is wiped off.
  •         Vegetable oils might appear to be a good substitute.  But they oxidise and become sticky, attracting dust and other particles which soon block the turning of the scoring wheel.  This requires frequent checking and cleaning.  Avoid vegetable oils.


Methods of applying
  •         The oil can be put into the cutters that have a reservoir.
  •         The cutter can be dipped into a container of oil with or without an oil-soaked material.
  •         The oil can be painted onto the glass before scoring.

  Any single one or combination of the above will work.

Sunday, 11 February 2018

Glass Cutting Surfaces

There are several considerations about your surface for cutting glass.

Make sure you are putting the glass on a flat surface. If the surface is uneven, it will give difficulties in scoring and breaking.  This means that large sheet timber is an excellent surface.  These boards need to be securely screwed down to the bench structure to avoid any warping.

There is some advantage to having a slightly cushioned cutting surface. This will help accommodate glass with a lot of texture and those sheets that have slight curves in them


In this example the user has placed corrugated cardboard under the glass for cushioning, but with a hard surface underneath


Consider ease of cleaning.  As you score and break glass, small shards will be left on the cutting surface.  The tell-tale squeaks as you move the glass indicate there is other glass under the sheet. These shards and any other small almost invisible things under your glass can promote unwanted breaks. Also, if there is glass or other grit on the surface, it may scratch the glass. So make sure you brush the cutting surface clean frequently.


An example of a ready made cutting bench.  It has the advantage of being easy to clean and compact when not in use. 


Think about the size of sheets you will be cutting.  Large sheets often have minor imperfections in texture, or some bowing.  These benefit from a slightly cushioned surface. It also allows the sheets to be put down onto the surface with more confidence that it will not break in contact with the bench top.  But if you are cutting mostly smaller sheets, they benefit from a smooth hard surface to support the whole of the sheet especially when cutting long thin or curved pieces.

An example of a large cutting bench with composition board top surface


Some of the materials used are sheet boards (such as marine plywood, MDF, and other composition boards), short pile carpets,  thin rubber or foam sheets, dining table protectors and pin boards. 

All these are useful for cutting each with advantages and disadvantages.
  • Carpets and foam can trap shards of glass, so have to be cleaned very carefully to avoid retaining sharp glass within the pile or foam.
  • Smooth, wipe-able surfaces avoid trapping glass, but can be slippery. Choose one with a non-slip surface.
  • A slightly cushioned surface is good for large sheets
  • Smaller sheets of glass are best cut on smooth hard surfaces, providing support for all of the glass sheet.
You can also consider, as in the example above, the use of different cutting surfaces on top of the larger smooth and hard surface.  This allows adaptation to the needs of your glass without duplicating surfaces.

Before scoring, clean the glass on both sides, to ensure any sounds you hear when moving the glass relates to glass shards on the bench rather than grit on the glass.  At the very least, clean along the cut line, as this makes the action of the cutter smoother. The grit on the glass actually interrupts the action of the wheel, so you get a staccato effect in the score line.

Wednesday, 26 July 2017

Cutting Hour Glass Shapes


Hour glass shapes, wasp waists, or those that are thinner along the length than the ends, should be avoided as much as possible.  They are difficult to break out from the score.  More importantly, they are an inherently weak shape. The longer the piece is with the narrow part along its length, the more likely it is to break; in cutting or in the long term, in the panel.  However, these shapes are sometimes unavoidable.


The principle to use in scoring and breaking out the glass is to remove less glass than that you are retaining at each stage of the process.

This has consequences: 
  • ·         breaking the first score is the easiest
  • ·         only a rough outline of the final piece should be scored and broken from the sheet
  • ·         Relieving scores and breaks will be necessary.  The number will depend on the relative thickness of the thin and thick parts.


You can make the first score and break of one side of the shape from the main piece of glass – usually with little difficulty or need for relieving scores. (1)

You then should score and break off the piece to be retained from the larger sheet.  Be sure to give a margin for the final piece. (2)

Now score the other part of the hour glass shape.  Do not tap the score. Begin gently to run of the score from each end.  Don’t worry if the runs do not meet up.  Do not tap to make them meet up. (3)

If running the score from both ends is not enough to make the run complete, you will need to use relieving scores.  These scores can be like onion rings – generally concentric curves running in the same sort of shape as the curve to be broken out.  


Or you can use the fish scale approach – overlapping crescents.  These are most useful for deeper inside curves.

Either way, each score needs to be planned.  Each relieving score should be smaller than the width of the piece to be retained.  In general, this means the outer relieving scores can be wider apart.  As you approach the final shape, the distance between the scores will need to be less and less. (4,5,6)


More information on scoring and breaking out concave curves can be found here:  http://glasstips.blogspot.co.uk/2008/08/cutting-concave-curves.html


Wednesday, 11 January 2017

Holding the Cutting Head

Many people hold their cutting head steady with a finger during the scoring process.  This is not necessary.

The axel of the cutting wheel is slightly forward of the centre line of the cutter.  In addition, the cutter is held slightly angled back toward the operator to be able to see the wheel and the cartoon (or marker) line.  Both of these act to ensure the wheel follows the movement of the arm or body in a forward motion. 

In cycling, the distance between the angle of the shaft of the cutter and the axel is called the “trail”.  The greater the amount of trail, the easier it is to keep the bicycle following a straight line. The same applies to the cutter. This trail is created by the extension of the angle of the cutter to the glass.  The axel of the wheel is behind that line. The cutting head has a sharper angle at the back than the front to accommodate this angle backwards. The resultant forward force is in front of the axel and so leads the wheel to follow the direction of the cutter without any need for stabilisation.

There is no need to have your finger on the cutting head. It swivels for a reason. It will follow the direction you are pushing without any angle, so there is a clean score.  If you attempt to stabilise the cutter head you risk the wheel running at a slight angle to the direction of the score.  I talk about this as a skidding score. The result of this is to give a score with forces directed not only straight down but sideways too.   This gives the glass many more ways to break.  And not always along the line you want.

Also when you want to score a tight curve, the slight movement of the head allows the curve to be slightly smoothed again without any skidding.  This means there will be fewer pressure lines sideways to the score line.


Manufacturers have put the play into the cutter heads for a reason.  The above attempts to explain it.  The manufacturers would not include a feature that costs time and effort, as well as cost if it had no purpose.  It seems perverse of us to try to run counter to that by holding the head or even fixing it solid, so it is unable to pivot at all.

Wednesday, 2 March 2016

The Effect of Glass Temperature on Cutting

There are many opinions on how glass cuts when cold.  Some report cutting outdoors in sub-freezing temperatures, others that only warm glass cuts well.  I decided to see what scientific information there may be on this idea.

The Science
The scientific literature mostly concentrates on the effects at higher temperatures than we are concerned with.  However, there are some things that are applicable, and some of these effects of temperature are outlined below.

·         High humidity results in loss of strength. 

·         The strength of glass is reduced by 25% at 100°C compared to 0°C.

·         Glass needs several days to be at an even temperature throughout.

·         Variance in temperature across the glass causes unwanted breakages.

·         Colder glass becomes more brittle due to loss of elasticity.

·         Hardness of glass increases with decreasing temperature.

The terms of strength, hardness and brittleness have scientific definitions that are hard to apply to the everyday glass cutting that we do.  Strength may or may not have applicability to glass cutting.  Elasticity may or may not be an important factor in cutting.  Surface hardness may play a part in cutting while cold.

Applicability of the Science
However some things seem to apply. 

High humidity results in loss of strength.  This may be a factor in low temperature cutting.  The humidity in a relatively closed environment increases with the reduction in temperature.  Breaking glass is about the creation of a weakness in the glass along the score line.  In so far as strength is a factor in the break running along the score line, this may be an element in cold glass cutting.  If the whole glass is weaker, the difference in strength at the score line is less and so promotes unwanted breaks.

Variance of the temperature of the glass throughout the substance of the glass promotes unwanted breakages.  Perhaps the cold glass that is difficult to cut is not equally cold throughout.  Certainly a number of people report that they store their large glass outdoors and can still score and break the glass during the winter perfectly well before bringing it into the studio. 

Glass becomes more brittle with decreasing temperature, and it also becomes harder.  Perhaps these two elements are a factor in controlling breakages.  If the glass is both harder and more brittle, a different scoring method is required. 

The way in which glass at any temperature breaks is related to the force of the score, the speed of the score and the angle of the cutting wheel.  If the glass is both harder (at the surface) and more brittle it requires less scoring force or a blunter wheel angle.  The more blunt the wheel on a thicker (i.e. stronger) glass, the more vertical the stress lines are created in the glass.  So in a cold and harder glass, a blunter wheel angle seems appropriate, even though the glass is not thicker.

It is not usual for people to have cutting wheels of different angles, so an easier, although more skilled, approach is to reduce the scoring force in cold conditions.  Reducing the force in scoring a hard and brittle glass causes the stress lines to be more vertical than increased forces do.  Increased forces cause lateral lines of stress to be created, leading to unwanted breakages.

Secondly, the glass being more brittle, less force in breaking stress is required.  As the glass becomes colder, the less elastic it is.  This elasticity is an important element in breaking the glass at room temperatures. The score needs to be run gently to counteract the loss of elasticity and the consequent increase in the brittle strength of the glass.

Conclusions
My conclusion, after the reading I’ve done, is that cold glass becomes slightly stronger and more brittle than room temperature glass, and so requires a slightly different method of cutting. This difference is to reduce the pressure of scoring and the force of breaking (applying stress to the glass).  

Of course you can warm the glass up before scoring it, but the research seems to indicate that significantly long times are required to equalise the temperature throughout.

Wednesday, 20 January 2016

Cutting Fused Glass

The same principles of glass cutting are applied to fused glass as to the glass used to make the fused piece.  The differences relate to thickness and variations in thickness.

You still score on the smooth side.  More pressure is not required.  For glass thicker than 6mm, you may wish to use a wheel with a more blunt angle. as shown in this illustration.

www.oaklanddiamondtools.com

The main reason that people may feel it is difficult to cut fused glass relates to the additional thickness.  Just as breaking 4mm glass requires more force than 2mm, breaking a 6mm piece requires more force than a 3mm piece.  


floridastainedglass.net

Properly adjusted metal cut running pliers can do the job, but a cut runner designed for thicker glass can be a boon.  They are designed to provide greater leverage and so more force to the glass breaking.  With these the glass breaks along the score line cleanly.


www.glass-tool.com


The breaking of glass that is uneven in surface levels, as in tack fused pieces, can be more difficult.  One is that running the cutter over glass with distinctly different thicknesses can be difficult.  Maintaining consistent pressure and speed over the bumps of the tack fused pieces is difficult.  The second is that the running of the score will not always follow the score line.  For example, if the score line runs close to the edge of a thick piece, the break is likely to skirt around the thick piece, and possibly off to the edge of the piece, rather than continuing to follow the score line. Planning the score line on tack fused glass is important to avoid trying to break near the edges of thick pieces.


One possibility is to score the glass on the shelf side.  This is certainly possible, even though the surface is rougher.  It does avoid scoring across different levels and makes the break along the score line more probable.


Wednesday, 23 December 2015

Score coated glass on the back - Kiln Forming Myths 16

Cut iridised glass on the back


The idea seems to be to get a more even score and avoid chipping of the iridised surface.

First, the iridised surface is almost microscopic in thickness.  It is put onto the surface as a mist of metallic oxides as it begins its run through the annealing lehr.  This thickness will not affect your scoring.

The back is usually rougher side of the glass and so will be more difficult to get a smooth, even score than the front iridised surface.

Chipping of the iridised surface is caused by too much pressure during the scoring.  Reduce your pressure and review your scoring practice.


Scoring the iridised surface with appropriate pressure will produce a clean break without chipping the surface.  These comments apply to dichroic and flashed glass too.

Wednesday, 10 June 2015

How Much Glass to Buy

Of course the answer is that you can never buy too much as you will use it for something later.  Still, economics comes into play sometimes and you need to consider how much glass is enough for a given project.

I find that the larger the pieces in the project, the more glass I need.  There is greater wastage with large pieces than in a project with many small pieces.  I always cut my large pieces first, as this leaves cullet for smaller pieces, thus reducing the wastage.

If you are using glass that has a definite pattern or flow to it, you need to plan on a greater wastage factor than if you are using plain glass or textured glass with no particular direction.

The stage you are at in your cutting will also have an effect on how much glass you need.  At earlier stages you will have more unexpected breaks than later on, so take that into account too.

Some people report that they can manage with one third more area than their project, others one half more.  I find that I usually need twice the area to have enough glass to complete the project.


Sunday, 20 January 2013

Cutting thick glass

Use the correct angle of cutter wheel for the thickness. 

Use a similar pressure to cutting 3 or 6 mm glass. It is natural to think that as the glass is thicker, you need to use more pressure. The different angle of the cutter wheel is designed to transfer the standard pressure more directly downward.

Use cut runners made for thick glass to help break the glass. Run score from both ends of the score, especially on curved scores.
Example of cut runners for thick glass

Alternatively, turn the over and use hammer and rounded screw driver to run the score (similar to tapping method for thinner glass). Place the screw driver blade directly over the score line and tap it with a hammer. This will start the run. Continue it by placing the screw driver over the score at the end of the open score and tap again to continue the run.

Saturday, 5 January 2013

Orientation of Cutter Heads


In addition to the alignment of the cutter, you need to be sure you are moving the cutter forward in the way it was designed. If you look at the cutter from the side you will see two things. The most obvious one is that the angles of the cutaway on the head are shallower at the front and steeper at the back. In addition if you look carefully, the axel for the wheel is slightly forward of the centre line of the whole cutter.

Cutters aligned to score to the left


So it does not matter where the fixing screw on the head is. It may be at the front or at the back. What matters is the cutaway at the back which allows the cutter to be used with a shallower angle, than if reversed. This is most obvious on wide cutter heads.

Cutters arranged to score to the right


Sunday, 30 December 2012

Repair of a Plastic Barrel Cutter


Generally, there are two parts that can break or be damaged – the wheel and the barrel.

Wheel
If the wheel is damaged or worn, you can replace the head. When considering that, look at the cost of the head and consider whether the small cost difference indicates you should buy a new cutter instead.

The most common damage is a flat spot on the wheel. You can check for this, immediately after dropping the cutter, by lightly moving the cutter across a smooth piece of glass. If you hear a regular ticking sound, the wheel is probably “flat spotted” and will need to be replaced.

A worn wheel is more difficult to detect and is also much less likely to occur. I have been using some of my cutters for 15 years without any sign of being worn.

Plastic barrel
Sometimes the plastic barrel cracks or breaks. This will mean that the oil in the cutter will leak out. So you can consider continuing to use the cutter without oil, or by dipping the head in an oil soaked bit of cotton wool or similar material before each cut.

If the break is at the threaded end and you want to continue to use the ball at the end for tapping purposes, you can glue the barrel back together with an epoxy resin. Make sure the pieces are free from oil. Then glue and allow to cure. After curing, sand down any excess resin to make the cutter comfortable to handle.

Then for additional strength you can wrap with dental floss or extremely fine wire. Start below the glued area and go to the end of the break and back again. You could coat this wrapping with epoxy again both to secure the wrapping and to further increase the strength.

Another solution is to cut the cracked end off and re-thread the remainder. It makes the cutter a little shorter, but will continue to hold oil and give good service.

Or, you could buy another cutter.


Sunday, 15 July 2012

Space In Copper Foiled Projects


When cutting for copper foil projects it is important to leave a small gap between the pieces. This is both to allow for the thickness of the foil and for the solder to form a bridge to the other side of the panel.

I prepare the space in the cutting process by scoring at the edge of the pencil thin cartoon line. This leaves the thickness of the line between the pieces. I do not use pattern pieces unless I am using very dense opalescent glass. When I do use pattern pieces I cut them out with a scalpel knife so there is no space between the pattern pieces. I then draw around the pattern pieces and cut to the inside edge of the drawn lines. This also gives a margin for the foil.

Fitting the pieces is still required though. Some people foil one piece and then fit the next to it before foiling it. This is probably the most accurate way of getting a close fit. However, I save up my cut pieces which I have fitted to the cartoon and foil them while watching TV. My cutting and fitting is normally accurate enough that I do not have to take the foil off pieces, grind and re-foil.

While doing this fitting you need to be aware that an additional small gap between pieces is required to allow the solder to join both the front and back of the panel. This forms an “I” beam for strength. The adhesive of the foil is not enough to make a lasting and strong panel. The solder joining the two sides will give the panel the strength to last for a long time.


Saturday, 26 May 2012

Cutting Small Diameter Circles

It is possible to cut regular, small diameter circles without buying a lens cutter. It can be done with the assistance of a Lazy Susan or cake decorating turntable.

Draw the circle of appropriate diameter on the turntable with a compass. Place the glass on top of the turntable, and position your cutter above the drawn circle. Press on the cutter with one hand and rotate the turntable with the glass on it, with the other.


Steady your hand with the cutter by keeping your elbow tight against your side. This enables you to make a very good, if not perfect, circle without buying an expensive small circle cutter.

If the glass is too dark or opalescent to see the line, make a template and put it onto the glass. Cut beside the template or use the template to mark the glass. Then place the marked glass on to the turntable and cut as with transparent glass.

You will not be able to run the score by turning the glass upside down and pressing as you can with larger circles. You will need to make a number of relieving cuts to the tangent of the circle and break them away one by one. Yes, this does leave a rough edge at various places around the circle, so grozing or grinding will be necessary.