Need for an Extension of Anneal Soak on Subsequent Firings
 |
| An example of the first cooling stage |
The rates are applicable to other than Bullseye glass. Only the temperatures need to be changed.
|
| An example of the first cooling stage |
The rates are applicable to other than Bullseye glass. Only the temperatures need to be changed.
Texture moulds are a form of bas relief in reverse. The texture of the
mould is the bas relief. The glass formed over the shapes is in negative relief.
The light is refracted through th
e back to give an image of bas relief although the surface is smooth.
 |
| Example of wave form texture mould |
The usual temperatures are too high. These moulds are an exercise in patience. The temptation is to fire higher than slumping temperatures to get good definition in the glass. However, a number of problems, especially bubbles, can be avoided by staying at the high end of slumping temperatures. This means the top temperature would be about 680C. To compensate for this low temperature, the soak needs to be three hours or more. To be sure the definition desired has been achieved, peeking near the end of this long soak is necessary.
Moulds that are produced with a rim around the edges can trap air and
create bubbles. The rim forms a perimeter dam to confine the glass. If the rate
of rise is quick to a high temperature, the edges can be sealed against the rim
before all the air has escaped. It is advisable to cut the glass for these
rimmed moulds a bit smaller than the internal dimensions formed by the rim.
 |
| Example of textured area surrounded by a rim |
Use of single
layers on texture moulds can lead to large, thin bubbles. This is most
prevalent when using high temperatures. Since the single layers tend to form
more slowly than an already fused two-layer piece, the temptation is to use
higher temperatures. The higher temperatures soften the glass to such an extent
that often bubbles form over the lower areas of the mould. Instead, low
temperatures with extremely long soaks should be used to allow the glass to conform to the undulations of the texture without dog boning or developing bubbles.
Of course, peeking will be required to determine when the texture is achieved. With
single layers, the surface will have greater undulations than with two layers.
The thinness of the single layer cannot fill the depression the way two layers
can.

Rapid rates to high temperatures can produce internal bubbles too. These
moulds have a multiplicity of hollows and depressions. Just as people are
warned about depressions in their shelves, the depressions in the texture
moulds can cause bubbles too. This means there are even more possibilities for
bubble creation than on apparently flat shelves. Long slow bubble squeezes are
required to allow air from under the glass.
Glass sometimes sticks to the mould. This is most often blamed on insufficient separator. Boron nitride is a good separator for these moulds especially if you go to tack fusing temperatures. At slumping temperatures, kiln wash will normally be sufficient. Both of these separators need to be applied carefully, as there are relatively steep slopes throughout the mould. Spraying needs to be done from at least four angles to ensure all the sides are covered.
Less often thought about is the draft of the shapes of the mould. If the slopes (draft) in the mould are too steep, the glass will “grab” the ceramic mould, because the ceramic contracts less than the glass when cooling. If shapes of the mould are steep and deep enough, the glass may even break as a result of this compression of the mould.
 |
| An example of some nearly vertical elements and a rim |
Other information is available:
Low Temperature Kilnforming, an Evidence-Based Approach to Scheduling, an ebook

A question about kiln wash. Do you have to let each coat dry while applying before applying the next coat?

This is another reason to advance the temperature slowly when slumping
or draping with a ceramic mould. A further reason to heat slowly is
to avoid steam formation within the ceramic body. If the steam is
created over a short time, the force can be great enough to break the
ceramic. To ensure the water evaporates, a soak at 95°C/203°F for a
significant amount of time is a better, safer option.
|
||
|
|
If you want to be sure your kiln wash is dry before you put the mould in the kiln, you can leave it in a warm ventilated space, or even on top of your kiln while it is being fired. Using either drying method will dry the kiln wash sufficiently before the glass is placed on the slumping mould.
Sintering (or laminating) is a special form of low temperature kilnforming that requires attention to the ramp rates and the length of soaks. The rates and soak times were determined by the strength of the resulting pieces.
 |
| Credit: Researchgate.net |
The ramp rate has a significant effect on the strength of
the resulting piece.
The soak time is extremely important in sintering to provide
strong results. It is loosely related to the ramp rate, but in an inverse manner.
The quicker the ramp, the longer the soak required.
There is no time advantage to rapid rises to the strain point followed by a very slow rise to top temperature. The six-hour soak required by fast rises to top temperature show there is a large time disadvantage with rapid rise scheduling of sintering.
More information is available in the ebook Low Temperature Kilnforming and from Bullseye.
It is common to think of cooling after annealing as a simple single cool rate to an intermediate temperature between annealing and room temperatures before turning off. This most often works well for full fused pieces up to 6mm/0.25. But as the pieces become thicker or more complex, the need for more controlled cooling becomes necessary.

Examples may help understand the cooling requirements of
glass that it thicker, or tack or contour fused.
Example 1
A 12mm/0.5” full fused piece needs
a two-hour annealing soak, followed by three cooling rates of 55°C/100°F per
hour, 99°C/180°F hour and finally 300°C/540°F per hour. The first rate is for
the first 55°C/100°F, the second rate for the next 55°C/100°F, and the final
rate is to room temperature.
 |
| An example of the variation in ΔT during the first 55C/100F of cooling |
Example 2
A rounded tack fuse of 1-base and 2-layer
stacks gives a total of 9mm/0.375”. Research has shown that you need to
schedule for twice the actual thickness for rounded tack fusing - so for
19mm/0.75”.
This requires an anneal soak of 150 minutes, and a first cool of 20°C/36°F. The second cool rate can be increased to 36°C/65°F. The final rate can be at 120°C/216°F per hour to room temperature.
The ΔT at the beginning of annealing was 7°C/12.6°F and at the end of a 2-hour soak was a ΔT of 1°C/2°F. The first cool ramp was 20°C/36°F per hour and gave a variance of between 2°C/3.6° and 0°. The final cool produced variances of up to 6°C/11°F, ending at 88°C/190°F with a ΔT=2°C.
 |
| An example of the ΔT during the second 55C/100F of cooling |
Example 3
A sharp tack or sintered piece
with two base layers and two tack layer stacks on top requires firing as though
30mm/1.18”.
An example of the ΔT during the final stage of cooling to Room Temperature
More information on cooling is given in the book LowTemperature Kilnforming; an Evidence-Based Approach to Scheduling.
It is possible to stick frit to slumped pieces. But soaking for a long time – several hours - at 650°C/1200°F is required to stick the frit. The added pieces will remain relatively sharp. You need to observe frequently from 600°C/1111°F to make sure that the form of the glass is not distorting.
 |
| Credit: Pyramid Gallery, Smyth and Zebrak |
Although it is possible, adding pieces to already shaped objects is not best practice, nor will it frequently give satisfactory results. If the slump is shallow, it is more possible to do this successfully than steep or highly shaped forms. But the most suitable practice is to flatten the piece, then tack fuse the pieces onto it. Follow this fusing with the new slump or drape. This flattening process will not be possible with all shapes.
The best results will be achieved by accepting what you have and make a new piece with the planned additions from the start.
This process will not be suitable for draped glass as the
glass will drape further during this low temperature soak.
I've a book that
gives more detail. Low Temperature Kilnforming, an evidence based approach to scheduling or at Bullseye
There are a lot of considerations when you are preparing to buy a kiln. Often the advice to people buying a new kiln is to “buy the largest you can afford,” or “x kiln is great, and they have good service.” These are general advice, not directly applicable to your needs.
More important is to think about buying a kiln that suits your kind of work. This might be:
These kinds of work are determinants for the size and depth of kiln you require. Even if you were to later decide on a larger kiln, the first kiln will continue to be valuable. And having a choice of kilns means you can use the one most suitable to the work.
The way you
assemble your work will affect your choice of how the kiln opens. The most
common styles are:
Each has its
advantages for different types of work.
Kiln depths are variable. Shallow kilns are easier to load. Deep kilns give more possibilities for casting and drops. It is possible to raise shelves on posts in deep kilns for flat work, making deep kilns flexible for both kinds of work.
The scale of your work will have a big effect on the kiln size. The larger the scale the bigger the kiln will be needed. But be careful to avoid “buying the largest you can afford” attitude. Kiln sizes vary:
A range of kilnforming styles are given across the top and kiln characteristics down the side of the grid. Where the kiln is very good for the kind of work given at the head of the column a “Y” is entered. Where the kiln is definitely not suitable a “N” is given. Where neither of these are given, the kiln will do the work acceptably, but not in an optimum manner.

This second grid relates
to controls and various features that kilns have added to the basic kiln. It
provides you with a checklist of items that might be desirable and allows you
to compare different brands of the same shape according to the additional
features they have or can have added.


Set up a centre point. You can do it by estimating. But it
is more accurate to measure a centre point that is at least 1cm from the edges.
Use that crossing point to measure out the radius of the circle.


Locking the pivot into place on the cross hairs
Adjust the cutting wheel along the length of the circle cutter bar to the marked radius. The measure marks on the bar are not always accurate and anyway wear away quickly.


Tighten the set screw.

Add a touch of oil to show the score line. Make a test circle by pushing the bar around with no pressure. This shows up any obstructions around the end of the bar.

Score in an anti-clockwise direction. This avoids accidental loosening of the set screw if it is under the button or handle.

Start with the scoring head under the arm with which you are
securing the centre pivot. This allows you to do the whole score in one motion.
The pressure you use should be no more than in your normal scoring.

Running the score
Running the score is a glazier’s term to indicate the way in
which a scored line gradually separates under gently applied breaking pressure. This can
be seen when gently applying pressure with cut running pliers. The score line
is made progressively visible by the gradual separation of the glass. This results
from the light passing through in a different way than when it is not separated
from top to bottom.

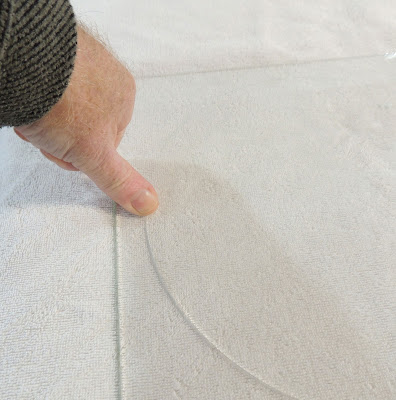
The glazier’s method to get a clean break of a circle is to score
on one side with a trace of oil. Then turn the glass over and press with your
thumbs on the score line. Running the score from the back requires a little
skill and a certain amount of courage or determination.
The object is to bend the glass just enough to crack it along the score without breaking it anywhere else. The best surface is a short pile carpet square, a rubber mat or a single layer of towel or an unfolded newspaper. These provide a surface with a little “give” to allow the glass to deform.
But if you have too soft a surface, it is easy to break through the circle. A too soft surface is given by a household carpet, several layers of towel, or any other surface with a lot of “give” to it.
You may need both thumbs to start the run depending on the
pressure you can exert. Try one thumb first. If that is not enough use both
thumbs.
If you place your thumb opposite a corner, you have greater leverage to start the run of the score. This leverage makes the running of the score easier as less pressure is required. You will hear a loud click at the opening of the first part of the score.

Continue around the circle by pressing at the end of the opened score, until the whole score has been run. You may hear quiet clicks as the score opens. Other times there will be no sound, but you will see the score run away from the pressure point.
Once you have run the score from the back, turn the glass
over to have the scored surface up. This makes it ready for the relief scores. It
is much more successful if all the scores – circle and relief - are made from
the same side. Unless you are scoring float or other glass that is smooth on
both sides, this flipping back will be the easiest anyway.

Make the relief scores on the front.. Sometimes only one
relief score is required to release the circle from the surrounding glass.
Another method is to cut the corners off so that you have an octagon around the circle. This gives you the opportunity to run the score from the top with breaking pliers. Ease the score open progressively around the circle.

This method is easiest for opalescent glass where you cannot see through to the score. By opening the score from the top, you do not have to estimate where the score line is. You can see the oil trace indicating where the score is and where to place your breaking pliers.
You should start at a
place where there is only a centimetre or two between the edge of the glass and
the score. This may mean that you have to move around the broader areas of the
rim so that the score runs both back to the first opened score and forward. It
is in effect, opening a new score four times. But with gentle persuasion the
scores will run toward one another. Do not use heavy pressure in griping the
pliers, or in bending the glass. Gradually increase the bending pressure until
you hear the click of the glass separating.
These two methods of running the score give the cleanest break-out of circles.
There are multiple ways to create the relief scores.
Score by drawing the cutter from the circle out to the narrow
edge, leaving a small gap between the opened score of the circle and the start
of the score.

You can also score a longer line to the corner. Again, leave
a space between the circle and start of the relief score.


Alternatively, score a first tangent and run the score

Further tangents scored and broken away

All the tangents run and broken away
This reduces the risk of breaking through the centre of the circle. But it does leave little nubs of glass at the point of each tangential score. And for that reason alone, is the least satisfactory of the methods of breaking out circles.
In each of these methods of running a relief score, you need
to tap under the relief score to run it to the edge of the circle. Normally,
the quarters or other fractions will drop out one by one. Occasionally the rim will
drop away after the scores of the first two quarters are run.
There are at least two ways to cut a circle without running the circle score first.
The first is to cut the corners off the glass to create an octagon, but do
not run the score.


Then use breaking pliers to run the scored circle. Once the
score is run, make a single or multiple relief scores, and carefully run it. the
circle can then be removed from the octagonal rim. This provides a clean cut.

It does not risk breaking through the scored circle to the
interior when tapping the relief score.
Many people run scores at a tangent to the circle without having opened the score of the circle. These are then run, in turn, to and along the edge of the scored circle.
They can then be broken off in turn, if they don’t simply fall off when they all are run.

tangent removal
Finally, some people tap under the scored circle to run the score, as in the first of the tangent removal methods. This leaves shells – or ledges – on the glass circle. These must be removed by grozing or grinding. Grinding leaves a rough surface which takes copper foil tape less well than clean cuts. It also increases the possibility of devitrification when fusing.

The least satisfactory method of running the score of a circle is to tap under the score before breaking the circle out.
In conclusion, running the scored circle first and without tapping will provide you with the cleanest cut circle. This will be so however your make your relief scores. But, making relief scores before running the circle score risks breaking through the circle.
Finally, it should be noted that cutting out larger circles is
easier than cutting small ones. Better, cleaner results are obtained because
the curves are less tight.

