Scoring the circle
 Setting out the centre point and radius of the circle
Set up a centre point. You can do it by estimating. But it
is more accurate to measure a centre point that is at least 1cm from the edges.
Use that crossing point to measure out the radius of the circle.


Locking the pivot into place on the cross hairs
Adjust the cutting wheel along the length of the circle cutter bar to the marked radius. The measure marks on the bar are not always accurate and anyway wear away quickly.


Tighten the set screw.

Add a touch of oil to show the score line. Make a test circle by pushing the bar around with no pressure. This shows up any obstructions around the end of the bar.

Score in an anti-clockwise direction. This avoids accidental loosening of the set screw if it is under the button or handle.

Start with the scoring head under the arm with which you are
securing the centre pivot. This allows you to do the whole score in one motion.
The pressure you use should be no more than in your normal scoring.

Running the score
Running the score is a glazier’s term to indicate the way in
which a scored line gradually separates under gently applied breaking pressure. This can
be seen when gently applying pressure with cut running pliers. The score line
is made progressively visible by the gradual separation of the glass. This results
from the light passing through in a different way than when it is not separated
from top to bottom.

The glazier’s method to get a clean break of a circle is to score
on one side with a trace of oil. Then turn the glass over and press with your
thumbs on the score line. Running the score from the back requires a little
skill and a certain amount of courage or determination.
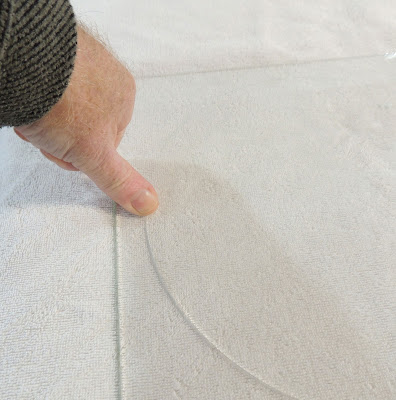
The object is to bend the glass just enough to crack it along the score without breaking it anywhere else. The best surface is a short pile carpet square, a rubber mat or a single layer of towel or an unfolded newspaper. These provide a surface with a little “give” to allow the glass to deform.
But if you have too soft a surface, it is easy to break through the circle. A too soft surface is given by a household carpet, several layers of towel, or any other surface with a lot of “give” to it.
You may need both thumbs to start the run depending on the
pressure you can exert. Try one thumb first. If that is not enough use both
thumbs.
If you place your thumb opposite a corner, you have greater leverage to start the run of the score. This leverage makes the running of the score easier as less pressure is required. You will hear a loud click at the opening of the first part of the score.

Continue around the circle by pressing at the end of the opened score, until the whole score has been run. You may hear quiet clicks as the score opens. Other times there will be no sound, but you will see the score run away from the pressure point.
Once you have run the score from the back, turn the glass
over to have the scored surface up. This makes it ready for the relief scores. It
is much more successful if all the scores – circle and relief - are made from
the same side. Unless you are scoring float or other glass that is smooth on
both sides, this flipping back will be the easiest anyway.

Make the relief scores on the front.. Sometimes only one
relief score is required to release the circle from the surrounding glass.
Another method is to cut the corners off so that you have an octagon around the circle. This gives you the opportunity to run the score from the top with breaking pliers. Ease the score open progressively around the circle.

This method is easiest for opalescent glass where you cannot see through to the score. By opening the score from the top, you do not have to estimate where the score line is. You can see the oil trace indicating where the score is and where to place your breaking pliers.
You should start at a
place where there is only a centimetre or two between the edge of the glass and
the score. This may mean that you have to move around the broader areas of the
rim so that the score runs both back to the first opened score and forward. It
is in effect, opening a new score four times. But with gentle persuasion the
scores will run toward one another. Do not use heavy pressure in griping the
pliers, or in bending the glass. Gradually increase the bending pressure until
you hear the click of the glass separating.
These two methods of running the score give the cleanest break-out of circles.
Relief scores
There are multiple ways to create the relief scores.
Perpendicular
Score by drawing the cutter from the circle out to the narrow
edge, leaving a small gap between the opened score of the circle and the start
of the score.

You can also score a longer line to the corner. Again, leave
a space between the circle and start of the relief score.

Tangents


Alternatively, score a first tangent and run the score

Further tangents scored and broken away

All the tangents run and broken away
This reduces the risk of breaking through the centre of the circle. But it does leave little nubs of glass at the point of each tangential score. And for that reason alone, is the least satisfactory of the methods of breaking out circles.
In each of these methods of running a relief score, you need
to tap under the relief score to run it to the edge of the circle. Normally,
the quarters or other fractions will drop out one by one. Occasionally the rim will
drop away after the scores of the first two quarters are run.
Breaking out without running circle first
There are at least two ways to cut a circle without running the circle score first.
The first is to cut the corners off the glass to create an octagon, but do
not run the score.


Then use breaking pliers to run the scored circle. Once the
score is run, make a single or multiple relief scores, and carefully run it. the
circle can then be removed from the octagonal rim. This provides a clean cut.

It does not risk breaking through the scored circle to the
interior when tapping the relief score.
Many people run scores at a tangent to the circle without having opened the score of the circle. These are then run, in turn, to and along the edge of the scored circle.
They can then be broken off in turn, if they don’t simply fall off when they all are run.

tangent removal
Finally, some people tap under the scored circle to run the score, as in the first of the tangent removal methods. This leaves shells – or ledges – on the glass circle. These must be removed by grozing or grinding. Grinding leaves a rough surface which takes copper foil tape less well than clean cuts. It also increases the possibility of devitrification when fusing.

The least satisfactory method of running the score of a circle is to tap under the score before breaking the circle out.
In conclusion, running the scored circle first and without tapping will provide you with the cleanest cut circle. This will be so however your make your relief scores. But, making relief scores before running the circle score risks breaking through the circle.
Finally, it should be noted that cutting out larger circles is
easier than cutting small ones. Better, cleaner results are obtained because
the curves are less tight.
Thanks, I will stop tapping in the middle first.
ReplyDelete