Showing posts with label Tack Fusing. Show all posts

Wednesday 19 July 2023

To Repair or Not to Repair

 Breaks during slumping sometimes occur. What can be done?

Cause of Break

The first element in assessing the piece is to determine why it broke

Should it be Repaired?

The second element is whether it should be repaired or re-used. Is it worth the effort of repairing? This will be about the importance and the time and effort you have already put into the piece.

Can it be repaired?

This is a third element of assessment. If the break resulted from incompatibility, any attempt at refusing will also break for the same reason. If inadequate annealing caused the break, it may be possible.

It is sometimes suggested that those pieces which fit together exactly, should be fused together flat and re-slumped. This ignores the fact that the glass will have stretched or deformed from the flat piece it once was.

  • ·   This re-fusing may be successful for shallow and simple slumps. But the piece will not be corrected by fusing the broken pieces from deep or complex slumps as a result of the stretching and thinning or thickening in the slumping process.
  • ·   The glass pieces will have an imperfect join when flattened because of deformations from the changes during the slumping.
  • ·   If the base is a single layer, the separate pieces will pull apart during the re-fusing process due to the lack of volume.
  • ·   The fusing process will make a tack fuse much flatter than originally intended. A contour fuse - at minimum - will be required to join the pieces.

For all these reasons, any flattening, fusing and then attempting a slump again is unlikely to be successful.

Fusing in the mould

In recognition of these problems about flattening, re-fusing, and slumping again some people suggest mending by firing in the mould. This would get over the difficulty of changes of shape. However, the required contour or full fuse will leave marking on the back and may lead to thickening at the bottom. It is also hard on your ceramic moulds if you fire quickly.

Changing the Shape

If it is desired to flatten an unbroken slumped piece for use in a mould of a different shape without much change in tack profile dimensions, there are two things to do. The maximum temperature to be used to get the glass flat and retain the degree of tack is the sharp tack - or lamination - range. It will require a significantly long soak at top temperature - hours.

This long soak time is a consequence of the effects of weight and span. The effective weight is less at the unsupported edges than at an unsupported centre. The slumped piece has most of its weight on the shelf now. This makes the flattening have to use a higher temperature or a longer soak. The effective span and weight at the edge is almost zero. This requires long soaks and frequent observation to know when the flattening is complete. Both these effects make the flattening of a piece without altering the profile a lengthy process.


More information is available in the ebook: Further information is available in the ebook: Low Temperature Kiln Forming.


Repairing a broken slumped piece of glass requires knowing why it broke, can it be repaired, is it worth repairing. Difficulties related to the changed shape, temperature to fuse, and changes in tack profile.

Wednesday 22 February 2023

Breaks Early in Firings

 My pocket vases keep breaking underneath the fibre paper. What can I do?


If a pocket vase is going to break it most likely will be in the brittle phase of the glass. This is usually from too fast heating. It, more rarely, can be too fast cooling. This happens as the glass is moving from or into a solid.  It is an extreme case of shading heat from the lower layers.

The general condition

As the temperature rises, glass becomes a little less brittle. The viscosity of the glass reduces. This can also be expressed as becoming less brittle. Due to its excellent insulating properties, glass transmits heat slowly through its substance. This means that the expansion differences within the glass are greatest during the coolest part of the brittle phase.

The brittle phase is described as glass temperature being below the strain point. Then strain point is the temperature at which the glass exits the brittle phase. This temperature is about 540°C/1000°F for fusing glasses. It is higher for float and bottle glass.

The effect of shading heat from the lower parts of the piece is to induce different rates of expansion within the glass. The riskiest part of this temperature range is the lower part of the brittle phase. This is where the viscosity is highest and the rigid structure is easily broken by different expansion rates. This has been empirically observed by Bob Leatherbarrow and others to have greatest effect below 300°C/573°F. So, slow ramp rates are advisable to at least this temperature. Some continue this slow ramp rate to the strain point before increasing the rate.


Credit: Latta's Fused Glass


Pocket Vases

The effect of the differential expansion shows most obviously in pocket vases. This is a construction where fibre paper is inserted to create the pocket between two sheets of glass. This leaves the lower part of the glass under the fibre paper insulated from the heat. The other parts are left exposed to the radiant heat. While the exposed glass is getting hot, the covered glass is still cool. This sets up the conditions for the maximum differential in expansion rates. The differential in expansion causes the glass to break – usually it is the bottom piece that breaks. A major reason to schedule for at least double the glass thickness of a pocket vase is this shading effect. Slightly different calculations apply to tack fusing where there is no insulating layer between glass sheets.


The care in scheduling applies both to the first ramp rate and to the cooling rates of the fired piece. Fast cooling will leave the area covered by the fibre paper much hotter than the exposed glass. The difference in contraction can break the glass on the cool down too.


More information is available in the ebook Low Temperature Kilnforming; an Evidence-Based Approach to Scheduling

Wednesday 8 February 2023

Annealing Tack Fused Pieces

"I'd like advice about annealing. I'm about to start a series that are to be wall hangings. The outside 100mm is only 3mm thick and the centre is 6mm and occasionally 9mm thick. They are going to be A3 and A2 size. I intend to tack fuse. I'm happy to experiment with the tack fuse temperature (I think about 677°C). How long should I anneal it? That's my question."

Determining the Tack Temperature

The high end of slumping, and the low end of sintering is 677°C/1252°F. Unless your kiln fires very hot, this is not hot enough for a tack fuse. Make some small-scale mock-ups in clear. Schedule the kiln to a full fuse on a rate not more than 300°C/540°F per hour. Peek into the kiln at 10°C/18°F intervals from 677°C/1252°F upwards. When you see the profile you want, note the temperature. When scheduling the tack firing, reduce the target temperature by 5C and add a 10-15 minute soak to get approximately the same result as you observed in the test firing.


Scheduling to Avoid Dog Boning

You have a border of 100mm/4.0” that is only one layer thick. This has the risk of becoming irregular at the corners compared to the sides (dog boning). To avoid dog boning of the 3mm base, the lowest temperature you can use is important. This is the main reason for the peeking – to determine the temperature at which dog boning begins. It is not only the degree of rounding of the edges you are looking for, but also the degree of retraction of the sides of the piece. When you note the beginning of the dog boning, you have reached just beyond the temperature to avoid that.

You will of course have to set the mock-up in such a way that you can see at least one side through the peep hole. The front will not give you accurate information, but if the side is in your sight line, you will see when it begins to deform. This peeking will keep you occupied for about 3/4 hour. Make sure you have gridded paper and pencil to hand to record information in between peeking.

It may be that the glass has not begun to round when the dog boning starts. In this case you will need to make the border larger and cut the glass back to straight lines. 20-30mm/0.75-1.125” extra all around will make it easy to trim the excess cleanly.

Annealing

I do not know the degree of tack you are aiming to achieve. It is important to the scheduling of the anneal. A sharp tack profile will require annealing for longer than a contour profile for your thicknesses. These suggestions assume the total height is 9mm/0.375”. If it higher, the soak and cooling times and rates will be longer and slower.

A sharp tack profile will need:

  • Annealing for 270 minutes (4.5 hours) with a cool rate of:
First 55°C/100°F cool at 13°C/23°F per hour.
Second 55°C/100°F cool at 23°C/41°F per hour.
Final cool at 78°C/140°F per hour to room temperature.

A rounded tack profile will need:

  • Annealing for 180 minutes (3 hours) with a cool rate of:
    • First 55°C/100°F cool at 25°C /45°F per hour
    • Second 55°C/100°F cool at 45°C /81°F per hour
    • Final cool at 150°C /270°F per hour to room temperature.

A contour tack profile will need:

  • Annealing for 120 minutes (2 hours) with a cool rate of:
    • First 55°C/120°F cool at 55°C /99°F per hour
    • Second 55°C/100°F cool at 99°C /178°F per hour
    • Final cool at 330°C /216°F per hour to room temperature.


More detailed information is in my eBook Low Temperature Kilnforming, An Evidence-Based approach to Scheduling. It is available from VerrierStudio on Etsy or through Bullseye

It is not cheap, but at 300pp worth it (in my opinion!). It discusses the three profiles of tack fusing - sharp, rounded, contour. It also deals with slumping, sintering, freeze and fuse, and bas relief or texture mould firings. The method for determining schedules is outlined and specific sample schedules are listed.

Wednesday 11 January 2023

Annealing Requirements for Shaped Pieces.

 Experiments related to slumping show that shaped items such as slumped, textured and kiln carved glass need annealing for at least one layer thicker than they are. The annealing for one layer thicker than the calculated thickness provides the most stress-free result for the finished product. Annealing for the calculated thickness does not always produce a stress-free result.  

Full Fuse

 This indicates that an evenly thick 6mm thick piece will get the best result from an anneal as for 9mm.

Texture Moulds

 A piece of glass on a texture mould with 3mm or more differences in height requires careful annealing. The more defined/sharper the texture, the greater care will be required. A 6mm blank on a mould with 3mm variation taken to a well-defined texture needs to be annealed as though it were 18mm thick. A sharp tack requires annealing as for a piece 2.5 times its actual thickness plus another 3mm.  This gives the 18mm/0.75” thickness annealing requirement for the 6mm thick piece.

Kiln Carvings

 The same kind of calculation applies to kiln carved items as for sharply textured pieces. Pieces with less sharply defined profiles can be treated as one of the more common tack fused profiles.


Credit: Vitreus-art.co.uk

Tack Fusings

 A rounded tack fused piece of a 6mm base with 3mm tack elements that is being slumped will need annealing as for 21mm.  Twice the actual thickness plus 3mm giving the annealing requirement as for 21mm/0.827”.

 A contour tack of the same dimensions as given in the first example will require annealing as for 19mm/0.75”. The annealing requirement when slumping is for 1.5 times the thickness plus another 3mm.

In General

 The general approach to annealing shaped pieces is to calculate the thickness for the anneal and add one layer more to get a good anneal for slumped and other formed pieces. 


 The research and the reasoning behind this approach is given in LowTemperature Kilnforming, An Evidenced-Based Guide to Scheduling available from the Etsy shop VerrierStudio and from Bullseye

Wednesday 21 December 2022

Simultaneous Fusing and Slumping

“I sometimes slump at the same time as I do a tack fuse. Is slumping at this higher heat bad for the mould? “

Image credit: Creative Glass

Mould

 It is possibly not bad for the mould, but it does depend on your temperature and heat work.  Ceramic moulds are typically fired to 1200° or 1300°C so higher kilnforming temperatures are unlikely to affect the moulds.  The speed at which the target temperature is reached is of concern though.  Ceramics have what is called quartz inversions.

 Two of the constituents of ceramics – cristobalite and quartz – have significantly large expansions at 226°C and 570°C / 440°F and 1060°F.  Rapid rises through these two temperatures risks breaking the ceramic mould.  This is not the case with steel moulds, of course.

Glass

 There may also be effects on the glass.  Slumping typically ranges between 620°C to 677°C (1150°F to 1250°F).  Tack fusing typically is done in the 740°C to 790°C (1365°F to 1455°F)range.  This is a significant difference even at the higher end of the slumping range and the lower end of the tack fusing range. 

 Some of the effects are:

·        The marking of the slumped glass will be greater at tack fusing. 
·        The glass will slip down the mould more. 
·        Any pieces applied to the base are likely to slide during the slumping process.
·        There is a risk of creating an uprising or bubble at the bottom as the glass slips down the side of the mould. 
·        There is more risk of creating needle points at the edges.

 Performing two processes at the same time risks difficulties.  Inevitably, compromises will need to be made between slumping and tack fusing.  Eventually, it will come to a time when the two process won't work together.


A slump taken to tack fusing temperatures is at risk from uprisings at the bottom, needling at the edges, excessive marking on the back, slipping down the mould and thickening

Wednesday 12 October 2022

Achieving Multiple Profiles in One Piece

People ask about whether it is possible to tack fuse additional elements without affecting the profile of the existing piece.


It is as though glass has a memory of the heat it has been subjected to.  For example, a sharp tack will become a slightly rounded tack, even though refired to a sharp tack again.  So, it is impossible to refire a piece to the same temperature or higher without affecting the existing profile.  But it is possible to fire a piece with differing profiles if you plan the sequence of firings.


Tack fuse onto existing profile


It is possible to add pieces to be tack fused with little distortion to the existing piece through careful scheduling and observation.  There are several requirements.

 •     A moderate rate of advance to the working temperature is required, rather than a fast one. This is because the piece is a single thicker piece with uneven thicknesses.  Also, a slow rise in temperature allows completion of the work to at a lower temperature.  This means there will be less change to the existing profile.

•     A minimal bubble squeeze - or none at all - is required on this second firing.  The added pieces generally will be small, so if possible, eliminate the bubble squeeze.  The requirement is to add as little heat work as possible.

 •     The working temperature should be to a low tack fuse temperature with a long soak. 

 •     Observation is required from the time the working temperature is achieved.  Peeking at 5-minute intervals is needed.  This to be certain that the current tack fuse can be achieved without much affecting the existing profile.  It will be a compromise that you will be able to choose during the firing.  The decision will be whether to retain existing profile and have a sharp tack.  Or a slightly rounded tack and more rounded profile on the original piece.

Planning for multiple levels of tack

It is possible to design a piece with multiple profiles within the completed piece.  You need to plan out the levels and degrees of tack you want before you start firing. 

To do this planning, you need to remember that all heat work is cumulative. In simple terms it means that on a second firing you will start where you left off with the first one. The texture in the first firing will become softer, rounded, or flatter than the second or even the third firing.

Three degrees of tack can be achieved with a little planning.  It works similarly to paint firings.  Some paints fire higher than enamels, and enamels hotter than stain.  You have to plan to fire all the tracing and shading first.  Then you add the opaque enamels, followed by the transparent enamels.  Finally, you add the silver stain.  This is unlike painting on canvas where you build up the image all together.

The same principle is true of a multiple level tack fuse piece.  When creating various profiles in glass, you proceed from firing the areas that will be the flattest first. Then proceed to the areas which will have the least tack last.  This is a consequence of the cumulative effect of heat on re-fired glass.

Plan out the areas that you want to have the least profile.  Assemble the glass for those areas. I suggest that a 6mm base is the initial requirement for anything that is going to be fired multiple times.  Add the initial pieces that will become a contour fuse or a very rounded tack. 

First firing

Put this assembly in the kiln and schedule.  Do not fire to the contour profile temperature.  Instead, you will be scheduling for a sinter or sharp tack. This depends on how many textures you plan to incorporate.  Start with a sharp tack.  Fire at the appropriate rate with a bubble squeeze to about 740°C for 10 minutes and proceed to the anneal cool.   Different kilns will need other temperatures to achieve a sharp tack.

You do not fire to the contour fuse temperature, because the base will be subject to more firings.  Each of these firings will soften the base layers more than the previous one.  This is the application of the principle of cumulative heat work.  When you fire a piece for a second time, there will be little effect until the softening point of the glass is reached. Once there, the glass further softens, giving the effect of a contour fuse.

Any glass that had already achieved contour profile from the first firing will flatten further.  This can be used in cases where the working temperature was not high enough.  Just fire again to the original schedule’s temperature.  Take account of the need for a slower ramp rate to the softening point.

Second firing

Once cool and cleaned, you can add your next profile level of tack fusing to the base.  Note that “level of tack” does not refer to thickness being built up.  It is about the amount of roundness you want to impart to the pieces.  You may be placing this second - sharper – level of tack in the spaces left during the first firing.  Again, schedule to the original approximate 740°C. But remember the base is now a single piece.  You need to slow the ramp rate to the softening point, after which the speed can be increased.  You will not need to retain the bubble squeeze unless you are adding large pieces, or into low areas. 

The second firing will show the pieces added for the second firing to have the profile of the original pieces.  Those pieces having their first firing will have a sharper appearance.
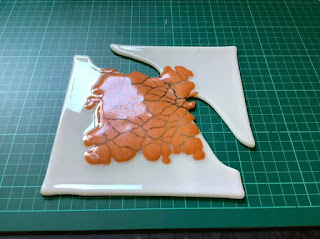
 

credit: vitreus-art.co.uk 

This is a piece where the flower petals and leaves could have been placed for the second firing to give a softer background with less rounded flower details.


Third firing

Clean well and add the pieces for the final level of tack.  Schedule the initial rate of advance a little slower than the second firing.  The piece is growing in thickness and complexity.  Once the softening point is reached, the original rate of advance can once again be used up to original temperature. 

Final firing

Clean well and add the pieces for the final level of tack.  Schedule the initial rate of advance a little slower than the second firing.  The piece is growing in thickness and complexity.  Once the softening point is reached, the original rate of advance can once again be used up to original temperature. 

Further notes on multiple firings

It is a good idea to observe the firing, once the working temperature is achieved.  This is to ensure enough roundness is being given to the final pieces being tacked to the whole.  Be prepared to extend the soak if the final pieces are not rounded enough.   Although you should have a good idea of the degree of tack for the final pieces from the previous two firings.

You may need to experiment a little with the temperature and length of soaks at the working temperature.  For example, if the degree of tack is too sharp in the first firing, you can extend the soak or increase the temperature for the next ones. 

If you are firing at 740°C, you may feel you can afford to extend the soak for the subsequent firings, because you are in the lower part of the devitrification range. Consider the risk of devitrification increases with the number of firings of the glass.  The preference is to increase the temperature a bit for subsequent firings to ensure you are not spending a cumulatively long time in the devitrification range but still be able to get the final tack level desired. 

The preference is to increase the temperature a bit for subsequent firings to ensure you are not spending a cumulatively long time in the devitrification range but still be able to get the final tack level desired. 

Because most of your heat work is happening in the low end of the devitrification range, the cleaning regime must be very thorough.  Any chemicals or soaps used must be completely washed off with clean water.  The piece must be polished dry to ensure there are no water marks left on the glass.

You can, of course, have more levels of tack.  One approach would be to start with a sinter, or tack to stick, firing. And repeat that four or more times.  Another is to increase the working temperature and reduce the length of time soaked there.  The shorter time means there is less rounding of each level, allowing the build-up of many levels of tack.  All of these require some experimentation. 

More information is available in the ebook Low Temperature Kilnforming.


Three firings to the same sharp tack profile will give multiple profiles in the finished piece. 

Wednesday 27 July 2022

Softening the Tack Profile


Often people want a particular profile not provided by the schedules in the controller or the ones they normally use for tack fusing. The question arises as to whether to increase the temperature or extend the soak on a previously fired piece.

You can do either.

You can extend the time or increase the temperature. There are benefits and drawbacks with each.

Increasing the temperature is the choice for a quicker firing. But you have less control.  By increasing the temperature, you will certainly get a softer edge to the glass. You do not know until the firing is finished how much the glass has changed.

Extending the time means that you know a softer profile will be created simply by more heat work being put into the glass.  If you combine the extended soak time with peeking at intervals, you have much more control over the exact profile achieved.  Observation at 5- or 10-minute intervals after the target temperature is achieved, will enable you to get exactly the profile you want. Just advance to the next segment when that profile is achieved. 

The drawback is that the firing takes a little longer and you have to be present at the time the working temperature is reached.  You can schedule that by using the delay feature on your controller.


Note that on any re-firing of a piece you need to be aware that you are firing a single thicker piece rather than the original multiple layers.  This will require a more cautious rate of advance up to the softening point of the glass – generally around 540°C.  After that, the original rate(s), soaks and annealing can be used.

Of course, the considerations of temperature versus time can be applied to an initial firing as much as to a re-friing of a piece.


Observation is the best way to have precise control over the profile of your tack fusing.

Further information is available in the ebook Low Temperature Kiln Forming.

Wednesday 22 June 2022

Ramp and Anneal Rates for Tack Fusing

Tack fusing is more difficult than most realise.  Many failures – usually breakages – occur because the complexity of tack fusing is not fully acknowledged.

Ramp Rate 

Calculations

One of the effects is the slower rate of advance that needs to be used.  The rate of advance needs to be slowed to that applicable to 1.5 to 2.5 times the actual total thickness of the assembled piece. 

Reasons

The reason for this firing for apparently excess thickness is the shading effect of the overlying pieces upon the glass below.  Glass is affected by radiated heat, whether the heat comes from above or the sides.  The parts of the base glass that have glass on top cannot receive the radiated heat.  This means the shaded base glass needs time for the heat to be conducted through the overlying glass to it. 

Beginning of heat input

Progress of heat input showing some parts of the base are compeletly heated while others are not

Glass is a good insulator, resisting any heat transmission through overlying glass. Slowing the rate of advance allows the convection of heat to the lower levels to be adequate to avoid heat stress.  The reason for the 1.5 to 2 factors is that experience has shown a simple applied arrangement will be safe with a factor of 1.5 as the calculated thickness.  If you have stacks or lots of difference in thicknesses, you need a slower rate to allow for the conduction of heat.  This is where the 2 times actual thickness factor is useful.

Finding the Ramp Rate

The information on the rate of advance for evenly thick pieces of 6mm to 9mm is widely available.  Determining the rate of advance for thicker items is more obscure.  You can get some guidance from the manufacturers’ websites.  But where the guidance is for thinner pieces or it is unclear, you need to find another reliable source. 

One very reliable source is the Bullseye annealing chart for thick slabs.    Yes, this chart tells you about the annealing of thick items, not about the ramp rate to the working temperature.  But you can infer the initial rate of advance from the final cooling rate.  The principle is that the glass can survive the indicated cooling, so it should also survive that rate of advance from cold to working temperature.

This means that a set up of a 6mm base with two layers of glass pieces on top distributed around the base, is a total of 12mm.  This should be fired as though 18mm (1.5 times actual) or up to 30mm (2.5 times actual).  In the first case the chart indicates the final cool rate is 150°C per hour.  This can be used as the initial rate of advance to at least 540°C (above the annealing range).  If you choose to use the 2.5 times factor, the initial rate will be 65°C per hour.

This approach gives you a reasonable degree of certainty about how fast you can fire your glass from cold.  Note that you still need to have a conservative bubble squeeze segment in your schedule, especially if the lay up includes areas where air might be trapped.


Annealing rates

Annealing times and rates are normally dependent on the thickness of the fired glass.  But published annealing rates are based on both even thickness across the piece and on cooling from two sides – i.e., not on the floor of the kiln.

Calculating for even thickness

If you have taken your stacked piece to a full fuse, you can anneal for the final thickness.  I would be a little more cautious with a contour fuse and anneal as though it were three to six millimetres thicker than when completely flat because you cannot be certain that the piece is evenly flat unless you obeserve.

Calculating for tack fused

If, however, you are firing to a tack fuse you need to look to schedules for thicker pieces.

Reasons

Glass remains an insulator as it cools.  As glass cools, it must conduct the heat through the thick parts at the same rate as through the thinner parts to avoid inducing stress.  Remember the principle of annealing is to keep all the glass with 5°C or less difference in temperature.  The thinner glass gives its heat up quicker than the thick.  This will induce stress and it can be enough to break the glass in the kiln or, more usually, some long time after the glass is cool.  This means you need to control the cooling to a rate that would be suitable for thicker glass. 

At the beginning of the cool the heat loss is from the surface and to a lesser extent through the shelf.
Further heat loss shows the exposed base layer is giving up its heat throughout, although other areas are only beginning to cool.  It will take some time for the three layer stack to cool.  The uneven cooling leads to the introduction of stress.


Determining the rate

The annealing soak length and the rate of the annealing cool are directly related to the thickness calculated for your piece.  You have already chosen a calculated thickness for the rate of advance to avoid breaking the glass.  Use the rates given in the chart for that thickness for your soak and anneal cool.  Any annealing with a shorter soak and a faster cool risks inducing stress and possible breakage.


Rates of advance and annealing are intimately connected.  A tack fused piece must be annealed as though it were 1.5 and up to 2.5 times the actual total thickness.  Annealing of tack fused pieces cannot be skimped.


Further information is available in the ebook Low Temperature Kiln Forming.


Wednesday 1 June 2022

Preventing dog boning

Firing a single layer, even with decorative elements on top, is most likely to “dog bone” due to lack of volume.  With a single layer you are always going to have difficulties with volume control. 

Photo credit: Paul Tarlow

Unless you are satisfied with an angular tack fuse at the lower end of the tack fusing range, you will always run the risk of dog boning. All the other variations of tack fusing use increased temperatures causing the glass to begin to pull in along the long sides to a greater or lesser extent (more with contour fuse, less with angular tack fuse).

Dog boning occurs because as the glass softens and the edges begin to round, the viscosity takes over from the solid phase of glass as a major force.  Viscosity can be thought of as an approximation of surface tension. 

Glass is a material with a plastic range over several hundred degrees.  This means that the hotter the glass becomes, the less stiff it becomes, and the viscosity force thickens the glass toward 6-7mm in the kilnforming temperature range. The greater the temperature, the more the glass pulls into a ball shape, or in the case of sheets, thickens at the edges and thins in the middle.  Higher temperatures reduce the viscosity to the extent that it becomes as thin as one millimetre.

Trick the glass

To avoid dog boning on tack and full fusing, you have to trick the glass with some special scheduling.

The trick employs the concept of heat work.  The nature of glass allows you to put a lot of heat work into a piece by soaking for a long time at a low temperature.  You might think of it as a kind of sintering.

A description of sintering:

The atoms in the [glass] diffuse across the boundaries of the particles, fusing the particles together and creating one solid piece. [This can be done by heat at low temperatures with extended soaks.]  Examples of pressure-driven sintering are the compacting of snowfall to a glacier, or the forming of a hard snowball by pressing loose snow together.   https://en.wikipedia.org/wiki/Sintering

By sintering (sometimes called fuse to stick) or - in kilnforming terms - by the use of heat work you can achieve the result you want without dog boning.

By taking the temperature slowly to about 700°C to 720°C and soaking there for two to four hours you can achieve a rounded tack fuse without dog boning.  You will have to experiment with the exact temperature and length of soak to get exactly what you want.

The length of soak time or exact temperature is not vital.  The two in combination will achieve the effect you want.  The importance of observation of your firing is re-enforced in the cases of sintering.  You cannot be sure until you check during the firing whether the edges of the glass are rounded enough for your purpose. That observation will also tell you whether a slightly raised temperature would be useful.  You will learn the time required to achieve the effect by recording the soak time when you advance to the anneal soak and cool.

Further information is available in the ebook Low Temperature Kiln Forming.


By the use of heat work in kilnforming you can achieve tack fused pieces without dog boning.

Wednesday 19 January 2022

Tack Fusing Difficulties

Many novice kilnformers tend toward the use of tack rather than full fusing in their work.  This is a bit perplexing, as tack fusing is more difficult than full fusing to complete successfully.


Why is tack fusing more difficult? 
The single most important reason is that the pieces of glass on top of the base shade the heat from the area underneath. And they do that unevenly over the base glass. Additionally, the tacked pieces are not fully incorporated into the base and so tend to behave as separate pieces, especially on angular tack fusing.  Both these factors require greater thought and care in scheduling.

Evidence
The evidence for the statement that tack fusing is more difficult than full comes from several areas.

There is a lot of evidence on social media of failed tack fused projects.  It may be argued that it is natural for the difficulties to be highlighted on the self-help groups. And the successes are not so widely shared.  There are other pieces of evidence.

Breaks of base sheet while the overlaying pieces remain intact.  

 This is a result of the overlaying glass shading the heat from the lower layers.  Some writers describe the effect as glass “seeing” heat.  The glass reacts more quickly to radiant heat than to transmitted heat from the air.  As a result, the glass exposed to the radiant heat absorbs heat more easily than the shaded areas.  This leads to uneven heating during the rise in temperature and a build-up of stress which frequently causes breaks from expansion differences in the base glass.

Breaks along the borders of the thick and thin areas of pieces are common in tack fusing.  

 This usually occurs during the cooling.  Thick and thin areas take different amounts of time to release the stored heat.  As in heat up, if the temperature differential is too great, the glass will break.  Research by Bullseye has shown that significant stress can be built up by temperature differences greater than 5°C across the piece.  What temperature difference is required to develop enough stress to cause a piece to break is unknown, although it does relate to the degree of variation in thicknesses and areas of base covered.

Scheduling as for thicker pieces.

 Further evidence is given by several sources stating that tack fusing projects need to be scheduled as though between 1.5 and 2.5 times the actual thickness to be successful.  This need for more careful firing is supported by the success of this strategy which increases the heat work as applied to tack fusing.

Further information is available in the ebook Low Temperature Kiln Forming.


Tack fusing requires more care than flat fusing because of heat shading and thickness differences.  There are some scheduling approaches that can minimise the risks of breakage.

Wednesday 27 October 2021

Tack fusing multiple layers


The question:

Full fused 6mm base, with 3mm tacked pieces. It is to be tack fused and slumped now.  Does the number of fuse firings affect the rate of advance, and how long a soak will be required to slump it? 


Multiple firings
If properly annealed each time the glass is fired, the number of firings does not affect how the glass should be fired.  This assumes the same number of layers are being fired.


Tack fusing
Tack fusing this piece will need some care.  The portion to be tack fused is 3 layers thick – overlapping white pieces surmounted by the yellow balls.  The base layer is shaded from the heat by the white, which is generally slower to transmit the heat than many other colours. Bullseye suggests doubling the total height and firing for that thickness. Bob Leatherbarrow suggests 1.5 times the total height for creating the schedule.  Firing Schedules for Kilnformed Glass,  p. 124-6

In this case, because of the amount of white, I would go with the Bullseye suggestion.  My researches for "Low Temperature Kilnforming" also indicated that a tack fuse requires a schedule for two times the thickness. Other levels of tack fusing require different calculations.  The total height of 15mm will be treated as 30mm for scheduling purposes.  This is midway between the thicknesses in the published table.  The rates and times in the table are linear. You can calculate a mid-point in the schedule to get the numbers for your piece.  Half the difference between 25 and 38 is 6.5mm giving 31.5mm.  Using the half-way point will be slightly more conservative than using exact calculations.  It is so close as to make no significant difference.

You will notice that the table gives only annealing times and rates.  There is way you can use this table for the getting initial heating rates.  Look at the final cooling rate for the thickness. If the glass can survive the cooling rate given without showing stress, it will also survive that rate of increase.  The mid-point between 90 and 45 is 67.5°C.  This gives an initial rate of advance (68°C) which can be applied for this piece that has so much shading of the base layer. It should allow the heat to transfer through the white to the base layer without great temperature differences between the covered and the uncovered base layer.

As there is a lot of work in this piece, and it is for someone else, you can be cautious.  Introduce a soak at 260°C of about 30 minutes.  This will help to ensure the heat is distributed to the bottom layer.  If you want to be even more cautious, you can introduce a second 30-minute soak at 371°C before continuing to 540°C.

At 540°C you have passed out of the brittle zone of glass and can increase the rate of advance to 167°C per hour.  The amount of heat work you have put into this piece by the slow rate of advance may enable you to complete the tack fusing with a soak at 720°C.  You will need to observe when the appropriate amount of rounding has been achieved. You will then be able to advance to the annealing portion of the firing. 

For this piece, the annealing soak will be for 5 hours with a cool of 11°C per hour for the first 55°C. Then 20°C per hour for the next 55°C and a final cool of  65°C per hour. This anneal and cool will be about 21 hours, in addition to the ca. 21 hours, in addition to about 10 hours heat up, so don’t expect a quick firing.  Plan two days for the tack fuse.


Slumping
Slumping will need care too.  The piece has uneven layers and the same care is required as for tack fusing.  Experimentation has shown me that scheduling for an additional 3mm (1/8") is needed to ensure the piece is thoroughly heated throughout its thickness.  In addition, the white is stiffer than the other colours and will not bend so easily.  This kind of slow schedule means the glass will be at the same temperature throughout as the slumping starts.

Because of the slow rates of advance, you may be able to slump this piece at 620°C with a significant soak time.  You will need to observe when the piece is fully slumped.  Be prepared to advance to the annealing and cool segments of the schedule.  Some times you need to extend the hold time.  Be prepared for this too. The annealing time and cooling rates will be the same as for the tack fusing.

Further information is available in the ebook Low Temperature Kiln Forming.


Wednesday 29 September 2021

Tacking Freeze and Fuse to Base Glass


The question has been asked:

I'm wanting to add some freeze fuse pieces on to float and just fire to a tack fuse … in one firing instead of two …[to avoid] losing the detail on the freeze fuse pieces. The top temperature on freeze and fuse is 720°C versus a … float tack temperature of 787°C. [can this be done?]

My response:

What you are doing with the freeze and fuse process is sintering the glass particles together by holding at a low temperature for a very long time.  This binds the glass together without altering the overall shape of the object. 

Sintering
There is no reason why you cannot sinter the freeze and fuse piece on top of a base glass, if you pay attention to one major thing.  The freeze and fuse object will shade the heat from the base glass.  If you do not slow the rate of advance enough, you will break the base glass by creating too great a temperature differential between the part under the freeze and fuse piece and the uncovered part.


Another element to be considered, is that the frozen object is damp.  This will need to be dried by a slow ramp or it will further complicate the uneven heating problem.

Scheduling the Rate of Ramp
Choosing the rate of increase in temperature is determined by the dimensions of what is being sintered.  One widely practiced method is to double the total height and fire for that dimension.  For example, if the freeze and fuse is 8mm high, add that to the 6mm base and fire for 28mm – (6+8=14)*2 =28mm.

Another slightly less cautious approach is to multiply the total height by 1.5 and use the firing conditions for that thickness.

Determining the rate of advance for the thickness you have calculated – by either method - can be aided by using the Bullseye chart for annealing thick glass.  Look at the final cooling rate in the chart for the nearest thickness. In this case, use the one for 25mm.  The cooling rate is given as 90°C per hour.  If the glass can safely cool at that rate, it should also survive that speed of heating at the start.

If you chose the 1.5 factor, the thickness to schedule for will be 21mm.  This is between the 19mm and 25mm thicknesses given in the Bullseye chart.  The cooling rate given for 19mm is 150°C and and for 25 is 90C. As 21mm is almost the mid point between the two, you can halve the difference in rates (150 and 90) to give 120°C as the rate of advance. Although in both schedules using these rates of advance for the described circumstance, I would add a soak at 250°C for 20 minutes, to be cautious.


Remaining Parts of the Schedule

Sintering Soak
The length of soak for the sintering stage can be the same as the soak for the freeze and fuse, as you will be both sintering the glass pieces together and to the base glass too.

Anneal Cool
The annealing soak and cool should follow the rates given for the calculated thickness - in this case for 21mm or 28mm.

The Bullseye chart Annealing Thick Slabs can be used for all types of soda glass (which includes float glass) to determine the soak times and cooling rates.  You only need to make alterations for the annealing temperatures.  The annealing temperature I use for float glass is 540°C. 

The first two stages of cooling are 55C each, so simple subtraction from the annealing soak will give the temperatures for each stage of the cooling. If we use the calculated 21mm thickness, the soak time will be 3.5 hours at 540°C.  Then the Bullseye chart's displayed cooling rate of 20°C will apply from 540°C to 485°C, and the cooling rate of 36°C will apply from 485°C to 430°C. The final cooling rate of 120°C will be from 430°C to room temperature.  The chart for these adaptations is described in the post about adapting the Bullseye chart for annealing.  The reasons behind these operations are given in the ebook Low Temperature Kilnforming.