From time to time you will see the statement:
“CoE is the determinant of compatibility”
This is Not True!
I wish I could come up with something simple to counteract
this CoE fallacy, but glass is complicated and I can’t think of a snappy phrase
to help. To understand why the statement
above is false, some background on what CoE does mean and what range of temperature
it applies to is important.
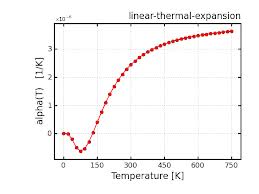
The coefficient of expansion can be a measure of either linear
or volumetric expansion. It is most
often conducted over the range of 20°C to 300°C. The result is expressed as an average over
this range. If there are variations in
rates of expansion, they are absorbed in this coefficient, ie., average. The measure is of the part of one metre the
material expands for each degree Celsius increase in temperature. In the glass community this coefficient is
expressed as two digits such as 83 which represents the expansion of glass by
0.0000083 of a metre for each degree Celsius change in the measured temperature range.
Note the temperature range over which this is measured – up
to 300°C. This coefficient works well
for crystalline solids, but not for glass.
Amorphous solids do not have linear expansion rates throughout the
working range of temperatures. Room temperature to 300°C is not a critical
temperature range for glass. After all, many of us turn the kiln off around 370°C.
This means that the CoE measured up to 300°C is not really relevant to
us, as we have discovered that the expansion rates for 6mm or less thick glass are
not critical below 370°C.
Annealing range
The CoEs at annealing temperatures – the critical range for
glass - are in the 400 to 500 range.
Critical temperature range for CoE
The Coefficient of Expansion is more important at the glass
transition point. This is the temperature at which the molten material becomes a
slightly flexible solid. The CoE and the viscosity interact in this range. It is critical, as the opposing
forces of viscosity and CoE must balance. The CoE is adjusted by the manufacturer to create this balance. It shows that CoE is dependent on the viscosity of the glass. And the characteristics of each colour must also
match all the other glass in the range of tested compatible fusing glass. This
is not a simple thing to do. If it were,
there would be lots of companies doing it.
Experience of moving to a single CoE for fusing glass
The Bullseye experience of attempting to achieve
compatibility across a range of glass in the early days of making fusing
compatible glass showed that less compatibility was experienced when the colours had
matching CoEs. Lani Macgreggor describes this experience well in this blog, “Eclipse of the Fun”.
An expert’s explanation
A Bullseye article by
Dan Schwoerer - possibly the major expert on making compatible glass - on achieving compatibility through compensating
differences is the key to understanding the balancing of CoE with the viscosity. It is on the Bullseye site
as Tech Note #3.
There is a more impassioned description of matters relating
to compatibility in five linked blogs by Lani Macgregor in the To BE or not
BE blog.
Manufacturing to a range of CoE
Spectrum long ago stated that the CoE of their glass
ranges up to 10 points to achieve a compatible range of
fusing glass. This is probably true for
every manufacturer of fusing compatible glass.
Why CoE is NOT the determinant of fusing compatible glass
The things that mean CoE cannot be the determinant of
compatible glass are:
- ·
The coefficient is for an
inappropriate temperature range for glass.
- ·
The
critical temperatures for expansion are in the annealing range, for which there
are no widely published figures.
- ·
The
expansion rates need to be adjusted to match the viscosity in this annealing
range.
- ·
A
major manufacturer has indicated their glass, known by the CoE of its fusing
standard glass, has a 10-point range of CoEs within their fusing range.
It is not
true that CoE is a determinant of compatibility.
CoE is an
inappropriate number to indicate compatibility.
It does not guarantee compatibility.
It is a suspiciously accurate number leading people to erroneously
believe any glass labelled with a given number will be compatible with any
other with the same number.
Other blog posts on CoE:
CoE does not determine critical temperatures:
Demonstration that CoE does not determine annealing or fusing temperatures:
Absence of any correlation between specific gravity and CoE: