Wednesday, 5 April 2023

The Importance of Three-Stage Cooling

It is common to think of cooling after annealing as a simple single cool rate to an intermediate temperature between annealing and room temperatures before turning off. This most often works well for full fused pieces up to 6mm/0.25. But as the pieces become thicker or more complex, the need for more controlled cooling becomes necessary.

 The aim of annealing is to get the glass to be the same temperature throughout its substance during the annealing soak. This is called the ΔT (delta T).  This difference has been shown to be 5°C to avoid high levels of stress.  Therefore, ΔT=5°C/10°F.  This difference in temperature needs to be achieved during the annealing soak and maintained during the cool.

 The object of controlled cooling is to maintain this small difference in temperature. It needs to be maintained throughout the cool to avoid inducing excessive stress in the glass, even if the stress is only temporary.  

 As the thickness or complexity of the piece grows, the annealing soak needs to be longer and the cool slower. The first cool is critical to the production of stress-free fused glass. That is the fastest rate that can be used in a single or multiple stage cooling. If you use that rate all the way to 370°C/700°F you will need at least 1.3 times longer to get to that temperature than if you used the first two parts of a 3-stage cool. This time saving becomes greater as complexity and thickness demand slower cool rates. It is not only time that is saved.

 The risk of breaks from rapid cooling after the anneal soak and to 370°C/700°F increases with more complex and thicker pieces. Although the stress induced by rapid cooing below the strain point is temporary, it can be great enough momentarily to break the glass. This is so even if the glass meets the ΔT=5°C/10° during the annealing soak.


Examples may help understand the cooling requirements of glass that it thicker, or tack or contour fused.

Example 1

A 12mm/0.5” full fused piece needs a two-hour annealing soak, followed by three cooling rates of 55°C/100°F per hour, 99°C/180°F hour and finally 300°C/540°F per hour. The first rate is for the first 55°C/100°F, the second rate for the next 55°C/100°F, and the final rate is to room temperature.

 What happens here is instructive as to the reasons for soaks and cool rates. In this recorded example the ΔT at the start of the anneal is 7°C/12.6°F. During the soak, the ΔT reduces to as little as 2°C, but ends with a ΔT=3°C. The 55°C/100°F cool rate over the first 55°C/100°F enables the ΔT to remain between 3°C and 4°C.  The second cool over the next 55°C/100°F maintains this ΔT of 3°C to 4°C. During the final cool the ΔT varies from 5°C to 1°C.


An example of the variation in ΔT during the first 55C/100F of cooling

Example 2

A rounded tack fuse of 1-base and 2-layer stacks gives a total of 9mm/0.375”. Research has shown that you need to schedule for twice the actual thickness for rounded tack fusing - so for 19mm/0.75”.

This requires an anneal soak of 150 minutes, and a first cool of 20°C/36°F. The second cool rate can be increased to 36°C/65°F. The final rate can be at 120°C/216°F per hour to room temperature.

 The ΔT at the beginning of annealing was 7°C/12.6°F and at the end of a 2-hour soak was a ΔT of 1°C/2°F. The first cool ramp was 20°C/36°F per hour and gave a variance of between 2°C/3.6° and 0°. The final cool produced variances of up to 6°C/11°F, ending at 88°C/190°F with a ΔT=2°C.

 The first two stages of cooling save 1.27 hours of cooling time over a single stage cooling of 20°C/36°F to 371°C/700°F. It still keeps the glass within that ΔT=5°C. More importantly, the third stage cooling is able to keep the variance to between 6°C and down to 2°C.

 The natural (unpowered) cooling rate of my 50cm/19.5” kiln at 370°C/700°F is 240°C/432°F per hour. It settles to the 120°C/216°F per hour only at 200°C/392°F. This is a fairly typical cooling rate for medium sized kilns. This rapid cooling at 370°C/700°F creates a greater risk of breakage than the controlled cool.


An example of the ΔT during the second 55C/100F of cooling

Example 3

A sharp tack or sintered piece with two base layers and two tack layer stacks on top requires firing as though 30mm/1.18”.


 This needs a 4-hour soak during which the ΔT varied from 8°C to 4°C. The first cooling rate was at 7°C/12.6°F and gave a ΔT variance of 4°C to 2°C. The second cooling rate of 12°C/22°F produced variances of 3°C to 1°C by 370°C/700°F. The final cool of 40°C/72°F per hour gave differences ranging from 5°C to 0° at 110°C/230°F.

 Note that the test kiln’s natural cooling rate does not achieve the third cooling rate until 140°C/284°F.  This shows that turning off the kiln at 370°C/700°F produces a high risk of breakage for thick and complicated pieces.  In addition, the two stage cooling rates saves 3.27 hours of cooling time.


An example of the ΔT during the final stage of cooling to Room Temperature

 The temperature differentials below the strain point can exceed the ΔT=5. The stresses induced are temporary according to scientists. But they can be great enough to break the glass during the cooling. It follows that the anneal soak may have been adequate, but the cool was so fast that excess stress was induced by the differential contraction rates. This stress being temporary, implies that testing for stress in a broken piece may not show any. The momentary excess stress will have been relieved upon cooling completely to room temperature.  (IMI-NFG Course on Processing in Glass, by Mathieu Hubert, PhD. 2015 , p.9.)


More information on cooling is given in the book LowTemperature Kilnforming; an Evidence-Based Approach to Scheduling.


Wednesday, 29 March 2023

Frit Additions to Shaped Pieces

It is possible to stick frit to slumped pieces. But soaking for a long time – several hours - at 650°C/1200°F is required to stick the frit.  The added pieces will remain relatively sharp. You need to observe frequently from 600°C/1111°F to make sure that the form of the glass is not distorting. 

Credit: Pyramid Gallery, Smyth and Zebrak


Although it is possible, adding pieces to already shaped objects is not best practice, nor will it frequently give satisfactory results.  If the slump is shallow, it is more possible to do this successfully than steep or highly shaped forms.  But the most suitable practice is to flatten the piece, then tack fuse the pieces onto it. Follow this fusing with the new slump or drape.  This flattening process will not be possible with all shapes. 

The best results will be achieved by accepting what you have and make a new piece with the planned additions from the start.

This process will not be suitable for draped glass as the glass will drape further during this low temperature soak.


I've a book that gives more detail. Low Temperature Kilnforming, an evidence based approach to scheduling  or at Bullseye


Wednesday, 22 March 2023

Kiln Choices

There are a lot of considerations when you are preparing to buy a kiln. Often the advice to people buying a new kiln is to “buy the largest you can afford,” or “x kiln is great, and they have good service.”  These are general advice, not directly applicable to your needs.

More important is to think about buying a kiln that suits your kind of work. This might be:

  • Flat and shallow sumps
  • Small and detailed work
  • Powder and other work that needs detailed assembly and little movement
  • Deep slumps/ tall drapes
  • Drop-outs and melts
  • Large scale panels

These kinds of work are determinants for the size and depth of kiln you require. Even if you were to later decide on a larger kiln, the first kiln will continue to be valuable. And having a choice of kilns means you can use the one most suitable to the work.

The way you assemble your work will affect your choice of how the kiln opens. The most common styles are:

  • Front door     
  • Top lid    
  • Clamshell/Top hat

Each has its advantages for different types of work.

Kiln depths are variable. Shallow kilns are easier to load. Deep kilns give more possibilities for casting and drops. It is possible to raise shelves on posts in deep kilns for flat work, making deep kilns flexible for both kinds of work.

The scale of your work will have a big effect on the kiln size. The larger the scale the bigger the kiln will be needed. But be careful to avoid “buying the largest you can afford” attitude. Kiln sizes vary:

  • Tiny
  • Small            
  • medium  
  • large
  • extra large

 These are some of the considerations that have been organised into two grids. They are an attempt to organise by the kind of work you intend to do with this kiln - drops, casting, jewellery, etc. It then lists the choice by kiln characteristics such as size, opening method, insulation, etc. Some of these characteristics will not be relevant to you at this time, but may be later.

A range of kilnforming styles are given across the top and kiln characteristics down the side of the grid. Where the kiln is very good for the kind of work given at the head of the column a “Y” is entered.  Where the kiln is definitely not suitable a “N” is given. Where neither of these are given, the kiln will do the work acceptably, but not in an optimum manner.


This second grid relates to controls and various features that kilns have added to the basic kiln. It provides you with a checklist of items that might be desirable and allows you to compare different brands of the same shape according to the additional features they have or can have added.


Wednesday, 15 March 2023

Circles – Some Methods of Scoring and Breaking Out

 Scoring the circle

Setting out the centre point and radius of the circle

Set up a centre point. You can do it by estimating. But it is more accurate to measure a centre point that is at least 1cm from the edges. Use that crossing point to measure out the radius of the circle.


Setting out the circle measurements

Place the pivot point of the circle cutter on the cross hairs. Lock it into place.


Locking the pivot into place on the cross hairs

Adjust the cutting wheel along the length of the circle cutter bar to the marked radius. The measure marks on the bar are not always accurate and anyway wear away quickly.


Adjusting the scoring wheel to the correct length


Tightening the set screw at the top of the turret

Tighten the set screw.


Add a touch of oil to show the score line. Make a test circle by pushing the bar around with no pressure. This shows up any obstructions around the end of the bar. 

Preparing to test the sweep of the cutter arm

Score in an anti-clockwise direction. This avoids accidental loosening of the set screw if it is under the button or handle. 


Start with the scoring head under the arm with which you are securing the centre pivot. This allows you to do the whole score in one motion. The pressure you use should be no more than in your normal scoring.


Oil trace of the score can be seen in the upper left quadrant


Running the score 

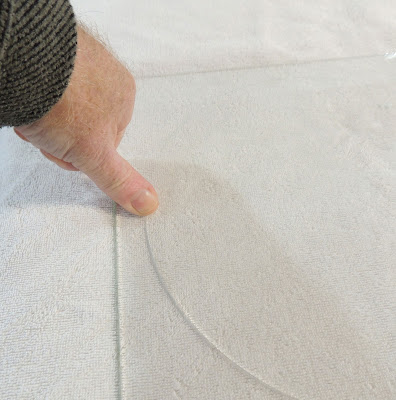
Running the score is a glazier’s term to indicate the way in which a scored line gradually separates under gently applied breaking pressure. This can be seen when gently applying pressure with cut running pliers. The score line is made progressively visible by the gradual separation of the glass. This results from the light passing through in a different way than when it is not separated from top to bottom.


The glazier’s method to get a clean break of a circle is to score on one side with a trace of oil. Then turn the glass over and press with your thumbs on the score line. Running the score from the back requires a little skill and a certain amount of courage or determination.

The object is to bend the glass just enough to crack it along the score without breaking it anywhere else. The best surface is a short pile carpet square, a rubber mat or a single layer of towel or an unfolded newspaper. These provide a surface with a little “give” to allow the glass to deform.

But if you have too soft a surface, it is easy to break through the circle. A too soft surface is given by a household carpet, several layers of towel, or any other surface with a lot of “give” to it.

You may need both thumbs to start the run depending on the pressure you can exert. Try one thumb first. If that is not enough use both thumbs.


At the start of the second pressure point

If you place your thumb opposite a corner, you have greater leverage to start the run of the score. This leverage makes the running of the score easier as less pressure is required. You will hear a loud click at the opening of the first part of the score. 

Score has been run completely around the circle

Continue around the circle by pressing at the end of the opened score, until the whole score has been run. You may hear quiet clicks as the score opens. Other times there will be no sound, but you will see the score run away from the pressure point.

Once you have run the score from the back, turn the glass over to have the scored surface up. This makes it ready for the relief scores. It is much more successful if all the scores – circle and relief - are made from the same side. Unless you are scoring float or other glass that is smooth on both sides, this flipping back will be the easiest anyway.


Make the relief scores on the front.. Sometimes only one relief score is required to release the circle from the surrounding glass.


Another method is to cut the corners off so that you have an octagon around the circle. This gives you the opportunity to run the score from the top with breaking pliers. Ease the score open progressively around the circle.

Opening the score with pliers

This method is easiest for opalescent glass where you cannot see through to the score. By opening the score from the top, you do not have to estimate where the score line is. You can see the oil trace indicating where the score is and where to place your breaking pliers. 

You should start at a place where there is only a centimetre or two between the edge of the glass and the score. This may mean that you have to move around the broader areas of the rim so that the score runs both back to the first opened score and forward. It is in effect, opening a new score four times. But with gentle persuasion the scores will run toward one another. Do not use heavy pressure in griping the pliers, or in bending the glass. Gradually increase the bending pressure until you hear the click of the glass separating.

These two methods of running the score give the cleanest break-out of circles.


Relief scores

There are multiple ways to create the relief scores.

Perpendicular

Score by drawing the cutter from the circle out to the narrow edge, leaving a small gap between the opened score of the circle and the start of the score.


You can also score a longer line to the corner. Again, leave a space between the circle and start of the relief score.


Tangents

 A third way is to score tangents from the edge to the opened score of the circle. 


Tangent scored from both sides of the circle

Tangent broken from both sides of the circle


Alternatively, score a first tangent and run the score

Further tangents scored and broken away

All the tangents run and broken away 

This reduces the risk of breaking through the centre of the circle. But it does leave little nubs of glass at the point of each tangential score. And for that reason alone, is the least satisfactory of the methods of breaking out circles.    

In each of these methods of running a relief score, you need to tap under the relief score to run it to the edge of the circle. Normally, the quarters or other fractions will drop out one by one. Occasionally the rim will drop away after the scores of the first two quarters are run.


Breaking out without running circle first

There are at least two ways to cut a circle without running the circle score first.

The first is to cut the corners off the glass to create an octagon, but do not run the score.

First corner scored and removed


The four corners removed


Starting to run the circle with breaking pliers

Then use breaking pliers to run the scored circle. Once the score is run, make a single or multiple relief scores, and carefully run it. the circle can then be removed from the octagonal rim. This provides a clean cut.


corners and rim removed 

It does not risk breaking through the scored circle to the interior when tapping the relief score.

Many people run scores at a tangent to the circle without having opened the score of the circle. These are then run, in turn, to and along the edge of the scored circle.

They can then be broken off in turn, if they don’t simply fall off when they all are run.


tangent removal 

Finally, some people tap under the scored circle to run the score, as in the first of the tangent removal methods. This leaves shells – or ledges – on the glass circle. These must be removed by grozing or grinding. Grinding leaves a rough surface which takes copper foil tape less well than clean cuts. It also increases the possibility of devitrification when fusing.


Tapping leads to shells as in the centre left of this picture

The least satisfactory method of running the score of a circle is to tap under the score before breaking the circle out.


In conclusion, running the scored circle first and without tapping will provide you with the cleanest cut circle. This will be so however your make your relief scores. But, making relief scores before running the circle score risks breaking through the circle.

Finally, it should be noted that cutting out larger circles is easier than cutting small ones. Better, cleaner results are obtained because the curves are less tight.


Wednesday, 8 March 2023

Annealing Soaks are Related to Cool Rates

Good annealing is important to the success of each firing of a piece. 

This is generally agreed.


I do not understand the reasoning of those who use long anneal soaks followed by quick cool rates and early shut offs. I don't understand because reasons are not given. Or the reasons are in the realm of kiln fairies and other mythical beings.

The length of the annealing soak can be determined from established sources. The Bullseye table for annealing thick slabs gives the recommended soak times for evenly thick slabs of glass from 6mm/0.25” to 200mm/8.0”. Use that to determine the annealing soak time.

The soak times do not need lengthening except for pieces of uneven thicknesses. The ebook Low Temperature Kilnforming gives the calculations for variations in thickness and degree of tack. Generally, they are 1.5 for contour; 2 for rounded tack; and 2.5 for sharp/angular tack. Excessively long soaks are not desirableThis is additional evidence that long soaks and quick cools create problems.


The Relationship Between Soak and Cool Rate

Use of the Bullseye table shows that there are cool rates associated with the soak times. These rates for the length of annealing soak need to be used, as they are based on research, rather than fingers in the air or mythical beings.

My experiments have shown the need to control the cooling rates to at least 50C before shutting off. The end of an adequate annealing soak has the glass within 5°C/10°F of each other part (the ΔT=5). The slow cool for the first 55°C/100°F below is important to avoid exceeding that maximum differential. The rate for the next 55°C/100°F is faster and can allow a wider ΔT, as the stresses are temporary. But they can be great enough at any point to break the glass during fast cools. Therefore, the rates associated with the annealing soaks cannot be exceeded safely.

Do not just use "what works" for others. Use information based on research. The only company publishing research is Bullseye. Their research is applicable to all fusing glass with the appropriate temperature adjustments. 

If you use long annealing soaks and quick cool rates or ones that stop at about 370°C/700°F, you risk breakages of your glass. There is no reason to take that risk.  Also long cools from annealing to 370°C take longer than the staged cooling recommended by the Bullseye research.


More information is available in the ebook Low Temperature Kilnforming.


Wednesday, 1 March 2023

Garden stakes

Credit: Terry Gomien


There are a variety of ways to make attachments for garden stakes. If you have a kiln, you can make a slot in the glass for the stake.

The procedure is to cut a short piece from the rod. Wrap it with thinfire or Papyros. Leave a fraction of fibre paper over the end of rod that is between the glass layers. This ensures there is a bit of separator between the end of the rod and the glass. Place the wrapped piece of rod between layers of glass and fire. When the firing is complete, pull the stub of rod from the glass. Clean the channel created well. When the slot is dry, apply adhesive to the cavity and insert the rod. Allow to cure.

Be careful about the diameter of the rod. The thicker it is, the more layers of glass are required to enable the glass to contain the stress.  A 3mm/0.125” rod needs at least one 3mm/0.125” layer of glass each side to be strong. Thicker rods need more layers each side.

The thicker the rod, the deeper into the glass the slot needs to be.  The slot for a 3mm/0.125” rod needs to be about 25mm/0.5” deep/long. Thicker rods require much longer/deeper channels.

It is possible to create square channels by placing fibre paper cut to be slightly larger than the diameter of the rod to be inserted. This is not as accurate as wrapping a stub of the rod, but has less risk of breaking the glass around the rod during firing.


Channels within the glass are much more secure than external attachments for garden stakes.


Wednesday, 22 February 2023

Breaks Early in Firings

 My pocket vases keep breaking underneath the fibre paper. What can I do?


If a pocket vase is going to break it most likely will be in the brittle phase of the glass. This is usually from too fast heating. It, more rarely, can be too fast cooling. This happens as the glass is moving from or into a solid.  It is an extreme case of shading heat from the lower layers.

The general condition

As the temperature rises, glass becomes a little less brittle. The viscosity of the glass reduces. This can also be expressed as becoming less brittle. Due to its excellent insulating properties, glass transmits heat slowly through its substance. This means that the expansion differences within the glass are greatest during the coolest part of the brittle phase.

The brittle phase is described as glass temperature being below the strain point. Then strain point is the temperature at which the glass exits the brittle phase. This temperature is about 540°C/1000°F for fusing glasses. It is higher for float and bottle glass.
The effect of shading heat from the lower parts of the piece is to induce different rates of expansion within the glass. The riskiest part of this temperature range is the lower part of the brittle phase. This is where the viscosity is highest and the rigid structure is easily broken by different expansion rates. This has been empirically observed by Bob Leatherbarrow and others to have greatest effect below 300°C/573°F. So, slow ramp rates are advisable to at least this temperature. Some continue this slow ramp rate to the strain point before increasing the rate.


Credit: Latta's Fused Glass


Pocket Vases

The effect of the differential expansion shows most obviously in pocket vases. This is a construction where fibre paper is inserted to create the pocket between two sheets of glass. This leaves the lower part of the glass under the fibre paper insulated from the heat. The other parts are left exposed to the radiant heat. While the exposed glass is getting hot, the covered glass is still cool. This sets up the conditions for the maximum differential in expansion rates. The differential in expansion causes the glass to break – usually it is the bottom piece that breaks. A major reason to schedule for at least double the glass thickness of a pocket vase is this shading effect. Slightly different calculations apply to tack fusing where there is no insulating layer between glass sheets.


The care in scheduling applies both to the first ramp rate and to the cooling rates of the fired piece. Fast cooling will leave the area covered by the fibre paper much hotter than the exposed glass. The difference in contraction can break the glass on the cool down too.


More information is available in the ebook Low Temperature Kilnforming; an Evidence-Based Approach to Scheduling

Wednesday, 15 February 2023

Conditions for Re-firing Kiln Wash

I do not know the exact chemical changes of kiln wash at fusing temperatures.  But I do suspect it has to do with the kaolin.  The aluminium hydrate is stable to much higher temperatures (melting point of 2,072°C/3,762°F).  So, I don't believe that part of kiln wash is changing. 

The Influence of Kaolin

Some reading has led me to learn that by 600°C/1113°F the kaolin begins going through a non-reversable chemical change.  Prior to that, water can rehydrate the kaolin.  In the hydrated state kaolin forms hexagonal plates that can slip over one another.  Once 600°C/1113°F has been exceeded the crystallisation formed cannot be reversed. It is a gradual process.  It does not become fully crystalline until 935°C - 950°C/1717°F - 1744°F. The crystallisation stops the lubricating effect of the kaolin.  I suspect that on the second full fuse firing these crystals (which contain silicon dioxide) interact with the glass (also silicon dioxide) and stick to the glass.  Although it does not fully combine with the glass.  Why this does not happen in the first firing, I do not know.

The fact that the crystallisation cannot be reversed must be the key as to why kiln wash with kaolin cannot be re-used once fusing temperatures have been reached.  The crystallisation at 800°C/1473°F is nearly complete.  It begins to exhibit the "stickiness" to the glass.  

People who consistently avoid contour and full fuse firings find they can get more than one firing from kiln wash.  This will be because the crystallisation is only partially completed.  But it indicates that repeated tack fusing on kiln wash will ultimately fail as the crystallisation will gradually increase with each firing.  The number of firings possible on one coating of kiln wash will be dependent on temperature and times, among a few other things.

However, at slumping temperatures, it appears the crystal formation is so slow as to have no effect with multiple firings.  Many people experience no difficulty with kiln wash sticking to the glass over many firings, when low temperatures are used.  High temperature slumps will reduce the life of the kiln wash (where life is taken to mean the degree of crystallisation).


Picture Credit: Amazon

Avoiding Kaolin

There are of course, ways to avoid kaolin. There is a kiln wash, called Primo Primer that does not have kaolin in it. And you could make your own kiln wash from aluminium hydrate. This is known as slaked alumina in ceramics. It can be used on its own with or without a medium to assist the smooth application of the kiln wash.  One good medium is CMC.

When selecting the aluminium hydrate, be aware there are finer and coarser particles.  The grades used in ceramics are usually coarser than glass people want. But it can be made finer by putting it in a rock tumbler with stainless steel ball bearings. You can run the result through a fine screen. Mix with water to brush on, or sprinkle dry over the shelf. Both these can be re-used. Neither provide as smooth results as when the kiln wash contains kaolin.

Chalk, also known as whiting, is calcium carbonate. This is often used as a separator in vitreous paint firings and some forming operations. It has low solubility in water, so cannot be painted onto shelves or moulds. It needs to be used as a loose or compacted powder. It goes through chemical changes too, making renewal after firing advisable. Above 800°C/1473°F calcium carbonate changes to calcium oxide, or quicklime. This corrosive form is another reason it is disposed of after any higher temperature firings.

Kiln wash and calcium carbonate can be fired many times at low temperatures, because their chemical composition remains relatively stable. Once higher temperatures are used, chemical changes occur. This seems to enable them to stick to the glass or form undesirable compositions. This phenomenon requires removal and re-coating of shelves and moulds after full fuse firings.  Their advantages are ease of use and low cost.

Wednesday, 8 February 2023

Annealing Tack Fused Pieces

"I'd like advice about annealing. I'm about to start a series that are to be wall hangings. The outside 100mm is only 3mm thick and the centre is 6mm and occasionally 9mm thick. They are going to be A3 and A2 size. I intend to tack fuse. I'm happy to experiment with the tack fuse temperature (I think about 677°C). How long should I anneal it? That's my question."

Determining the Tack Temperature

The high end of slumping, and the low end of sintering is 677°C/1252°F. Unless your kiln fires very hot, this is not hot enough for a tack fuse. Make some small-scale mock-ups in clear. Schedule the kiln to a full fuse on a rate not more than 300°C/540°F per hour. Peek into the kiln at 10°C/18°F intervals from 677°C/1252°F upwards. When you see the profile you want, note the temperature. When scheduling the tack firing, reduce the target temperature by 5C and add a 10-15 minute soak to get approximately the same result as you observed in the test firing.


Scheduling to Avoid Dog Boning

You have a border of 100mm/4.0” that is only one layer thick. This has the risk of becoming irregular at the corners compared to the sides (dog boning). To avoid dog boning of the 3mm base, the lowest temperature you can use is important. This is the main reason for the peeking – to determine the temperature at which dog boning begins. It is not only the degree of rounding of the edges you are looking for, but also the degree of retraction of the sides of the piece. When you note the beginning of the dog boning, you have reached just beyond the temperature to avoid that.

You will of course have to set the mock-up in such a way that you can see at least one side through the peep hole. The front will not give you accurate information, but if the side is in your sight line, you will see when it begins to deform. This peeking will keep you occupied for about 3/4 hour. Make sure you have gridded paper and pencil to hand to record information in between peeking.

It may be that the glass has not begun to round when the dog boning starts. In this case you will need to make the border larger and cut the glass back to straight lines. 20-30mm/0.75-1.125” extra all around will make it easy to trim the excess cleanly.

Annealing

I do not know the degree of tack you are aiming to achieve. It is important to the scheduling of the anneal. A sharp tack profile will require annealing for longer than a contour profile for your thicknesses. These suggestions assume the total height is 9mm/0.375”. If it higher, the soak and cooling times and rates will be longer and slower.

A sharp tack profile will need:

  • Annealing for 270 minutes (4.5 hours) with a cool rate of:
First 55°C/100°F cool at 13°C/23°F per hour.
Second 55°C/100°F cool at 23°C/41°F per hour.
Final cool at 78°C/140°F per hour to room temperature.

A rounded tack profile will need:

  • Annealing for 180 minutes (3 hours) with a cool rate of:
    • First 55°C/100°F cool at 25°C /45°F per hour
    • Second 55°C/100°F cool at 45°C /81°F per hour
    • Final cool at 150°C /270°F per hour to room temperature.

A contour tack profile will need:

  • Annealing for 120 minutes (2 hours) with a cool rate of:
    • First 55°C/120°F cool at 55°C /99°F per hour
    • Second 55°C/100°F cool at 99°C /178°F per hour
    • Final cool at 330°C /216°F per hour to room temperature.


More detailed information is in my eBook Low Temperature Kilnforming, An Evidence-Based approach to Scheduling. It is available from VerrierStudio on Etsy or through Bullseye

It is not cheap, but at 300pp worth it (in my opinion!). It discusses the three profiles of tack fusing - sharp, rounded, contour. It also deals with slumping, sintering, freeze and fuse, and bas relief or texture mould firings. The method for determining schedules is outlined and specific sample schedules are listed.

Wednesday, 1 February 2023

Grinding out Chipped Edges

Sometimes the edge of a drop vase is chipped during the polishing process, or more frequently, during use. What to do?

 Grind the edges down until the chip disappears. This seems like an obvious statement. But it is often overlooked.


The grinding can be at a slight angle to the length or parallel to the base of the piece. The angled grinding removes less glass but needs a jig of some sort to keep the angle consistent. The difficulties of obtaining a consistent angle grind, makes grinding a flat edge simpler.

 You can do this flat grinding and polishing by hand in only a half hour or so. Although a flat lap or belt sander will enable you to do it more quickly.

 You have to be careful while griding, especially when using the rough grits, to avoid small chips on the new edges. One trick I learned is to make a small bevel or chamfered arris the edge before doing the flat grinding.


Credit: www.pavingxpert

 If it is a large or deep chip you are grinding away, you will need to do it in stages.

 You do not want a large arris at any stage. It is possible to create such a large arris that you have to grind more glass away than the original chip would have demanded. When the grinding comes close to the end of the arrised edge, stop. Make a small arris on the edge again before continuing to grind the face. Repeat this as often as required until the chip is removed. 

 Make this arris at the start of every finer grit. The arris will not need to be so big as for the first, rough grinding. You are not taking off as much glass on the surface. But the arris will prevent tiny chips appearing at the edge of the polished surface.

 I give a final arris the polished edge. This gives a pleasant roundness to the edge. It also keeps the edge from being delicate and subject to further chips.