Showing posts with label Fused Glass in Glasgow. Show all posts

Wednesday, 18 March 2020

Candle shades


These kinds of drapes are generically known as handkerchief drops, as they form the kind of shape that is formed by holding the cloth in the middle and letting it drape.  They can be done as small drapes over kiln posts, cocktail shakers, and much larger forms.


Two heights of new cocktail shakers


A well used cocktail shaker with kiln wash


A kiln post wrapped in preparation for firing


Two short kiln posts after firing


When preparing several drapes to be fired at one time you need to consider several factors.


Higher in the kiln is hotter.
The heat in a kiln, as in an oven, is greater the higher in the kiln is supported.  This means that taller supports will drape quicker than shorter ones. The consequence is that all the drapes should be of the same height.

A single layer that has begun to stretch at the shoulder of the former 


Larger spans fall quicker than smaller.
The more of the glass that is unsupported, the quicker it will fall, even at the same height. This is because the larger amount of unsupported glass has more mass than a smaller one and so falls quicker.  Plan for all the glass to be of similar sizes.

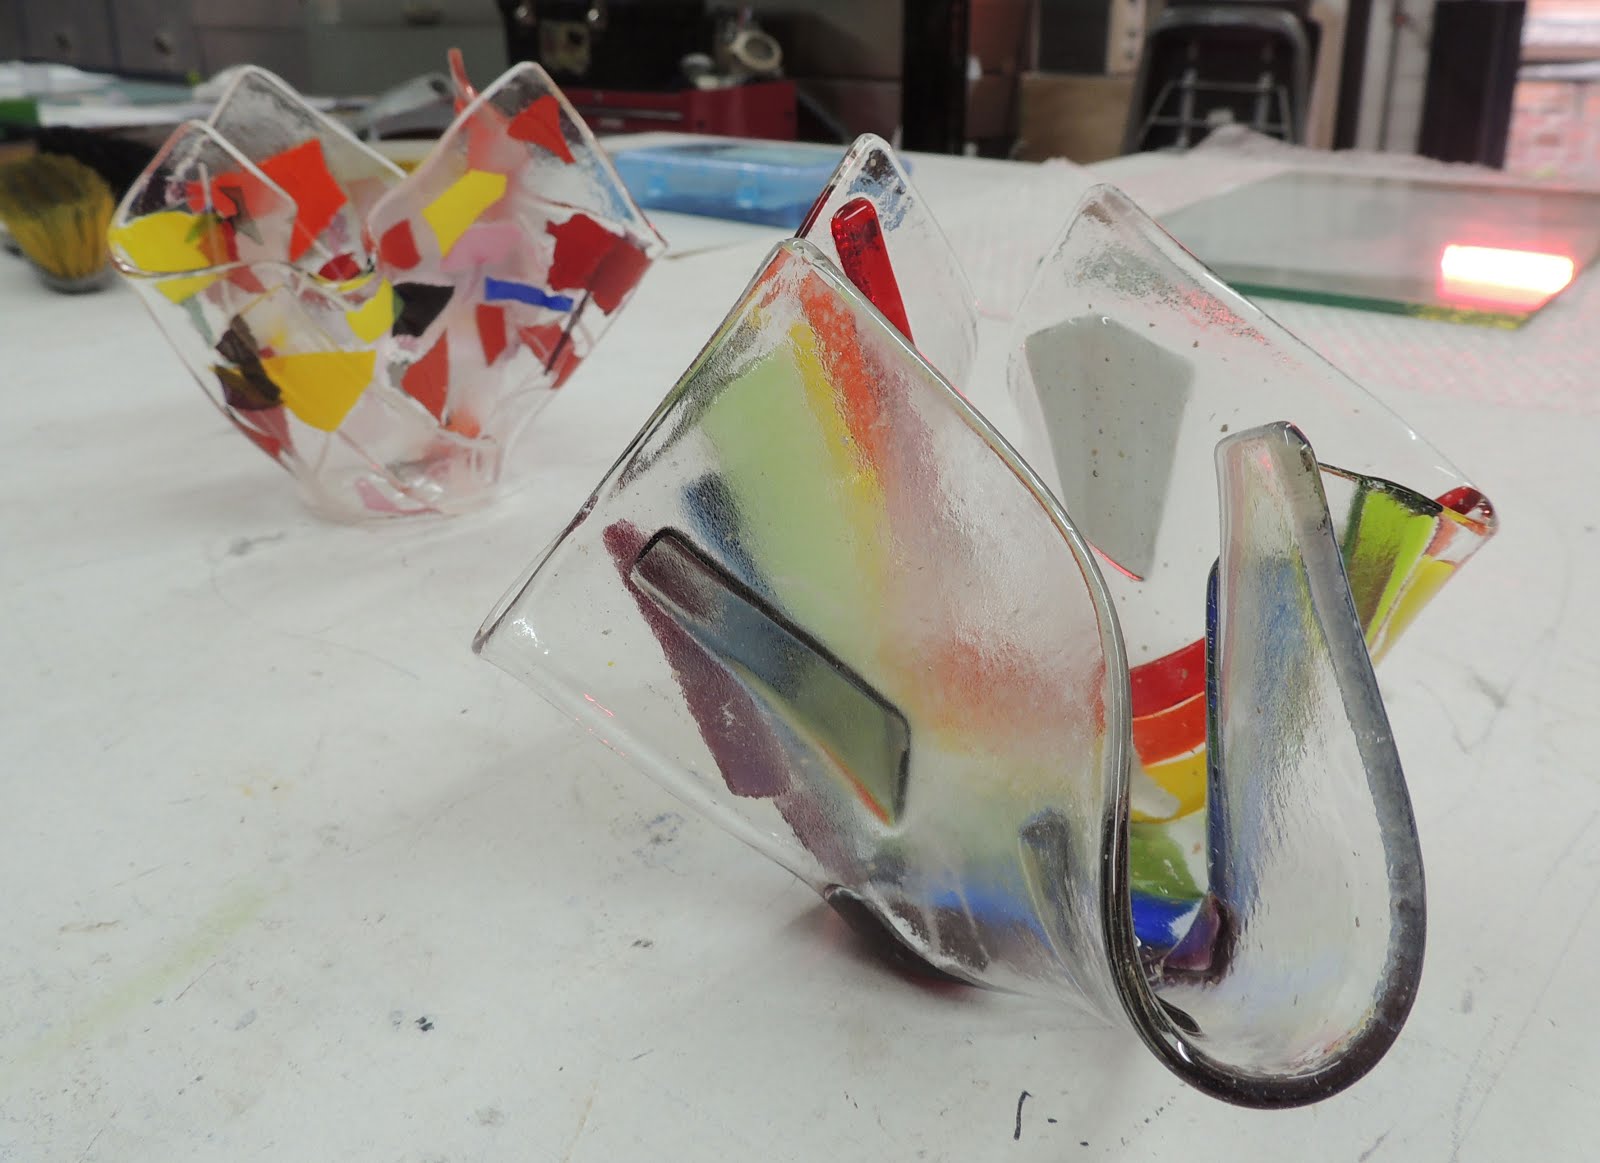
These two were fired at the same time. The back one is larger than the front 


Different shapes fall in different ways.
Squares and circles are the most common shapes used in a  drape. The corners of squares are points that are further away from the centre of the support than the sides.  These points begin to fall first, drawing the sides in later in the firing.  Circles form a taco shape before the ends of the “taco” begin to fall.  This deformation of the circular “taco” takes longer than a square takes.

Care needs to be taken that the glass does not thin excessively at the shoulder of the support.  There is less difficulty, if the same shapes are fired together as different heat work is required for each shape.


Observation by peeking is required to stop free drops at the right time.
As in all drapes, it is important to observe the progress of the drape at intervals.  This is best done by quick peeks to note the development of the shape and to move to the cooling segment when the drape is complete. This also requires a scheduling of a long soak and knowledge of how to advance the kiln controller to the next segment of the schedule.

Wednesday, 18 December 2019

Annealing Range for Unknown Glass

It is possible to anneal unknown glass with some degree of certainty by using what is known as the slump point test.  This will not be as accurate as a factory determined test, so you do have to extend the range over which you do the annealing.  

The annealing of glass with unknown characteristics is possible in two ways - shotgun and calculated.  The examples here are for 6mm thick glass.  The soak and cooling times need to be extended for thicker glass.  


Both the shotgun and calculated approaches exemplified here assume glass of 6mm thickness.  For thicker glass the soak time needs to be extended and the anneal cool rate slowed more than indicated above.  Using the Bullseye chart for annealing thick slabs will give you an indication of the relationship of thickness to speed.


1)  One is the traditional shotgun approach – pick an arbitrary, but slightly high temperature, and soak for a minimal amount of time there. Then go very slowly through the next 55°C.  This may be as slow as 25°C per hour, followed by a doubling of that rate for the next 55°C. Then double again to 300°C or less.

2)  By using the slump point test and the calculations, you will be sure of the annealing point/temperature equalisation point within 10°C.  The approach here would be to soak for half an hour at the calculated temperature, followed by a slow drop of 50°C per hour to 55°C below annealing soak and then at 100°C/hr to 110°C below your chosen temperature equalisation point. The final cooling could be at 200°C to room temperature.

2a) An additional tweak to the slump point test calculations is to use the Bullseye concept behind their recommendations for thick slabs.  Using their concept, you reduce the calculated annealing point by 30°C from the calculated annealing point to do the temperature equalisation soak at the lower end of the annealing range.  Having calculated the annealing point, you reduce that temperature by 30°C and soak for  a longer time of 60 minutes and at a slower rate as noted in the chart.

In using the chart for unknown glass you substitute the calculated temperatures, but continue to use the rates and times indicated.  An example:

  • You have calculated that the annealing point is approximately 535°C.
  • Subtract 30°C from that to get a equalisation temperature of 505°C.
  • Assume the piece is uniformly 12mm thick or 6mm tack fused (when you want to use rates for  twice the actual thickness to account for the difficulties in tack fusing). 
  • For a 12mm thick piece your soak time at 505°C will be two hours.
  • The cooling rate for the first 55°C is given as 55°C per hour according to the chart. Therefore the first cooling segment will be 55°C from 505°C to 450°C.  The second will be 99°C per hour from 450°C to 395°C.  The third rate will be 330°C per hour from 395°C to room temperature.


You can see that the times and rates are taken as given by the chart (as determined by the thickness of your piece), but the temperature set points are determined by the calculations for the glass you have tested.

When determining what temperature you should use to anneal a glass about which you are uncertain of its characteristics, you can use one of two basic approaches.  Pick an arbitrary temperature and soak for some time there and then proceed slowly in 55°C segments to about 370°C.  A second more certain method is to use the slump point test to determine the annealing point and then apply the Bullseye chart for thick slabs for the soak times and cooling rates.

Further information is available in the ebook Low Temperature Kiln Forming.

Wednesday, 4 December 2019

Pot Melt Temperature Effects

Image credit: Craft Gossip

When firing a pot melt, you have to consider how high a temperature is needed.

Viscosity reduces with higher temperatures which increases the flow and reduces the length of soak, although there are often some undesirable opacifying effects at prolonged higher temperatures.

The size of the hole is also relevant to the temperature chosen. The smaller the hole, the higher the temperature will have to be to empty the pot in the same amount of time. Of course, you can just soak for longer at a lower temperature to achieve the desired object of emptying of the pot without changing the temperature.

Using the same principle, the larger the hole the lower the temperature required to empty the pot in a given amount of time.  So, in general the larger the hole in the pot, the faster it will empty, given the same temperature.

The temperature used to empty the pot will need to be between 840C and 925C (1546F and 1700F).  The problem with temperatures in the 900C to 925C range is that the hot colours tend to change, e.g., red opal tends to turn dark and sometimes become brown. Some transparent hot colour glasses also opacify. There is also the possibility that some of these glasses will change their compatibility with others in the range.

The best results seem to come from temperatures in the 840 to 850C range with longer soaks than would be required at 925C.  Also remember to give melts a longer than usual anneal as they will be thicker than 6mm at the centre - sometimes as  twice the edge thickness, which will require annealing for twice the thickest area.

Revised 2.1.25

Wednesday, 20 November 2019

Pot Melt Contamination

Pot melting occurs at temperatures above that for which kiln washes are designed. This means the kiln wash most often sticks to the back of the melt.

If you put only fiber paper – Thinfire, Papyros, or standard 1mm or 2mm fibre paper – at the bottom, the dripping glass will tear and move it about.  It also tends to incorporate fibers from the refractory papers into the melt.  It is best to avoid fibre papers of any kind on the base.  Using fibre paper around the edges of dams, if you use them, is better than simple kiln washing of the dams.

From wikihow


If you have a sandblaster, it is easy to take the kiln wash off leaving a matt surface. You can live with this for many purposes, but if you want a more polished surface you can take the melt up to fire polishing temperature to shine up the surface. You will need to flip this over and fire again, if the original top surface is what you want to present.  Or if you like the new shiny surface, use it as is.

If you are going to cut the pot melt up for other uses, there is no need to fire polish as the surface does not matter, only the cleanliness, and removal of contaminants.


There is another thing you can do to avoid kiln wash contamination.


The best solution appears to be to put a disk or rectangle of glass on top of fibre paper. It can be clear or any colour you wish, but needs to fill the area enclosed by the dams. This seems to keep the fiber paper from tearing and being incorporated into the glass, even though the base will have the fibre paper marks.


It also works very well when you are confining the melt to get a thicker disk. Make sure you have kiln washed the sides of the container or dam very well, in addition to 3mm fibre paper arranged so that it is 3mm narrower than the expected final thickness, or any excess glass may stick to the dams. The means of arranging the fibre paper around the dams is given here. You may need to grind the marks off the edge of the disk, but this is much easier than grinding it off the bottom.

Wednesday, 6 November 2019

Analysis of Breaks during Fire Polishing


The analysis of breaks in fire polishing can be difficult.  The temperature and heat work are minimal, so the edges can look sharp, which would indicate that the break occurred on the cool down.

But this is where you really need to feel the edges.  If they feel very sharp, then you can be more confident that the break occurred on the cool.  But if there is even the slightest smoothness to the edge as you feel it, the break probably occurred on the heat up to fire polish.


In this picture, there appears to be an annealing break, because of the hooked ends of the break.  That is typical of a break due to inadequate annealing.  It is important to know when the break occurred, so that appropriate remedial action can be taken for future firings of similar pieces.

To determine if the annealing break occurred because the initial anneal was inadequate, it is important to do a touch test. Just looking at it will not be enough.

If the edges were even slightly smoothed, the anneal break occurred on the way up.  This would mean that the anneal of the original blank was not adequate, assuming a reasonable rate of advance was used for the thickness of the piece.

If the edges are razor sharp, the break occurred on the way down, indicating that the anneal after the fire polish was not adequate.  This would mean that in future the annealing needs to be done more carefully on fire polished pieces.

Being too quick to apply a diagnosis of a break during a fire polish can lead to the wrong conclusion, and so the incorrect alteration of future schedules.

Saturday, 2 November 2019

Schedules for Steep Drapes

I have been asked for a schedule for draping in the context of a tip on steep straight sided drapes.

What you are trying to do with a steep drape is two things. One is to compensate for the heat sink that the glass is supported by, and the second is to compensate for the relative lack of weight at the outer edge of the glass.


The supported glass transmits its heat to the support, leaving it colder than the unsupported glass. This often leads to breakage due to heat shock at much lower temperatures and slower rates of increase than glass supported at its edges. My experience has shown that - contrary to what I recommend for other kinds of firings - a slow rise with short soaks at intervals up to the working temperature works best. The reason for these slow rises and soaks is to try to get the support and the glass to be as nearly as possible at the same temperature throughout the rise in temperature. The soaks help ensure the mould is gaining heat without taking it from the glass.


The other problem with steep drapes is that the edges of the glass begin to drop more quickly than the area between the support and the edge. This leads to the development of an arc that touches the mould side near the bottom before the glass between the edge and the and the support. Extended soak times are required to allow the glass to stretch out and flatten. If this is done at high temperatures, the glass will thin - possibly to the extent of separating.


So the requirements for a firing schedule on this kind of drape are slow increases in temperature with soaks to avoid thermal shock, and an extended soak at the (low) forming temperature.


Whether using steel or ceramic moulds, I use a slow rise in temperature to 100C with a soak of 15 minutes. I then increase the rate of rise by 50% for the next 100C and give a 15 minute soak there. For the next 200C I raise the temperature at twice the original temperature rise, again with a 15 minute soak. The glass and mould should now be at 400C. This is still at the point where the glass could be heat shocked, so I only increase to 2.5 times the original rise rate but use this rate all the way to forming temperature.


Each kiln has its own characteristics, so giving schedules is problematic. 


  •  A side fired kiln will need slower heat rises than a top fired one. 
  • The closer the glass is to the elements, the slower the rate of increase needs to be. 
  • The kind of energy input - electric or gas - has an effect. 
  • The thickness of the glass is also a factor in considering what rate to use. 
  •  The size of the glass in relation to the size of the support is important - the greater the differential, the slower the heat rise should be. 


So in making a suggestion on heat rises, it is only a starting point to think about what you are doing and why you are doing in this way.

I have usually done this kind of draping in top fired electric kilns where the elements are about 250mm above the shelf, and about 120mm apart. In the case of a 6mm thick piece about three times the size of the support area, I use 50C/hr as my starting point. This is one third of my usual rate of temperature rise. However you must watch to see what is happening, so that you can make adjustments. You should observe at each of the soaks, so you know how the glass is behaving. It will also help you to pinpoint the temperature range or rate of advance that may be leading to any breakages.


On steep slumps, the temptation is to use a high temperature to complete the drape. This is a mistake as the glass will be more heavily marked and tends toward excessive stretching and thinning. What you really need is a slow rate of advance to a relatively low temperature. If you normally slump at about 677C, then you want to do this steep, straight sided drape at 630C or less. It will need a long soak - maybe up to an hour. It will also need frequent observation to determine how the drape is progressing. So plan the time to make yourself available during this forming soak.


Annealing is done as normal, since the mould and glass are more closely together and will cool at the same rate.


The original tip on the set up of a steep straight sided slump is here.

Sunday, 20 October 2019

Freeze and Fuse

"Freeze and fuse" is a term devised to describe a technique to obtain complex edge shapes and some bas relief.


The basic method is as follows, although there are a number of variations that can be successfully adopted.


Mix enough water with fine frit to make a damp slurry.


Then place about 3mm into your mould and tap on a hard surface. Tap quite vigorously to bring any air bubbles to the top and compact your powder.


Use a paper towel at this point and blot off any water that has risen to the surface.


Continue to layer, tap and blot until you're level with the top of the mould.


The more you tap and blot out any water (and every time you tap, more will rise to the top) the better your results will be.


When your paper towel won't absorb any more water, you're ready to put your mould into the freezer. One to three hours should be enough, but it must be frozen throughout.


Take the frozen glass from the mould. Letting it sit while you programme the kiln will allow it to come from the mould more easily. Place the glass form on the kiln shelf. Raise the temperature as fast as you like to 90C. Soak there for at least half an hour to remove any water in the piece. Then raise the temperature at about 100C/hour (depending on the thickness and size of the glass form) to a low fire polishing or sintering temperature (about 720C to 740C). Higher temperatures will flatten the form and change its shape. Soak at this sintering temperature for an hour or so.  Check on the progress of the firing by peeking at 10 minute intervals and advance to the next segment of the schedule when  the surface begins to shine.  


If you are planning another firing, you should not fire beyond the first hint of a shine appearing.


Some experimentation is required to get the best combination of rate, time and temperature.


Experience will show you variations on this basic method.

Further information is available in the ebook Low Temperature Kiln Forming.

Wednesday, 16 October 2019

Heat Work is Cumulative


“…. the first fuse (contour) I brought it up to 1385°F and held for 5 minutes - it did not contour as much as I would like - do I re-fire at same temp and hold longer or go up in temp and hold same amount of time or something else?”

Observe
Of course, the smart answer is “Observe to get it right first time”.   Observation will enable you to determine when the piece is fully fired.  To observe you need only peek at 5-minute intervals to determine if the piece is as wanted. 

Know your Controller
In combination with this you will need to know your controller well enough to be able to advance to the next segment if the piece is done before the segment finishes; or how to stay on the same segment until it is finished and then advance to the next segment.

Of course, there are circumstance when you cannot or do not want to be present at the top temperature of the firing.  Then consider using the delay function to enable you to be present. This gives a countdown until the kiln starts.  The practice is fully described in this blog entry.

Time or Temperature
If you are experiencing an under-fired piece and want to re-fire it to get a better finish, the usual question is whether to fire for longer or at a higher temperature.

The response is – “Neither”.

Re-fire to the same temperature and time as before, unless you are looking for a radically different appearance.  Heat work is cumulative.  You have put heat into the glass to get the (under fired) result.  By firing it again, the heat will begin to work on the glass as it rises in temperature.  The piece, in this instance, is already a slight contour.  The additional heat of this second firing will begin to work just where the first firing did, and will additionally change the existing surface just as the first firing did.  The degree of contour achieved by the first firing will be added to equally in the second firing.  It is of course, a good idea to peek in near the top temperature to be sure you are getting what you want. More information on heat work is available here with its links. 

Rate of Advance

It is important to remember that on the second firing the glass is thicker, and you need to schedule a slower rate of advance until you get past the strain point – about 540°C for fusing glasses, higher for float and bottle glasses.

Future firings

At the finish of the second firing you will have soaked at the top temperature for twice the scheduled time.  You can use this extra time for the next similar firing, or increase the temperature slightly and keep the original firing’s length of soak. 


As pointed out earlier, observation for new layups, sizes, thicknesses, etc., is important to getting the effect you want the first time.


Wednesday, 25 September 2019

Low temperature breaks in flat pieces

The usual advice in looking at the reasons for breaks in your pieces must be considered in relation to the process being used.  Breaks during low temperature processes need to be considered differently to those occurring during fusing.  


The advice for diagnosing breaks normally, is that if the edges are sharp, the break occurred on the way down in temperature. Therefore, the glass must have an annealing fracture or a compatibility break.  It continues to say if the edges are rounded it occurred on the heat up, as it broke while brittle and then rounded with the additional heat.


This is true, but only on rounded tack and fused pieces.

I exclude low temperature tack fuses from the general description of when breaks occur in flat pieces as it is not applicable at low temperatures.  

Low temperature flat work includes sintering, laminating, sharp profile tack fusing, etc.  There are lots of other names used for this "fuse to stick" work.  In all these cases, the finished glass edge will be barely different than when placed in the kiln.  It stands to reason therefore that you cannot know when the break occurred, as the edge will be sharp whether it broke on the way up or the way down.  

Periodic observation during the firing is the only way to be sure when the break occurred. These observations should coincide with the move from the brittle to the plastic stage of the glass.  Therefore, about 540C.  It can be at a bit lower temperature, but not a lot.  If the glass was not broken by that time, you can be fairly certain it broke on the way down.

Further information is available in the ebook Low Temperature Kiln Forming.


Wednesday, 18 September 2019

Fibre Dams


Fibre dams are a good and relatively inexpensive refractory material to form dams around regular and especially irregular shapes.  You need only cut the shape you want from the fibre board, if it is not a shape with straight lines.  

You can fire without any kiln wash or hardening if it is a one-off use.  For shapes you want to keep, you can harden the fibre board. 
Once hardened with colloidal silica, you need to paint the board with a separator – kiln wash, boron nitride or similar.

There are some precautions in the use of fibre paper and board.  The main physical one is that refractory fibre is lighter than glass and so will float on top of “molten” glass – that is fusing compatible glass higher than about 800°C.

Fibre board dams can be weighted with kiln furniture on the surface of the board.  If the board is flat this can be on the surface.  If the board is vertical, weights can be placed at the corners.

In the absence of fibre board, you can use layers of fibre paper.  If you have 6mm fibre paper, you need only one layer for two-layer glass, but remember that to get a bullnosed edge to the glass without needling, the fibre paper should be 3mm less than the final height of the fired piece. Thicker glass will require more than one layer of fibre paper.  Place as many layers of fibre paper as required to be at least equal in height to the finished piece on top of one another.  Push “U” shaped pins into the layers of paper to fasten the layers together.  Then cut the required shape out of all the layers all at one time. 

When finished cutting the shape out, you may want to line the edge with 1mm fibre paper to keep any of the layers of fibre paper showing through.  This dam will not need any kiln wash to prevent the glass sticking to it, unless you want multiple uses and so need to rigidise it with colloidal silica.

You can weight this fibre paper dam down by placing kiln furniture near the edge, all around the shape just as for the fibre board.

Safety in use of refractory fibre is described in Gregorie Glass.
Scroll down to Dusts/Particulates for safety recommendations.

Wednesday, 4 September 2019

Controlled cooling


It is sometimes stated that you can simply turn the kiln off below 370C and let the kiln’s natural rate of cooling take over the cool down.

This works for most flat 6mm pieces in most kilns, but as you work thicker or with greater contrasts in thickness, lots of tack fused elements or in a small rapidly cooling kiln, you do need to control the cooling toward room temperature.

The first thing you need to know is the natural cooling rate of your kiln.  

The rate of cool is not just about the annealing soak. The soak at annealing temperature is to equalise the temperature throughout the blass to have a differential of not more than 5C. 

The rate of cool is about avoiding thermal shock, too. The glass needs to maintain the temperature variation to less than 5 degrees Celsius difference throughout the glass as it cools.  This requires a slow controlled cool.  

You may program a cool of 100C to 370C thinking that the kiln will maintain that rate or less.  If the natural cooling rate of your kiln at 370C is 200C/hour, you risk thermal shock due to the rapid increase in the cooling rate.

You really do need to know the natural cooling rate of the kiln from the point you turn the programmer off to room temperature to be safe from thermal shock.

The alternative to turning off at 370C is to program the schedule all the way to room temperature.  The kiln will use no energy unless the kiln cools too quickly on its own.  At which point the program will kick in to slow the cooling of the kiln.


Wednesday, 28 August 2019

Finding Your Kiln’s Natural Cooling Rate

You need to observe how your kiln behaves while cooling without any power to be sure when you can safely &turn it off and let it cool without power.

Assuming you have programmed your kiln for a shut off at 370C, you need to observe every quarter hour or so to record both time and temperature.  From those observations you can calculate the cooling rate at the various temperatures.

Say at 6:00 your kiln was at 370C;
At 6:15 it was at 310C;
At 6:30 it was at 265C;
At 6:45 it was at 230C;
At 7:00 it was at 200C;
At 7:30 (you missed the quarter hour) it was at 160C;
At 8:00 it was at 140C;
At 9:00 it was at 125C;
At 10:30 it was at 110C.

To calculate the rate, you divide the temperature difference by the proportion of an hour between observations, as demonstrated in the following table.

Kiln Name/Description
Size
Shelf composition
Amount of glass
Observations
Time
Temperature
minutes
Proportion
temperature
Rate of
1st
06:00:00
370
difference
of an hr
difference
cooling
2nd
06:15:00
310
15
0.25
60
240
3rd
06:30:00
265
15
0.25
45
180
4th
06:45:00
230
15
0.25
35
140
5th
07:00:00
200
15
0.25
30
120
6th
07:30:00
160
30
0.50
40
80
7th
08:00:00
140
30
0.50
20
40
8th
09:00:00
125
60
1.00
15
15
9th
10:30:00
110
90
1.50
15
10


Although this is an example, it shows how the cooling rate slows down as the kiln cools. 

If you were cooling a flat piece 12mm thick, you might get away with turning the kiln off at 370C, as a flat piece can cool as quickly as 300C/hr.

If you were cooling a piece 19mm thick, the natural cooling rate of the above kiln is too fast. 19 mm thick pieces need a cooling rate of 150C/hr, so according to the figures above you need to programme this kiln down to 230C to get the appropriate final cooling rate.

If it is a tack fused piece with a 6mm base and areas of two layers of tack fusing, you should fire as though it is 24mm thick.  In this case, the final cooling rate needs to be 90C/hr.  For the kiln in the example above, that rate is not achieved until below 160C, so that is the minimum temperature for switch off.

This method can be used for any temperature range.  For example, you may want to know the rate of cooling from the top temperature to the annealing temperature.  This method will work there too. You may want to record the temperatures more frequently than every quarter of an hour though.

Further information is available in the ebook Low Temperature Kiln Forming.

You really need to know your kiln’s natural cooling rate before you can be confident of switching the kiln off at 370C.  This blog shows a method of determining the natural rate of cooling.