Showing posts with label Materials. Show all posts

Wednesday 5 March 2014

Metal Framing Materials


Lead is a very weak metal. Therefore various other metals are often considered for the perimeter of the panel to strengthen the whole.

Zinc is a metal often used for strengthening the perimeter of panels. It is stronger than lead – by about 8 times. It is relatively easy to solder. However it is subject to more rapid corrosion than lead.

So an alternative is aluminium which is about about the same strength as zinc. However it does not accept soldering, so professional joining or cold fixing solutions are required to make the frame.

Copper is over 10 times the strength of lead and can be considered as an alternative to zinc. It accepts solder well, but as a came is extremely expensive. It does corrode to a verdigris unless protected and maintained. However, because of its strength, copper wire - as a single strand or several twisted - can be used inside other came such as lead or zinc to provide strong support.

Brass is about 19 times stronger than lead. It is available in came profile as well as “U” and “L” profiles. It accepts solder well and resists corrosion. It is more expensive than lead, but similar in price to zinc.

Mild steel strength varies but is at least 27 times stronger than lead. It does not accept solder easily, and does corrode without painted protection, but is a less expensive option than aluminium, zinc or copper. As an angle or “T” shape, mild steel and iron have been used for centuries to support leaded glass panels.

Stainless steel is at least 37 times stronger than lead. It is difficult to weld and does not accept solder at all. It is very resistant to corrosion.


When considering framing solutions for panels, the main factors to consider are relative strength, corrosion, and joining methods possible.

Brass, Copper, Lead and Zinc all can be joined by solder. Aluminium and stainless steel cannot be joined with solder. Although mild steel can be joined with solder, a good strong joint is difficult.

The stronger the metal, the thinner profile required, which can make metals that are more expensive by weight an economical solution, as metal prices are most often by weight rather than shape.

It also is possible to combine a stronger metal with a weaker metal, such as including copper wire or steel rods in the lead came.

It is not absolutely necessary to solder the panel to the framing material. A frame can be made and the panel fixed within it by other than hot soldering methods. In this case the frame takes the whole weight of the panel.

Wednesday 26 February 2014

Metal Strengths


Metal Strengths

The strength of metals is most often compared by their tensile strengths. These numbers are Newtons per square millimetre and represent the relative strength of each metal compared to another.  The range of numbers indicates the variations caused by various alloys.

Tin                      19
Lead                14 – 32
Solder 60/40        48
Zinc                120 – 246
Aluminium       120 – 246
Copper            220 – 270
Brass              340 – 540
Mild steel         500 – 750
Stainless steel  740 – 970

These figures may be of interest in considering what frame to place around a free hanging stained glass panel.

Wednesday 19 February 2014

Panel Framing Options


Some framing options for free hanging stained glass panels are given here.  They are not exhaustive, of course, but do give some principles to be considered when making frames.  Wood and metal are the two traditional materials for framing panels to be hung.

Wood
A wood frame requires joints of some kind. These joints are important to the durability of the frame. The two main kinds of joints are glued and screwed.

Glued joints


Lap joints seem to be strongest. An odd element relating to the strength of this joint is that placing a wooden pin in the joint weakens, rather strengthens the lap joint.

Mortice and tenon is also a strong joint. It requires considerable skill to make a good joint.


A mitred is among the weakest, but can be strengthened with a biscuit or fillet in the joint.

A mitred joint with biscuit ready for glueing.


Screwed joints
These have a lot of movement before failure, but do give a lot of resilience to the joint as they can stretch rather than immediately give way. They also can be used with any of the glued joints if appearance is not of prime importance.

Frame style
The width and thickness of the frame are interrelated – thicker frames (front to back) can be narrower, thinner frames need to be wider. So the desired appearance of the frame width has a significant effect on the dimensions of the frame.

Metal cames or angle

Lead can be an adequate framing material, but if strengthening is required, you can use copper wire within the came and fold the leaves closed over it. You can also use steel rod within the came, as shown in the posting.

Zinc is a stronger metal than lead – about 8 times, but still has a weak tensile strength. I corrodes easily, but accepts solder as a joining method. It is more expensive than lead.

Some of the variety of zinc came available

Aluminium is a little stronger than zinc, but does not take solder. It has similar costs to zinc.

Some of the aluminium profiles available

Copper is about 1/3 stronger than zinc and also takes solder. It corrodes to a verdigris, but can be protected by clear varnish or paint. It is more expensive than zinc, but can be used as wire which is less expensive than other forms of copper.

Brass is over two times stronger than zinc and also takes solder. It resists corrosion well, and is a little cheaper than copper.

Some of the brass came options.


Mild steel is over 3 times stronger than zinc, but does not take solder at all well. It is relatively cheap and welds easily, making it a good framing material, although a method of fixing the panel into the frame is required.

Stainless steel is about 4.5 times stronger than zinc, but does not take solder and needs special welding. It resists corrosion very well, but is expensive in relation to zinc.


Hanging and fixing options
Two point hangings are the most common as they prevent twisting and distribute the weight to the sides of the panel.

The hanging material is straight up from the zinc framed sides to the fixing points

The hanging material whether line, wires or chains should be straight up from the sides to two separate fixing points. A triangle shaped hanging puts a bowing stress on the panel or frame.

A variation where the chain is taken to the corner of the window, is less secure, as it stresses the joint away from the sides

Loops or holes for screws should be placed in the frame rather than the panel.

The hanging is from reinforced corners directly to fixing points on the overhead beam

Ensure the fixing points for the hanging wires are sound and secure.

If the panel is fitted tight to the opening, consider ventilation requirements to reduce condensation between the primary glazing and the hung panel.

Wednesday 21 August 2013

Reclaiming Solder


Re-using solder can range from simply soldering the ends of the solder sticks together (if you are using blowpipe solder). This will then form a useable stick with solder blobs on its length.

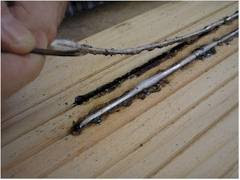
If you have a number of blobs and splashes, don't throw them out. Collect them together and when you have enough you can make them into another stick of solder.


You can tape two narrow pieces of glass onto a length of marble or heavy steel about 3-4 mm apart. Put the pieces in the channel formed by these two pieces of glass and melt the pieces with your soldering iron. This will form a useable stick.

Lifting the new solder stick from the wood


The same can be done by cutting out a 3mm wide and deep channel in a piece of timber and doing the same as above. The wood will smoke a bit and blacken, but not ignite.  And you can use a blowtorch to melt the solder if you do it this way.


Using the (slightly irregular) solder stick


Wednesday 15 May 2013

Fixing Paint for Transport


The very cheapest hair spray works well with glass paint, if you need to transfer your painted glass to another place for firing. Complete the painting and then spray with cheap hair spray as you would to fix a charcoal drawing. This will hold the paint firmly during transport and does not affect the paint during firing.

Friday 10 May 2013

Tracing on Opalescent Glass


Opalescent and dense glass presents problems as the usual method of tracing the image through the glass is not possible. If you first spray the glass with a cheap hair spray, this gives a “toothed” surface to the glass. Then using carbon paper an image can be transferred. However, the carbon paper leaves a greasy residue, so water based paint will not take, but an oil medium will.

Sunday 5 May 2013

Matting


Oil, and Water and Gum as Media for Matting by Dick Millard [edited from a discussion]

Oil has been used, I believe, since the 16th Century, and certainly up through the 1970's to today. It is used wherever it is determined it should be used, and one is sufficiently informed and facile to use it in a manner of delivering its full and lovely potential.

First of all, oil is not characteristically employed as a matt, out of which, by the negative process, one "takes out lights". In overwhelming instances, with which I am acquainted, it is used as a shading material applied over a pre applied and "worked" under matt of water and gum base.
This provides the required "tooth" to provide both a degree of adherence and ease of application.
So, I would suggest an oil matting, or a shading application over a smooth glass surface, would be generally problematical!


A group of blending brushes

Add a bit more gum to your water under matt which will reduce the necessity to fire that matt, which changes the character of the desired "tooth". The purpose of the "tooth" to receive the oil matt is also to provide "porosity" as an "absorbant", which additionally holds the oil mixed paint to the matt. Otherwise, the oil remains too liquid and does not float in a controlled fashion. It will require a much dryer application of kerosene, or increased absorption by additional blending.
I had a large landscape piece, hills in the back ground, that I matted and applied an alcohol mat too, but I was lifting the water mat trying to cover it with alcohol, so I added more gum to my mat and that did the trick. I also used a very soft Chinese brush. I have found that firing the mat first and looses tooth.


A group of stippling brushes

I have noticed over time that some people seem to have the impression that the less gum used, the better. I advise not to use an excessive amount of gum arabic, as a soft matt, with a soft touch produces a soft look. This is interpreted to mean 'less is better'. That is true, but only up to a point. If too little gum is used, or none, it will come off as if it were flour or mud diluted with water and applied. Too little gum severely jeopardizes any opportunity to produce soft gradation from the highlight to the untouched matt.

Tuesday 30 April 2013

Tracing with a Pen

Example of a pen nib


Using paint mixed with essential oil or turpentine and with a fine mapping pen for small lettering works well, as the oil flows better than water. Although with practice, a water based paint can be used with a pen, but it is a little tedious as the pen has to be loaded frequently with a tracing brush and constantly cleaned as the water dries quickly.


Examples of nibs and holders

Sunday 10 March 2013

Glues in Kiln Forming


Glues have two major uses in fusing. One is to stick things together after being fused (cold fusing). The other is to hold things together before fusing.

Holding things together while preparing the piece to be transferred to the kiln is a major use of low tack adhesives and glues. All of these burn off a lot lower than the temperature at which the glass begins to stick together. So, if you are gluing overhanging pieces, for example, they can move after the glue has burned off.  If you are assembling pieces that will not stay in place while you are putting it together, glue will not help get the final result you want.  If you are gluing to keep things stable while you move it to the kiln, you may find everything is ok.

However, glue tends to boil off if the temperature is raised too fast. During this process, the effect of the boiling will move the glass pieces that are most unstable. This also occurs if you use too much glue. You should only use as much as will stick the pieces together. Also too much glue leads to black spots and sometimes bubbles between the layers of glass.


The adhesives commonly used are the Bullseye product “Glastac”, Elmer’s glue, diluted PVA - or school - glue. All of these take varying times to dry and hold the glass pieces in place. So, a popular alternative is hair spray. This is a lacquer which dries almost instantly. It provides a thin film of adhesive and burns off in the kiln with no residue. You should use the varieties with no additives.


Glue most often leads to problems or unexpected results, so several ways have been used to achieve the desired results.

One way to deal with unstable components on small pieces is to make a large piece with a repetition of the design and cut it up after fusing in to the sizes you want.  Clean the pieces very well, and then fire them again to at least fire polish to remove any cutting or grinding marks.

An alternative to using glue, especially at the edges where the pieces are likely to move, is to use dams. My practice is to make the dams slightly taller than the unfired piece and line with fibre paper. I put 3 mm fibre paper against the dam, and thinfire against the glass. Both of these should be 3 mm narrower than the final height of the fused piece will be. This is to allow the glass to make a rounded edge as it will not be able to stick to the fibre as it sinks down to its final height.

Bullseye hot dams as an example of damming

Another alternative to using glue is to fire the piece upside down, so that the pieces do not have to be supported. This does require some planning and forethought. You can draw the design in reverse on thinfire, using different coloured pencils for the various layers to help in building the piece up in reverse. You then cap the assembled pieces with the piece that will become the bottom. Take the whole to a tack fuse. Then clean very well to remove any residues from the shelf. It is possible to sandblast and then clean to make sure there are no residues left. Of course this is not possible if you are using dichroic or iridised glass. Also note that iridised surfaces and thinfire do not get on well – there is extreme pitting in the iridised surface. 


Example of pieces glued and ready for the flip

 Once the piece is cleaned, fire again to get the desired surface texture.


Cleaning a piece after first firing

Tuesday 5 March 2013

Bones as Inclusions in Glass


The major components of bones are calcium and organic materials making up the marrow. If the bones are not old and weathered a very bad smell will be produced. The organic material will cause bubbles. Finally, it takes a long time to burn out the marrow, so it is best to use bones that have weathered for a number of years.

Calcium “erodes” during firing, so fine and thin bones will leave a shadow of ash (or a big bubble if there is not a long bubble squeeze. The bone has to be encased or trapped by the glass as it will not stick permanently to the glass on its own.

It can make dramatic shapes if the bones are arranged in novel ways to represent other things. The whole of the bone does not need to be encased, as the thicker parts will be strong enough to support themselves.

Tuesday 20 November 2012

Soldering corroded metals


Some investigation has shown that zinc corrodes more easily than lead (lead being a medium anodic and zinc a high anodic metal). Bronze, Copper and Brass are among the least easily corroded materials other than precious metals. Lead comes immediately after copper in the ease of corrosion.

The implication is that more easily corroded materials need more aggressive/abrasive cleaning before soldering and that their longevity in the weather will be shorter than the less easily corroded metals.

Saturday 15 September 2012

COE


CoE

CoE is an abbreviation for coefficient of linear expansion. This has a very specific definition which is not widely understood.

The "linear expansion coefficient" is determined by a laboratory test which expresses the average expansion rate from room temperature to 300ºC. It ignores the more important range of expansion for determining compatibility for fusing and the expansion through the annealing and softening ranges as this graph shows.


It also ignores viscosity, an important element in determining whether glasses will "fit" each other on fusing. Not all "90" expansion glasses are compatible.

The two major factors in a fusing compatible glass are expansion characteristics and viscosity. These need to be in balance with each other within one piece of glass and with other pieces of glass with which they are combined. There are other factors of course, because glass chemistry is very complicated.

Saturday 25 August 2012

Measuring Openings


Measuring rectangular openings


Timber and metal openings can vary in their dimensions. So measure each opening at the top and bottom, and at the left and right as well as the middles of each side and top and bottom.

To be perfectly sure the window has right angles – is square – take the diagonals from opposite corners, e.g., top left to bottom right and top right to bottom left. These measurements should be within 5mm of each other for the window to be considered square.

You can check for ”squareness” with a try square, although that is not completely accurate.

Templates
If it is not possible to tell where the right angles of the opening are, a template is called for. The material to be used for taking templates should be stiff, easy to cut, unaffected by moisture, and relatively inexpensive. This eliminates paper and some cardboards. If you can find stiff corrugated cardboard this works well. Mounting board works well too, but is expensive. Foam board is excellent, but also expensive. Hard board or other thin pressed board is inexpensive but difficult to cut with a knife. Thin plywood is also a good material for templates, especially if the opening is relatively regular. The more complicated the opening, the more cardboard, mounting board, or foam board becomes useful for its ease of shaping to the opening.

What ever material you use, you must mark which is the interior and exterior and for further checks, which is left and right. Fit this template into the opening to make sure it fits into the opening smoothly. This template will form the external extent of the built window when it is installed into an opening with a rebate.

Where the window is to be fitted into a channel, as in stone, you need to make the template of stiff material so you can determine the panel can be installed and that there will be enough of the panel within the stone channels to ensure the stability of the window in the future and still be able to manipulate the leaded panel into the opening.

Wednesday 30 May 2012

Fibre Blanket Moulds


Fibre blanket moulds are good for free form moulds. The blanket can be cut into shapes or crumpled. It does not have binders as the papers do, so kiln wash is not necessary. Still, I have always sprinkled alumina hydrate powder over the mould. You can then support the high spots with kiln furniture – existing or custom made.

Pre-wetted fibre blanket is available - Moist Pack is one brand name.
Or you can make the mould yourself from fibre blanket and hardener. You need:
  • ceramic fibre blanket. It should be 3 mm or thicker, but 25 mm needs to be compressed when wet. It is possible to use two layers of 3 mm fibre blanket, but they do not stick together well unless thoroughly wetted.
  • colloidal silica - often is called mould hardener or rigidiser. Paint this onto the fibre blanket liberally, both sides if possible.


The rigidiser can be brushed on or sprayed on. Some people soak the blanket in the rigidiser and then squeeze out the excess.

You must protect the master with cling film, Vaseline, or other waterproof separator. Be sure about whether you want a draping or slumping mould, as the inside needs to be smoothest for a slumping mould and the outside smoothest for a draping mould.

Press the wet fibre blanket to the master. Then let it dry for a couple of days to become stiff enough to remove from the master. Let the negative dry for another period when out of the mould.

The drying method for rigidised fibre mould depends a bit on the structure from which you are taking the shape. If the shape is a piece of glass you can heat slowly to about 300C, but you have to be careful not to go much above that temperature to avoid the mould sticking to the glass. When cool you can carefully remove the mould from the glass and fire it to about 720C to cure it.

Other materials should be able to withstand at least 400C if you are drying in the kiln.


Materials that cannot be subjected to heat should be air dried. This will take a long time, possibly a week or more. The master should be coated with petroleum jelly or cling film to ensure the drying of the mould does not also cause it to stick to the master.

When the mould is dry, put into the kiln and fire to around 760C to cure the mould. You can fire fast, and after 10 minutes at 760C, you can just turn the kiln off, as there is no possibility of thermal shocking the mould. The point is to get the glass which has been in suspension to soften and stick together. Upon cooling the mould will be hard, as it is held together by the glass structure within the fibre blanket.

Once rigidised, you can sand the mould to refine the shapes. But you must use dust mask as the dust and fibres are dangerous to your health.  Do it out doors if possible. Otherwise a well ventilated room is necessary. You can sand down the high spots and generally smooth the mould to obtain a finer texture. Usually 100 grit sandpaper does the job quickly and leaves a relatively fine surface texture. If unhardened blanket is exposed during the sanding process, You can add a mixture of the rigidiser and the "dust" from the sanding to any holes, dimples or exposed unhardened fiber in the mould Then re-apply rigidiser to the sanded areas, and cure the mould at 760C again.

If you are rigidising, you need a separator – kiln wash – either powder or in a solution brushed on. A rigidiser does not burn off; it fuses to itself within the mould material and makes it harder. The resulting mould material will also be more brittle and should be handled with some care. I.e., never pick up the mould by the edges or with a piece of glass on top.

When you are satisfied with the shape and texture, you apply the kiln wash and fire.

The rate of heating the kiln and the soak will depend on the complexity of the shape of the mould and the thickness of the glass but there are no concerns about the mould as it is not subject to thermal shock.

With delicate treatment, the mould can be reused many times.
Two examples are shown here:
Lamp shade panel form

This is a "free form" mould made to give the glass sheet the appearance of crumpled paper


Thursday 5 January 2012

Paper

The traditional approach to cartoons meant three versions were necessary. One with all the drawing details, one with the cut lines, and one for layout and leading.

If you are doing a leaded or copper foiled panel without details for painting on glass two copies are the maximum required. I make do with one original, as I have no place to keep the glass pieces laid out while cutting and beginning to lead, nor do I make templates for cutting.

The paper you need is one that is stiff enough to avoid changes in shape or wrinkling with changes in humidity. The paper also has to be robust enough to stand up to lots of movement. Cartridge paper from a roll works well, but is often seen as expensive. Brown wrapping paper is usually stiff enough, although thinner than cartridge paper.

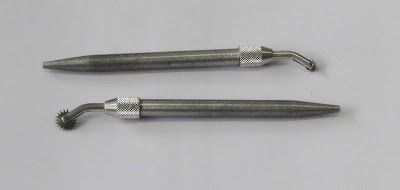
Tracing paper is very useful, if you do not have a light box, as you can trace details from one version of a cartoon – whether new or from an old one – into another. However it changes shape when exposed to high humidity. To transfer the cartoon to more stable or more opaque paper, you can use a pounce wheel to transfer through the tracing paper for the final cartoon.

Two pounce wheels

If you have a light box you can use it to make the transfer, or you can stand at a window with the two sheets of paper taped together to trace the design onto the final cartoon paper.

If you need to make pattern pieces you will need a second copy to cut up. Here you need paper or card that lies flat. You may also find it useful to cover the main cartoon with a water proof covering if you are going to do a lot of grinding and fitting over the cartoon. You can do this by oiling your paper (as for stencils) or by sticking clear vinyl over the cartoon.

Saturday 8 May 2010

Kiln Shelf Breakage

Placing moulds directly on shelves can cause breakage as my kiln keeps reminding me. If you put a mould directly onto the shelf, it apparently keeps the kiln from evenly heating the shelf on the way up and the mould keeps the shelf hotter than the edges on the way down. I don't know whether the shelf breaks on the way up -although I think that is so - or the way down. It doesn't happen every time, and that's why I forget.

It seems there is a critical relationship between the size of the shelf and the size of the piece covering the mould. The greater the proportion -up to some maximum, maybe 90% - the greater the likelihood of breakage it seems. A fully covered shelf would heat and cool along with the mould. When the mould is small in relation to the shelf, the heat can travel under the mould well enough to avoid breaking, it appears. It is the large range in between that causes the trouble.

A preventative is to fire without a shelf. But failing that possibility, raise the mould a little from the shelf with kiln furniture or pieces of thick fibre paper. Also keep the shelf elevated a little from the floor of the kiln.

Tuesday 2 March 2010

Effect of Plaster-Water Ratio on Some Properties

Plaster-water ratio (by weight) 100/30

Setting time (min) 1.75

Compression strength (kg/sq.cm) 808
Dry Density (kg/cu metre) 1806

Plaster-water ratio (by weight) 100/40

Setting time (min) 3.25

Compression strength (kg/sq.cm)474
Dry Density (kg/cu metre) 1548

Plaster-water ratio (by weight) 100/50

Setting time (min) 5.25
Compression strength (kg/sq.cm)316
Dry Density (kg/cu metre) 1352

Plaster-water ratio (by weight) 100/60

Setting time (min) 7.24

Compression strength (kg/sq.cm)228
Dry Density (kg/cu metre) 1206

Plaster-water ratio (by weight) 100/70

Setting time (min) 8.25

Compression strength (kg/sq.cm)175
Dry Density (kg/cu metre) 1083

Plaster-water ratio (by weight) 100/80

Setting time (min) 10.50
Compression strength (kg/sq.cm)126
Dry Density (kg/cu metre) 990

Plaster-water ratio (by weight) 100/90

Setting time (min) 12.00
Compression strength (kg/sq.cm)98
Dry Density (kg/cu metre) 908

Plaster-water ratio (by weight) 100/100

Setting time (min) 13.75

Compression strength (kg/sq.cm) 70
Dry Density (kg/cu metre) 867


This table of relationships makes it clear that the less weight of water added to the plaster, the stronger the resulting mould will be. It also is clear that with less water, the setting time is reduced. So some compromise may be needed to be able to pour the mixture before it sets.

Saturday 27 February 2010

Properties of typical gypsum plasters and cements

Number 1 Pottery Plaster
% of water to dry mix by weight - 70%
Set Time – 27 – 37 mins
Dry density – 1105 kg/cubic metre
Expansion on setting – 0.21%
Compressive strength - 126 kg./square centimeter

No. 1 Casting plaster% of water to dry mix by weight - 70%
Set Time – 27 – 37 mins
Dry density – 1058 kg/cubic metre
Expansion on setting – 0.2%
Compressive strength - 140 kg./square centimeter

Plaster of Paris% of water to dry mix by weight - 70%
Set Time – 27 – 37 mins
Dry density – 1105 kg/cubic metre
Expansion on setting – 0.2%
Compressive strength - 140 kg./square centimeter

Number 1 Casting Plaster% of water to dry mix by weight - 65%
Set Time – 27 – 37 mins
Dry density – 1162 kg/cubic metre
Expansion on setting – 0.22%
Compressive strength - 168 kg./square centimeter

Pottery Plaster
% of water to dry mix by weight - 74%
Set Time – 27 – 37 mins
Dry density – 1162 kg/cubic metre
Expansion on setting – 0.19%
Compressive strength - 126 kg./square centimeter

Hydrocal Cement
% of water to dry mix by weight - 45%
Set Time – 25 – 35 mins
Dry density – 1442 kg/cubic metre
Expansion on setting – 0.39%
Compressive strength – 35 kg./square centimeter

Hydroperm Cement% of water to dry mix by weight - 10%
Set Time – 12 -19 mins
Dry density – 
<641 br="" cubic="" kg="" metre="">Expansion on setting – 0.14%
Compressive strength – 35 kg./square centimeter

Hydro-Stone cement
% of water to dry mix by weight - 32%
Set Time – 17 -20 mins
Dry density – 1913 kg/cubic metre
Expansion on setting – 0.24%
Compressive strength – 703 kg./square centimeter

Ultracal cement
% of water to dry mix by weight - 38%
Set Time – 25 - 35 mins
Dry density – 1568 kg/cubic metre
Expansion on setting – 0.08%
Compressive strength – 421 kg./square centimete
r

Tuesday 23 February 2010

Break Down Temperatures of Common Mould Constituents

Binders are essential parts of mould materials. They hold the refractory parts of the mould together. Selection is dependent on the temperature you will be using. This also is important in choosing the refractory material to use.

Gypsum plaster - 704C – 816C
Hydrocal cement - 704C – 816C
Hydroperm cement – 760C – 927C

Colloidal silica – 1260C
Colloidal alumina – 1260C
Calcium alumina cement (cement fondu) – 1538C

There are of course, many other factors to take into account when choosing binders and refractory materials for moulds.

Monday 15 February 2010

Mesh Sizes

Mesh and grit sizes are most often refered to by a number. This relates to the number of wires per inch - and in a subsidary fashion also to the size of the wire used to form the grid through which the material falls and so is sorted into various sizes. The table below gives some of these figures most useful for mould making - mesh number, percentage of open area, the wire diameters in mm, and the mesh opening or material size in mm.

No.12 ; % open 51.8 ; dia. 0.5842 ; size 1.5240

No.14 ; % open 51.0 ;dia. 0.5080 ; size 1.2954

No.20 ; % open 46.2 ; dia. 0.4064 ; size 0.8636

No.30 ; % open 37.1 ; dia. 0.3048 ; size 0.5156

No.40 ; % open 36.0 ; dia. 0.2286 ; size 0.3810

No.50 ; % open 30.3 ; dia. 0.1905 ; size 0.2794

No.60 ; % open 30.5 ; dia. 0.1397 ; size 0.2337

No.80 ; % open 31.4 ; dia. 0.1143 ; size 0.1778

No.100;% open 30.3 ; dia. 0.0940 ; size 0.1397

No.120; % open 30.7 ; dia. 0.0940 ; size 0.1168

No.200; % open 33.6 ; dia. 0.0533 ; size 0.0737

No.325;% open 30.0 ; dia. 0.0356 ; size 0.0432