Showing posts with label Fused Glass Classes in Glasgow. Show all posts

Wednesday 14 October 2020

Multiple Firings of Kiln Wash


Many people report that they fire multiple times on kiln wash that has not been renewed.  Most add coats over existing kiln wash.  They only remove all the kiln wash when it begins to crack, stick to the glass or gets divots.

We all know that kiln wash fired a second time to full fuse is likely to stick to the glass.  We also know that kiln wash fired to slumping temperatures lasts almost indefinitely.  Somewhere between the two temperatures the kiln wash undergoes a chemical change that makes it more likely to stick to the glass on the next full fuse firing. 

credit: Immerman Glass


Some people continue firing without adding additional layers of kiln wash until cracks, divots, or sticking occurs.  This leads to creating a fix after the failure of the kiln wash. This requires both finding a means of cleaning the kiln wash residue from the glass, and fixing the firing surface.

Others paint a layer of kiln wash on top of the existing separator before high temperature firings. This continues each firing with a fresh layer of kiln wash.  However, the same cracks, divots, and sticking occurs at some point, requiring a complete re-coating of the shelf, and getting the kiln wash off the glass.

credit: Sue McLeod Ceramics


Re-coating of a shelf takes a couple of minutes and can be done with simple tools.  A broad scraper will remove most of the kiln wash.  This can be followed by rubbing with an open weave sanding sheet as used for plaster board or other dry walling.  If you are worried about the dust – which has less risk than fibre papers – you can dampen the surface before beginning the cleaning process.

If the kiln wash has been on the shelf for many firings, it is more difficult to remove, requiring more effort than a single firing.  High temperature firings as for melts also make the kiln wash more difficult to remove. But the same process is used in these cases.
       
Kiln wash in firings at slump and low temperature tack fuses can be reused as many times as it remains smooth and undamaged since the temperature is not high enough to cause the chemical changes.

The ultimate benefit of renewing kiln wash is that not only less effort is required to clean and re-coat, than to fix pieces with kiln wash stuck to them, and also the cost of kiln wash is significantly less than fibre papers.


Wednesday 23 September 2020

Making Thin Sheets

The question of how to make thin sheets arises from time to time.  Unless you are a glass manufacturer, it is unlikely you can make large, thin glass sheets.  But you can approximate making thin sheets by two methods that I know.

Sintering

One of these is sintering.  This is firing the glass to a low temperature and soaking for a long time.  The common form of this is powder wafers. 

By using a screen to deposit an even layer of glass powder you can make very thin, but delicate sheets of glass.  The procedure I would use is a screen of about 45 – 60 threads per inch.  This is coarse enough to allow the powder through, but not so fine as to “reject” large amounts of the coarser particles. 

You can screen the powder directly onto a kiln washed shelf, or onto Thinfire or Papyros.  You will not be able to move the unfired powder on a sheet of paper or fibre paper without changing the thickness and shape of the screened powder.  It must be laid down onto the separator directly on the shelf.  You can of course, move the shelf to the kiln if you can get in without tipping it.


Method

Support the screen about 3mm above the surface to allow the powder to fall through.

Make a ridge of powder at one end of the screen.  Using a smooth straight edge wide enough to cover the whole of the screen, lightly spread the powder from the starting end to the other. Then repeat drawing the powder to the starting end.  Make about five repeats of this – that is 10 passes, to get enough powder laid down to form about 0.5 to 1mm sheet.  You will need to experiment with the number of passes to get what you want.

Do not try to press the powder through the screen.  That will only wear the screen out quickly and may tear it.  Each pass should be a light spreading of the powder.  It is heavy enough to fall through the screen without additional force.

You could, of course, just sift the powder over the area you want to cover and judge by eye how even the layer is.  It is possible that your observation is good enough, but it is more likely that you will have thick and thin areas.  Often even at sintering temperatures, the thin is pulled toward the thicker, leaving small or large holes.   By screening the powder, you know you will have an even layer


Firing

The kind of schedule to use to sinter the glass particles together without changing their structure is the following:
220°C to 482°C , soak for 60 mins
55°C to 593°C, 10 minutes
28°C to 665°C for 5 mins
as fast as possible to 482°C for 30 mins
28°C to 427°C, no soak
55°C to 370°C, no soak
110°C to 50°C, no soak
This will work for most fusing glasses.

This slow firing allows enough heat to penetrate the glass grains that they will stick together without changing shape or developing holes.  I admit the anneal cool is very cautious.  You can experiment with quicker cools if you want to speed the process.

  
Pressing

This is a technique of thinning already existing sheets of glass.  Typically, you will have a 6mm or thicker piece of glass that you want to be 3mm or less.  Paul Tarlow has described this kiln pressed glass very well in his books and on the fusedglass.org site.

In essence, you use a pair of kiln shelves.  Kiln wash both shelves.  Place the glass to be thinned on one shelf.  At the outer edges of the shelf put down spacers of the thickness you want the glass to be after pressing.  This will keep the upper shelf from settling down too much and more importantly unevenly.  Place the other shelf, kiln washed side down, on top of the glass.  Be sure the spacers are in places where they can support the upper shelf.


If you are thinning from 6mm to 3mm, normally you do not need any additional weight on top of the upper shelf.  But the thinner you want the glass to be, the greater the weight needs to be.  It could be another shelf, fire bricks or steel weights.

When scheduling the annealing remember you must take account of the mass of the weight on top of the glass.  You will need a much longer temperature equalisation soak and a much slower annealing cool.  

Further information is available in the ebook Low Temperature Kiln Forming.

Wednesday 16 September 2020

Keeping Bottles from Rolling


A common problem in firing bottles is that they may roll into one another and stick, making both bottles useless.

One way to overcome this is to let the bottle find its heavy point by setting on smooth and level surface. It will gently roll to one direction before slowly coming back in the other. When it stops this oscillation, the heaviest part of the bottle will be on the bottom.  Mark the bottle in some way so you can move to the kiln in that position. If after this, it rolls in the kiln, then your shelf is not level. 

Additional assurance against rolling is putting a small piece of thin fibre paper (1 or 2 mm)at each side of the point the bottle touches the shelf.  Thinfire and Papyros are not enough to ensure there will be no movement. But the small bumps of fibre paper are enough to stop the bottle from rolling.

Sometimes you want a particular part of the bottle up or down, but it won’t stay in place.  Then you need to put a slightly thicker piece of fiber paper against the bottle on each side.  It is better if it is not Thinfire or Papyros as they tend to disintegrate above 400C, long before the bottle begins to distort enough to keep it in place.

Other materials you can use to prevent the bottle from rolling are crumbled chalk, whiting, kiln wash, or even a few grains of sand.

Preventing bottles from rolling in the kiln is about finding the natural heavy spot, or propping the bottle in place with a variety of heat resistant materials.

Wednesday 9 September 2020

Long Annealing Soaks


You Can’t Anneal Too Long.

Can you anneal too long?

Yes, you can.

It’s not just the possible temperature differences in the kiln.  If you have temperature differentials across your kiln, any piece that crosses those boundaries will have temperature differences locked into the glass.  If you know you have temperature differentials and your glass by circumstance must be in both the cooler and the hotter regions, you need to do a standard length of soak only.  Then reduce the rate of cooling a little more than normal, so that a slower cool occurs.  This should avoid most of the stress that can be induced by very long soaks in a kiln with hot and cool spots.

The other factor against annealing too long has been revealed by Bullseye research on annealing.  This video at about 13:00 minutes into the film explains.  This complicating factor in annealing is about the difference in temperatures of the surfaces of the glass.  The research shows that the longer you anneal the greater the differential in temperature becomes between the upper and lower surfaces of the glass.  This means that you can introduce stress across the whole piece, rather than just a section as in an unevenly heated kiln.

This comes from the recording of a typical long annealing cool during my testing.

What is more, the longer you soak, the cooler the bottom becomes in relation to the top.  The reported research does not state the reasons for this.  It just commented this as an observational fact.  It can be assumed that the air temperature differences are the cause.  Even during cooling the air is hotter on top of the shelf than under.  This would allow the bottom surface to cool more than the top. This assumption is borne out by the fact that the effect is reduced or eliminated by having elements under the shelf.

There are two reasons to avoid long soaks. Uneven temperatures across the surface are locked into the glass.  And long soaks at annealing induce an unwanted temperature differential between the top and the bottom of the piece.

Wednesday 4 March 2020

Instagram as a place to sell


What it is

Instagram is a place to show work and get followers.  It is a photo and video sharing site owned by Facebook.  It is a place to tell visual stories that lead to direct message conversations that can lead to sales.  But it is not a direct selling site.

Developing a body of followers is a slow process requiring continued commitment.  Audiences tend to focus on the Instagram stories and videos. Talking to camera, showing your workspace, showing and telling about favourite products are some of the things you can do to make stories for Instagram.  Posting these images and videos is way to get feedback on new products by inviting people to react.


Using it

Instagram’s value is largely as a marketing tool.  It is not a place to do frequent or blatant selling.  There is a general lack of response to posts with an overt selling message.  But occasional on-line sales to a group of committed followers seem to work. Beware of the effort and cost of packaging and posting, though.

What to post?

Frequent posting is essential to developing and maintaining your group of followers.  Remember the title - Instagram.  Instant reporting of developments is important.  It develops the connection between what you are doing and your followers.  The things to concentrate on are such things as how the day has gone, stories, new venues and products.  Ask questions of followers to get feedback and conversations developing.

Some use Instagram as their main social media source.  Share anything in your life that you are comfortable with everyone knowing, and of course, how the business is developing.  In all this sharing be yourself, have your own voice.  Your postings need to be when there is news rather than at set times.  Your account becomes livelier and more personal when spontaneous.

Images

Good photographs are essential.  Photos and videos are the essence of Instagram.  Your photos need to have clear captions. The captions need to provide the context for each image. Some suggest that concentration should be on the captions, and then finding a photo to fit.  The captions and hashtags are the ways people find their way to your postings.  You need to think about the terms potential customers may use to find out about your kind of work.  There is no need to overload the images with hashtags.  A few well thought out terms will give better results.  Look at the kind of tags you would use to find items of interest outside your craft. The really important element is an emphasis on providing a story in all the postings.

Sharing

In addition to creating content, reciprocation of likes and comments is important.  This means you need to spend some time on the platform to help develop followers.  Instagram does assist in creating a community of followers and makers, especially if you connect with makers of similar things and exchange supportive chat.

Time commitment

There are suggestions that 80% of your time on Instagram should be building your brand, and partaking in the community. The rest of the time you can tell about new products, promotions, and answering questions that will help people in deciding on the purchase.  But, generating sales is difficult by use of only Instagram.

Location of Outlets

Galleries use Instagram too.  But it is mostly about raising awareness of their businesses, so sales on Instagram are incidental to them.  They use it to let people know about news of the gallery and artists, their interests, and promote their exhibitions.  For them it is about publicity. 

Their secondary use is by browsing and getting a sense of potential exhibiting artists as persons and what their expertise and audience may be.  This means that getting galleries as followers can be a way to maintain contact with galleries and get invitations to participate in events.


How Can Glass Enthusiasts use Instagram?

It may seem the emphasis of this post is on full time craft artists, but these things are applicable to any craftsperson who wants their work to be more widely known and purchased.

Anyone who is going to craft fairs needs to do a lot more than turn up with product.  Many times, I hear of people lamenting the poor attendance at an event.  Or, the concern that people don’t seem interested in buying your work.

The organiser of the craft event can do only a limited amount of promotion.  Their promotion will be largely general and untargeted.  Your promotion will be much more targeted, because it will be directed at your followers – an already interested audience.  If you can get your followers to attend the event, or spread knowledge of your attendance at an event, you have a greater chance of having a good event.


In summary, Instagram can be an element in building an audience for your glass work.  This can increase attendance of interested people at the events you are involved in, if you put effort into getting followers who appreciate your work.

Sunday 9 February 2020

Pricing, 2 - Pricing Structure

Creating a Pricing Structure

After calculating what you are going to charge, use the prices to create a pricing structure:

  • Selling price to the public - recommended retail price
  • Wholesale price/trade price
  • Sale or return price
  • Selling direct to the public

The selling price for the public should be the trade/wholesale price times two, plus tax. This means that the wholesale price is your bottom/lowest price that will give you a profit.


You should set your prices to realistically cover your costs, including time spent at an event, and know what you need to charge to make a profit. You charge double your wholesale price to cover your own costs of sales, such as packaging, stand hire, etc.


Do not undercut your other outlets, otherwise they will no longer want to sell your work.


Use selling to the public as an opportunity to test the market by exploring new products and new prices.


Selling to trade


The prices you offer to trade, i.e., your wholesale prices should cover your costs and provide some profit.


Galleries and shops have enormous overheads, which is why they put so much of a mark up on pieces, but remember they will be selling your work all of the time, so you can produce the work without interruption.


Before approaching wholesale or trade outlets you need to decide on:

  • Minimum order quantities.
  • Discount prices, and quantities to qualify.
  • How much of your work they will need to make a good display (it is in both of your interests to display your work as well as possible).
  • Consider charges for carriage or if you want to offer carriage free.
  • Agree what the payment terms are – pro forma, payment on delivery or credit. If offering credit, ask for trade references.

Sale or Return


If you provide work on consignment (sale or return), make sure you know exactly what the terms are. Keep a close eye on the pieces, as there are risks that may or may not be covered by the seller


You do not want your work out for too long, so if it is not selling after 6 months it is time to move it. That means keeping records of where your work is and when it was placed.


Review your prices annually.


More information is available 
Establishing the costs
Creating a pricing structure
Terms and conditions of sales
Customer relations


Payment

Tuesday 31 December 2019

Gravity


One of the fundamental elements in kiln forming is gravity. When glass is hot it moves according to the effects of gravity and you have to remember that gravity has a big effect on all your firings.

The effects mainly cause:
  • Uneven thickness on shelves that are not level.
  • Uneven slumps into moulds which are not level or the glass is not levelled.
  • Uneven forming due to varying viscosities. Gravity acts on the softest parts of the glass first.
  • Faster or slower forming due to span width. With greater span, gravity pulls the glass into the mould more quickly than with a small span.
  • Gravity acts on things of greater thickness more quickly than those of lighter weight. So a thick piece will form more quickly than the same sized thin piece.
  • Surface tension (affected by viscosity and heat) is affected by gravity also. The glass will attempt to draw up or spread out to about 7 mm if there is enough heat, time, and low viscosity.
  • The effect of gravity causes upper pieces to thin lower ones, as it presses down while the glass is plastic. This has the effect of making the colour of the lower piece less strong.

More information on each of these effects can be found throughout this blog.

Wednesday 4 December 2019

Pot Melt Temperature Effects

When firing a pot melt, you have to consider how high a temperature you wish to use.

Viscosity is reduced with higher temperatures so increasing the flow and reducing the length of soak, although there are often some undesirable opacifying effects.

The size of the hole is also relevant to the temp chosen. The smaller the hole, the higher the temperature will have to be to empty the pot in the same amount of time. Of course, you can just soak for longer at a lower temperature to achieve the desired object of emptying of the pot without changing the temperature.

Using the same principle, the larger the hole the lower the temperature required to empty the pot in a given amount of time.

The temperature used to empty the pot will need to be between 840C and 925C. The problem with temperatures in the 900C to 925C range is that the hot colours tend to change, e.g., red opal tends to turn dark and sometimes become brown. Some transparent glasses also opacify. There is also the possibility that some of the glasses will change their compatibility.

So the best results seem to come from temperatures in the 840 to 850C range with longer soaks than would be required at 925C - possibly 4 or more hours.

Also remember to give melts a longer than usual anneal as they will be thicker than 6mm at the centre - somtimes as much as twice the edge thickness.

Wednesday 27 November 2019

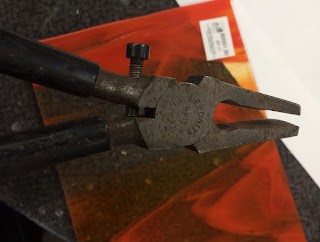
Using Cut Running Pliers Without Cushions


Using Cut Running Pliers Without Cushions

There are a wide variety of cut running pliers for different purposes.  A description of some of them is here.


This post is to describe maintenance and use of this kind of cut runner.


The plastic covers that come with these cut runners eventually wear out.  The replacements are hard to find. There are things you can do other than buying a new pair just for the shields.

You can dip the jaws in tool coating compounds such as Plastidip.  This does not last as long as the plastic, but is easy to re-do.

You can wrap the jaws in tape.  Electrical tape, duct tape or even self-adhesive elastic bandage will do the job. Again, not long lasting, but easy to replace.

Or

You can use the cut running pliers without any covering on the jaws.  “You can’t do that. You will crush the glass!” is the response I hear.  You can use them bare. I do, and so can you.


The key is in the adjusting screw.  It is there not just to tell you which is the top of the pliers; it has a function too.  That screw adjusts the opening of the jaws to the thickness of the glass. 


A simple way to ensure you have the correct opening is to put one corner of the jaw on the edge of the glass with the jaw opening less than the glass is thick. Then tighten the screw until you feel the handles of the pliers begin to open.  Then you have the right opening for the thickness of the glass. 


It ensures you cannot crush the glass, as the jaws will not close at the centre to be less than the glass thickness. 

You also have a more direct feel of the glass without the spongy connection of the plastic. You can sense the glass beginning to bend just before the score runs due to the gentle pressure of the jaws of the cut runners on either side of the score.

Whether you use the cut runners with or without cushions on the jaws, it is important to keep the adjustment screw lubricated so you can adjust the width of the jaw opening for different thicknesses of glass.


Wednesday 20 November 2019

Pot Melt Schedule

I usually use a schedule like this for either S96 or Bullseye:

100C/hr to 220C for 20 minutes; this is approximately the crystobalite inversion temperature – to be kind to the pot.

220C/hr to 570C for 20 minutes; this is approximately the quartz inversion temperature – again to be kind to the pot.

220C/hr to 677 for 30 minutes; this is a bubble squeeze temperature to allow larger bubbles to escape from the pot before melting begins.

330C/hr to 850C for 120 minutes; this is to ensure there is plenty of time to empty pot.

AFAP to 805C for 30 minutes; this is to allow thickness equalization and also to allow bubbles to pop and seal.

AFAP to 482 for 90 minutes; this is for Bullseye, but is applicable to other glasses too.

55C/hr to 427C no soak (for 6 to 8mm thickness)

99C/hr to 370C no soak.

120C/hr to 150 end.

Allow to cool to room temperature 

Pot Melt Contamination

Pot melting occurs at temperatures above that for which kiln washes are designed. This means the kiln wash most often sticks to the back of the melt.

If you put only fiber paper – Thinfire, Papyros, or standard 1mm or 2mm fibre paper – at the bottom, the dripping glass will tear and move it about.  It also tends to incorporate fibers from the refractory papers into the melt.  It is best to avoid fibre papers of any kind on the base.  Using fibre paper around the edges of dams, if you use them, is better than simple kiln washing of the dams.

From wikihow


If you have a sandblaster, it is easy to take the kiln wash off leaving a matt surface. You can live with this for many purposes, but if you want a more polished surface you can take the melt up to fire polishing temperature to shine up the surface. You will need to flip this over and fire again, if the original top surface is what you want to present.  Or if you like the new shiny surface, use it as is.

If you are going to cut the pot melt up for other uses, there is no need to fire polish as the surface does not matter, only the cleanliness, and removal of contaminants.


There is another thing you can do to avoid kiln wash contamination.


The best solution appears to be to put a disk or rectangle of glass on top of fibre paper. It can be clear or any colour you wish, but needs to fill the area enclosed by the dams. This seems to keep the fiber paper from tearing and being incorporated into the glass, even though the base will have the fibre paper marks.


It also works very well when you are confining the melt to get a thicker disk. Make sure you have kiln washed the sides of the container or dam very well, in addition to 3mm fibre paper arranged so that it is 3mm narrower than the expected final thickness, or any excess glass may stick to the dams. The means of arranging the fibre paper around the dams is given here. You may need to grind the marks off the edge of the disk, but this is much easier than grinding it off the bottom.

Saturday 2 November 2019

Schedules for Steep Drapes

I have been asked for a schedule for draping in the context of a tip on steep straight sided drapes.

What you are trying to do with a steep drape is two things. One is to compensate for the heat sink that the glass is supported by, and the second is to compensate for the relative lack of weight at the outer edge of the glass.


The supported glass transmits its heat to the support, leaving it colder than the unsupported glass. This often leads to breakage due to heat shock at much lower temperatures and slower rates of increase than glass supported at its edges. My experience has shown that - contrary to what I recommend for other kinds of firings - a slow rise with short soaks at intervals up to the working temperature works best. The reason for these slow rises and soaks is to try to get the support and the glass to be as nearly as possible at the same temperature throughout the rise in temperature. The soaks help ensure the mould is gaining heat without taking it from the glass.


The other problem with steep drapes is that the edges of the glass begin to drop more quickly than the area between the support and the edge. This leads to the development of an arc that touches the mould side near the bottom before the glass between the edge and the and the support. Extended soak times are required to allow the glass to stretch out and flatten. If this is done at high temperatures, the glass will thin - possibly to the extent of separating.


So the requirements for a firing schedule on this kind of drape are slow increases in temperature with soaks to avoid thermal shock, and an extended soak at the (low) forming temperature.


Whether using steel or ceramic moulds, I use a slow rise in temperature to 100C with a soak of 15 minutes. I then increase the rate of rise by 50% for the next 100C and give a 15 minute soak there. For the next 200C I raise the temperature at twice the original temperature rise, again with a 15 minute soak. The glass and mould should now be at 400C. This is still at the point where the glass could be heat shocked, so I only increase to 2.5 times the original rise rate but use this rate all the way to forming temperature.


Each kiln has its own characteristics, so giving schedules is problematic. 


  •  A side fired kiln will need slower heat rises than a top fired one. 
  • The closer the glass is to the elements, the slower the rate of increase needs to be. 
  • The kind of energy input - electric or gas - has an effect. 
  • The thickness of the glass is also a factor in considering what rate to use. 
  •  The size of the glass in relation to the size of the support is important - the greater the differential, the slower the heat rise should be. 


So in making a suggestion on heat rises, it is only a starting point to think about what you are doing and why you are doing in this way.

I have usually done this kind of draping in top fired electric kilns where the elements are about 250mm above the shelf, and about 120mm apart. In the case of a 6mm thick piece about three times the size of the support area, I use 50C/hr as my starting point. This is one third of my usual rate of temperature rise. However you must watch to see what is happening, so that you can make adjustments. You should observe at each of the soaks, so you know how the glass is behaving. It will also help you to pinpoint the temperature range or rate of advance that may be leading to any breakages.


On steep slumps, the temptation is to use a high temperature to complete the drape. This is a mistake as the glass will be more heavily marked and tends toward excessive stretching and thinning. What you really need is a slow rate of advance to a relatively low temperature. If you normally slump at about 677C, then you want to do this steep, straight sided drape at 630C or less. It will need a long soak - maybe up to an hour. It will also need frequent observation to determine how the drape is progressing. So plan the time to make yourself available during this forming soak.


Annealing is done as normal, since the mould and glass are more closely together and will cool at the same rate.


The original tip on the set up of a steep straight sided slump is here.

Glueing Glass Pieces

The best solution is to avoid the use of glue completely. If you cannot, use as little as possible and make sure it burns out cleanly.

The glues to which kiln workers have normal access, do not survive to tack fusing temperatures. Therefore they can only be considered as a means to get the glass assembly to the kiln. The glue will not hold the pieces in place until the glass begins to stick, so the pieces must have a stable placement. If not, the pieces will slip, roll and move once the glue has burned out.

The second requirement of glues is that they burn out without leaving a residue.

Glues that have been used with little or no residue include:

Powdered CMC that can be disolved in warm water

-CMC (carbylmethylcellulose). It is a cellulose based binder used in a wide variety of industries, including food. For our purposes, it is also used in the ceramics industry and is often called glaze binder. It is a main constituent of "glas tac" from Bullseye. This can be made up into a viscous solution to catch and hold frits and other sprinkled elements in place.

- PVA (Polyvinyl Acetate) is water-based glue. It is sometimes known as school glue. It can be diluted to about 10parts water to 1 part PVA. This is sufficient to hold the glass pieces together with only a drop for each piece of glass. It does not work so well for small sprinkled elements.

One of many brands of  Ethyl Cyanoacrylate
 glue

- Super glue burns off with no concerns about cyanide. It should be used sparingly and also works best for pieces of glass.

One of many hair laquers in pump spray bottles


- Hair lacquer is normally applied as drops at the edges of the assembled pieces and so can be used to hold pieces of glass as well as sprinkled elements.

In all uses of glue the principles to remember are:
- Use the minimum to hold pieces together while getting the work into the kiln.
- Put the glue at the edges of the glass or where its combustion gasses can escape easily.
- And in all cases, you need to test to see if a residue is left on the glass at full fuse when using a new glue.

An alternative to glue is frit as described here.

Friday 1 November 2019

Effect of Heat on Sandblasted textures

This is based on Graham Stone’s work with float glass. The temperatures are applicable to float glass, and so need to be adjusted for other glasses, but illustrate the principle of how heating temperatures affect the glass.
Temperatures in degrees Celsius.

650 Blasted surface softened, evened, less "brutal".

690 Blasting still opaque but less "white"
700 Blasting becoming too sheeny but still okay for certain effects.
740 Blasting now subtle and glossy

Based on Firing Schedules for Glass; the Kiln Companion, by Graham Stone, Melbourne, 2000, ISBN 0-646-39733-8, p24

Polishing with Cerium Oxide

If you want to go beyond cork in your polishing, cerium oxide will give an optical polish.

You need to grind your glass at 800 or higher grit, or use the cork belt after 400grit. Any rougher surface will not give a smooth polished surface. It will only polish the high spots.


Many do not like to use cerium oxide as it is messy. Especially so on a wet belt sander as the speed is really too fast for the use of polishing pastes. The speed sprays the slurry all over the place.


You need a felt wheel or belt to which you apply the cerium oxide. First you mix the cerium with water to a yoghurt consistency and apply that to the wheel or belt. Begin polishing and add more water and cerium paste as the polishing surface dries. You will notice this as the glass will begin to drag. Do not delay, add more of the paste before continuing. Otherwise you will heat up the glass and risk breakage.


His Glassworks has good descriptions and videos on use of cerium oxide.

It is helpful to mark the glass with a paint or china marker before starting the polishing process to show the areas that are to be polished. This enables you to see what work has been done without completely drying the piece.


For large surfaces you will need to use a horizontal grinder with a polishing pad attached, or a hand held polisher.


An alternative is to use “trizact” belts that are about 4000 grit. These achieve a polish that is very good, if not as optical as with cerium oxide.

Thursday 31 October 2019

Viscosity Changes with Temperature


This image is taken from Pate de Verre and Kiln Casting of Glass, by Jim Kervin and Dan Fenton, Glass Wear Studios, 2002, p.27.

It shows in graphic form how the viscosity of glass decreases with increases in temperature. The temperatures are given in Fahrenheit.  

The coefficient of expansion also changes with temperature. 

This graph is also from Kervin and Fenton
 It is these two forces of viscosity and expansion that must be balanced around the annealing point to give a stable and compatible range of fusing glass.

Drop Rings

Mould

It is possible to purchase drop rings of various sizes. It is also easy to construct one from vermiculite board or ceramic fibre board. Merely cut a circle of the desired radius from the board. Leave at least 50mm of board outside the circle, and more for thinner boards.

Kiln wash the top and inner sides of the drop ring


Glass

The glass should be larger than the hole in the ring. This will vary by radius of the hole. The glass will need to be from 50mm larger diameter than the hole for smaller holes to 100mm larger diameter for holes over 300mm.

Glass should be at least 6mm thick for the first 100mm of drop and an additional 3mm for each 50mm more. So, a drop of 200mm would require glass of 12mm thick


Temperatures

The temperature rise should be no more than 150C per hour to about 675C for 6mm glass and less for thicker glass. Remember the glass is much closer to the elements than normal and it is easy to thermal shock the glass.


With close inspection you can see that the edge of the glass rises from the mould as it sinks in the middle.
The outside edges of the glass rise from the mould as the centre begins to drop in the centre.  As the glass gets hotter, this raised edge settles back on to the mould.  If the glass is really near the elements, there is a small risk the glass will touch the elements.  No harm will be done to the kiln, but the glass edge may have some needles.

The rate and amount of slumping is controlled by temperature, span (the width of unsupported glass on the mould) and time. The higher the temperature the faster a piece will slump and the thinner the walls will be. However you can slump at lower temperatures by holding the temperature for a longer time to reduce the thinning of the sides.

Also note that the wider the span, the faster the glass slumps.

If you slump at high temperatures with a drop ring the sides of the bowl tend to be straight and steep. The strain is limited to the region immediately inside the rim. Therefore the glass tends to thin next to the rim and the colours are diluted. If you slump at a lower temperature for a longer period of time the strain is distributed over the entire unsupported area. This results in a more rounded shape for the bowl and even thickness of the glass across the bottom of the bowl.


Experiment

Finding the right combination of time and temperature requires a bit of experience and guess work. If you want a rounded bottom, heat the glass to the point that it starts to bend on the mould and wait for 30 minutes. If it has slumped about 1 inch in that time wait another 30 minutes. You are looking for a slumping rate that is acceptable. If it hasn't moved very much then increase the temperature 15C and check again in 15 minutes. Keep moving temp up and waiting for 15 minutes until the piece has completely slumped. This might take several hours.

If you want straight sides keep heating the piece rapidly.

Stopping
When the piece has slumped to the desired shape, flash cool the kiln to about 30C above the annealing point to stop movement in the glass. Extend the annealing soak and increase the length of the annealing cool time (reduce the rate of temperature fall) over normal slump firings of the same thickness.


Glass falls through drop rings in relation to the size of the glass on the drop ring, the size of the opening, the temperature rise rate and to some extent the colours and amount of opalescent glass used.