Wednesday 29 March 2017

Colourising Metals for Glass

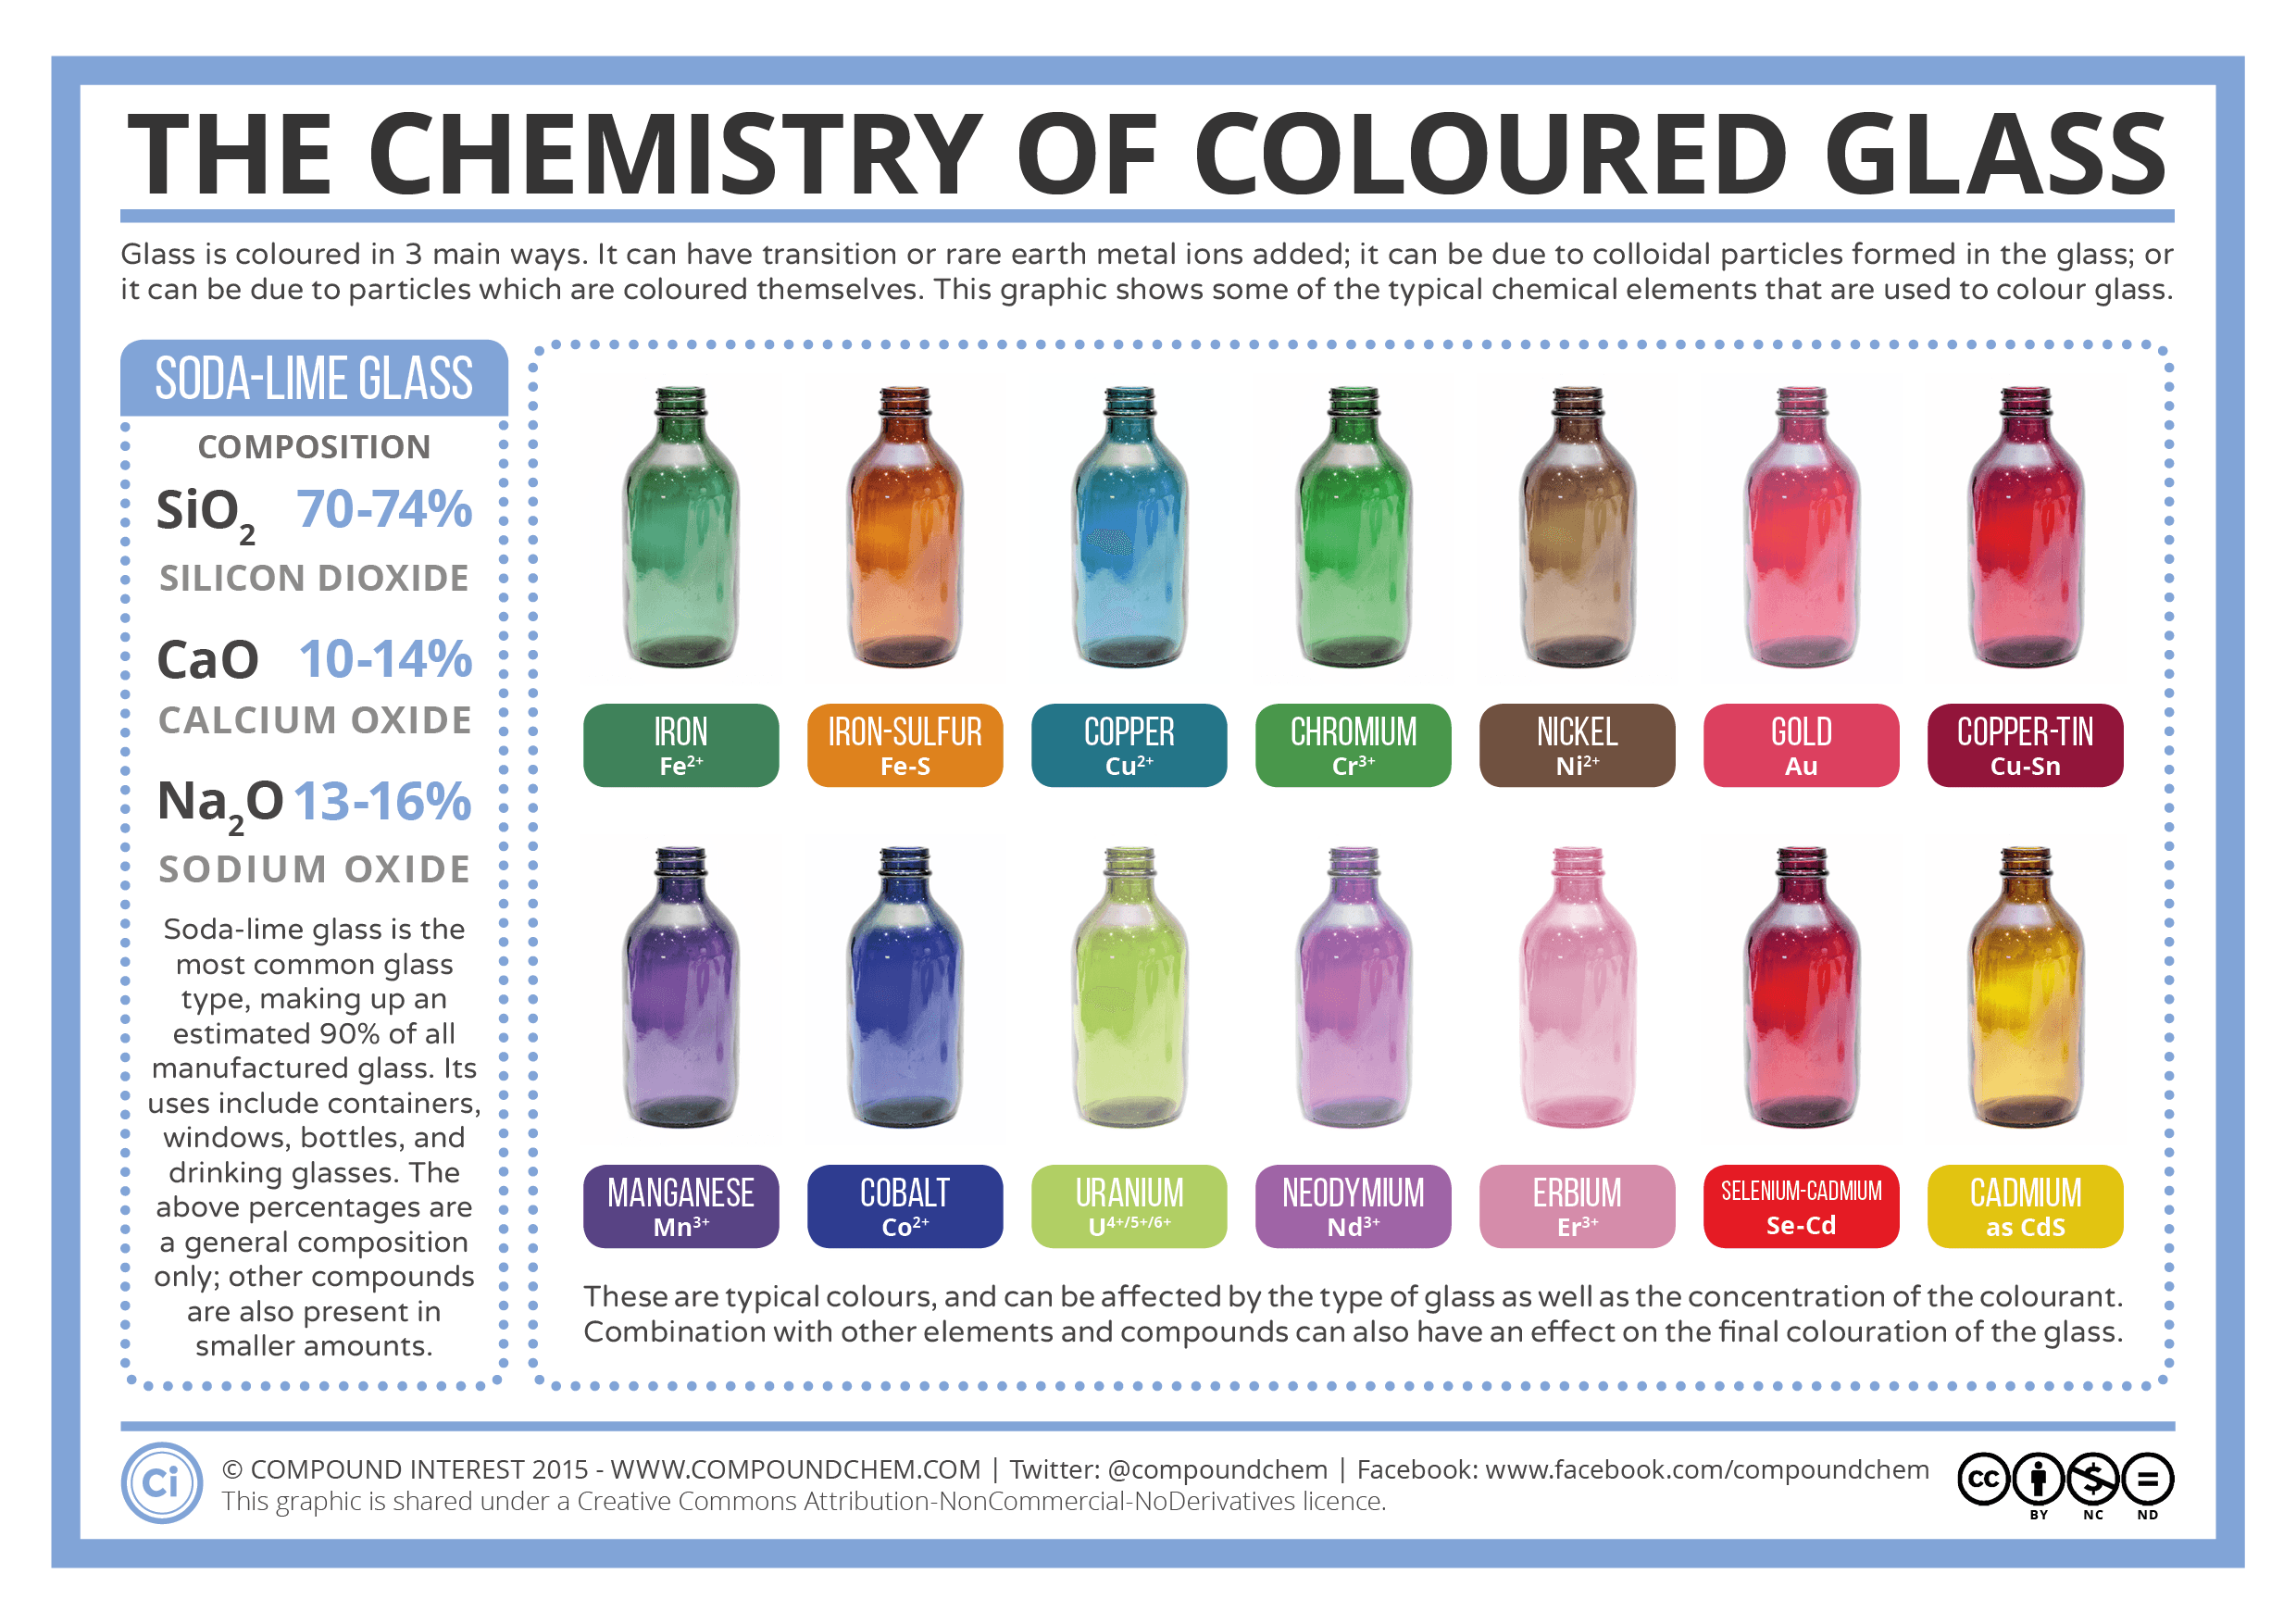
There are many minerals and chemicals that are used to give glass its variety of colour.  This note attempts to give information on the most common elements and combinations used to impart the colours to the glass.


Antimony oxides produce white glass as do tin oxides.  Together with lead, antimony results in yellow.


Cadmium together with sulphur forms cadmium sulphide and results in deep yellow colour.  Together with selenium and sulphur it yields shades of bright red and orange. 


Chromium is a very powerful colourizing agent, yielding dark green or in higher concentrations even black colour. Together with tin oxide and arsenic it gives emerald green glass. Chromium aventurine, in which aventurescence was achieved by growth of large parallel chromium(III) oxide plates during cooling, was also made from glass with added chromium oxide in amount above its solubility limit in glass.


The material can be introduced into glass either in the form of chromic oxide or potassium dichromate, the latter being a more convenient form.  Potassium chromate is yellow and this colour can be imparted to certain glasses. To produce emerald green glass in which a yellowish cast must be avoided, the addition of tin oxide and arsenic is necessary.

Chromium is associated mainly with the production of green glass, but other colours from yellow through bluish-red, red to dark green or even black can be achieved in combination with other oxides.


Cobalt is the most powerful blue colorant used in glassmaking producing rich blues when used in potash containing mixes, but it can also give shades of green when used with iodides.  The deepest of blues are produced when used in glass containing potash.


Small concentrations of cobalt (0.025 to 0.1%) yield blue glass. The best results are achieved when using glass containing potash. Very small amounts can be used for decolourizing. Addition of 2% to 3% of copper oxide produces a turquoise colour.


Copper is a very powerful and versatile colouring agent when used in colouring glass.  Copper greens and blues are not difficult to produce, although the behaviour of copper in a silicate melt can be complicated.  Copper was used most profusely to produce green glass.  


Pure metallic copper produces a very dark red, opaque glass, which is sometimes used as a substitute for gold in the production of ruby-coloured glass. The art of using copper for ruby glass goes far back to ancient times but even so using copper oxide to make ruby glass can be very difficult. Today we find copper being used to produce turquoise blue tones.


Didymium gives green colour (used in UV filters) or lilac red.


Metallic gold, in very small concentrations (around 0.001%, or 10 ppm), produces a rich ruby coloured glass (gold ruby), while lower concentrations produces a less intense red, often marketed as cranberry. The gold is used as gold chloride. The colour is caused by the size and dispersion of gold particles.


Iron is a very useful and powerful colouring agent even though it can be an undesirable impurity in making glass. Iron in its metallic forms cannot remain in equilibrium with glass and can be disregarded. But its ferrous and ferric forms are of a great help in producing coloured glass.  Iron(II) oxide may be added to glass resulting in bluish-green glass.  


Together with chromium it gives a richer green colour.  In a reduced condition, it can be combined with chromium to produce a deep green glass. 


Used with the combination of carbon or other reducing agents, sulphur and iron sulphides give a dark amber colour.


Lead compounds produce a range of yellows.


Manganese can be added in small amounts to remove the green tint given by iron, or in higher concentrations to give glass an amethyst colour.


Manganese dioxide, which is black, is used to remove the green colour from the glass. This results in a very slow chemical process where it is converted to sodium permanganate, a dark purple compound. Windows made with manganese dioxide solarise to change to a colour which is lightly tinted violet because of this chemical change.


Manganese in its low state of oxidation is colourless, but it is a powerful oxidising agent and can be used for decolourising purposes to oxidise the iron content.  Manganese is mainly used in the production of purple glass resembling the colour of potassium permanganate crystals. The purple colour is achieved by the trivalent manganese however in its divalent state it only imparts a weak yellow or brown colour.


Nickel, depending on the concentration, produces blue, or violet, or even black glass. It is used in the production of smoky coloured glass


Lead crystal with added nickel acquires purplish colour. Nickel together with a small amount of cobalt can be used for decolourizing of lead glass.  When it is introduced into lead crystal it gives a purplish colour, which compensates for a yellow tint produced by other constituents.


Selenium, like manganese, can be used in small concentrations to decolourize glass, or in higher concentrations to impart a reddish colour, caused by selenium nanoparticles dispersed in glass. It is a very important agent to make pink and red glass. When used together with cadmium sulphide, it yields a brilliant red.


Silver compounds such as silver nitrate and silver halides can produce a range of colours from orange-red to yellow. The way the glass is heated and cooled can significantly affect the colours produced by these compounds.


Sulphur, together with carbon and iron salts, is used to form iron polysulphides and produce amber glass ranging from yellowish to almost black.  With calcium it yields a deep yellow colour.  


In borosilicate glasses rich in boron, sulphur imparts a blue colour. Cadmium sulphides, which have a deep yellow colour, are often used in the production of glazes and enamels.


Tin oxide with antimony and arsenic oxides produce an opaque white glass (milk glass), first used in Venice to produce an imitation porcelain.


Adding titanium produces yellowish-brown glass. Titanium, rarely used on its own, is more often employed to intensify and brighten other colourizing additives.


Uranium (0.1% to 2%) can be added to give glass a fluorescent yellow or green colour.  Uranium glass is typically not radioactive enough to be dangerous.  It is often referred to as Vaseline glass by USA collectors.  When used with lead glass with very high proportion of lead, produces a deep red colour.


Chart
A good visual chart of minerals and resulting colours is here.


Influence of the glass-making process on colour.
It is not only the minerals that give the glass the colour; it is combined with the way in which the materials are treated.  The physical conditions under which the glass is made also have an influence on the colour.  The main ones are:
1.   The temperature of the melt/batch
2.   Temperature of reheat during the working of the glass
3.   The temperature of the 'Lehr' (Annealing Oven)
4.   Duration of the melt/batch
5.   Time and temperature relationship at different stages in production
6.   The type of colorant being used
7.   Concentration of the colorant
8.   Atmosphere of the furnace
9.   The composition of the colorant within the glass composition, as is the case when iron is added to glass. The type of iron oxide formed decides if the glass will be blue or yellow
10.                The number of times the same glass is melted. Repeated melting of the cullet will usually give a darker tone to the finished piece

Thursday 23 March 2017

Approaching a Gallery

Images of WorkMake sure that you have good quality images taken of your work (35mm transparencies, digital images for CDs or email), after all, you will be competing with practitioners that have been in business for years and are firmly established as leading national and international designers. Sending poor images/presentations reflects very badly on your approach and your work.

Invest in a professional portfolio filled to the brim with beautifully laid out colour photography on a black background. Don’t walk into the gallery with a handful of snapshots.

Sending Biography and VisualsSend general descriptive information about yourself and your work to the gallery first. Then follow this up with a telephone call. Find out the contact name you need for the relevant department within the gallery. If you send something with no contact name your presentation can sit in a pending tray for months! Contact as many galleries as you can handle, rather than waiting for a reply from the first one on your list.

Research and Make Appointments
Don’t just turn up at a gallery with your work. Galleries plan their exhibition schedule at least two years in advance. They are busy most days with artists and dealing with clients so it is always best to make an appointment first.

Pop in regularly to your local galleries, or research on the internet, to get an idea of the kind of designers they display, and the style and quality of work on show.

Keep in TouchContemporary galleries are always looking for new original designers for their exhibition programme, so update the gallery regularly by sending emails, transparencies and CD (with images).

It is especially important that the gallery can see how serious you are about your work, how it develops in style and that you are still exhibiting and producing work 2-5 years later. Make sure your work is unique and difficult to duplicate. Keep your own designs and patterns dated and own the copyright to them.

Don’t give up. There's someone out there who will like your work. When you find gallery owners who are crazy about your work, stick with them.

When you have an offer of a show
Watch the papers for announcements of other openings at the gallery to see how well each opening is advertised. Ask around the arts community to see how well known the gallery and its owner are.

Check on the gallery/artist percentage agreement when calling each gallery. Your price to the public must be calculated based on this. Charge what the work is worth!

Check around with other artists represented by the gallery, asking them about promptness of payment by the gallery.

Be businesslike in all dealings.Prepare a contract, if the gallery does not have one, to cover mutual expectations. It should include who does what, e.g., mounting of the work, invitations to the opening, opening night, payment terms, artist’s residual and resale rights, etc.

Don’t be a pain to the gallery owner. Don’t pester. If you have to be anxious about the show, do it privately.

Enjoy the opening night!

Wednesday 22 March 2017

Over Annealing

Sometimes the statement is made that you can never over anneal.  This statement is true only under certain circumstances. 

Annealing
The statement is also dependent on the understanding of what anneal means.  Annealing is the process of stabilising the temperature, ensuring the piece is at the same temperature throughout, and then gradually cooling the piece to avoid heat shock.  This is to point out that annealing is both the soak and the slow cool.

Long Soaks
Long soaks at the annealing stabilisation temperature can be injurious to your piece if the temperature in your kiln is not even.  This can mean that one or more parts of your piece are at different temperatures. This sets up stress within it.

Placing
You can reduce the possibility of stress by placing the piece at the centre of the kiln or avoid placing the piece in the cool spots of the kiln. 

Cool Rates
Another method of avoiding locking in the stress to the piece is to reduce the cooling rate to less than normal.  This will reduce the temperature differential within the piece.

Mass Being Cooled
In all this you need to remember that the anneal cool rate is relative to the mass of material to be cooled.  Therefore, a thick piece needs a slower annealing cool than a thin one.


But it is not just the thickness of the glass to be cooled.  You need to think about the mass of the kiln shelf or mould that supports the glass.  An example is that glass on a ceramic shelf needs slower cooling than one on a fibre board shelf, because the mass of the shelf needs to be taken into account as well as the glass. Connected to this is whether the shelf is on the floor - slower cooling - or supported on posts, allowing air to circulate under the shelf.

Wednesday 15 March 2017

Fibre board moulds

A publication on moulds from fibre boards is available from Stained Glass Supplies. This gives much more detail than this note can.  However, the basics are outlined here.

Commonly available refractory boards are:

·         Calcium silicate
·         Standard fibre boards
·         Armstrong ceiling tiles

They can be used bare (except Armstrong ceiling tiles) or hardened.

A question that will arise is whether to harden or not.  This depends on the durability you require.  A board that is not hardened does not require kiln wash when fired.  However, as it is soft it is easy to break.  A hardened fibre board mould always requires kiln wash or another separator.  It does become durable and almost rings when tapped once it is hardened and cured.  If the shape needs to be preserved for further use, hardening is advisable.


Working methods

Usually hand tools are all that are required to get the results required.


Safety

Do any work on refractory boards outdoors if possible, and with a respirator.  If you must do it indoors, have good ventilation, wear a respirator, and clean up with damp sponges or other absorbent material to avoid putting the dust back into the air.

Do you need to pre-fire fibre moulds?

Moulds that are small or thin do not erequire firing before using.  Thick and large fibre moulds do need to have the binders burned out before use to avoid carbon marks on the glass.

Sunday 12 March 2017

Advice on Commissioning Craft

This is an outline of information you can give to a potential client to help them with the process of commissioning.

If you have always imagined owning something unique and original, or like to be distinctive and stylish and can’t find what you are looking for on the high street, then commissioning could be the way forward.

If you are nervous about taking the next step and uncertain what is involved, these are the key stages.
Step 1: What do you want?
Step 2: Research by looking at ideas and images that suit your imagination. Note who is working in that kind of style.
Step 3: Write a brief of what you have discovered and then discuss your ideas with the artist you have identified.
Step 4: Discuss the budget and get a written quotation.
Step 5: Agree on the time frame for progress and delivery updates. There are sometimes difficulties in making unique items.
Step 6: Communicate regularly with each other.

Remember, because the process is about communication, there is the potential for misunderstandings and differing expectations by the commissioner and maker. Make sure you have thought the process through before proceeding and ensure all aspects are clarified in writing before you begin - including the quotation, payment schedule, time frame, etc.

And finally…… Enjoy it

The opportunity to commission a piece is an exciting experience and can be rewarding to both you and the maker. As long as you are prepared, and keep communicating with each other, you will become the owner of a unique and special piece of work which will bring hours of pleasure and will be the envy of your friends. 


The full information can be downloaded from craftscotland