Showing posts with label Stained Glass Supplies Ltd. Show all posts

Wednesday 19 May 2021

What are enamels?


Not all enamels are equal

Enamel paints
This description refers to a paint that air dries (or with minimal heat) to a hard finish (usually gloss). Most commercially available enamel paints are significantly softer than either vitreous enamel or heat cured synthetic resins. The term "enamel paint" generally is used to describe oil-based covering products, usually with a significant gloss finish. Many latex or water-based paints have adopted the term.

Enamel paint has come to mean a "hard surfaced paint" and usually is in reference to paint brands of higher quality, floor coatings of a high gloss finish. Most enamel paints are alkyd resin based. Some enamel paints have been made by adding varnish to oil-based paint. Enamels paint can also refer to nitro-cellulose based paints. Nitro-cellulose enamels are also commonly known as modern lacquers.  These have been largely replaced by synthetic coatings like alkyd, acrylic and vinyl.


Enamel paints are used for coating surfaces that are outdoors or otherwise subject to hard wear, or variations in temperature.  A widespread application is in paints for cars. It is also used frequently to decorate or label bottles due to the low curing temperatures of some formulations.


Vitreous enamels 

Vitreous enamels are used in a variety of circumstances.  Metal signs are most frequently enamel coated; they are used in ceramics as over glazes;  and they are used on glass in many circumstances.

Vitreous Enamel is simply a thin layer of glass fused at high temperature on to the surface of a metal or glass. Vitreous Enamel can be defined as a material which is a vitreous solid obtained by smelting or fritting a mixture of inorganic materials.  The word enamel comes from the High German word ‘smelzan’ and from the Old French ‘esmail’.

The key ingredient of vitreous enamel is finely ground glass frit. Colour in enamel is obtained by the addition of various minerals and metal oxides. 

Vitreous enamel is made by smelting naturally occurring minerals, such as sand, feldspar, borax, soda ash, and sodium fluoride at temperatures between 1200°C and 1350°C  until all the raw materials have dissolved. The molten glass which is formed is either quenched into water or through water-cooled rollers. This rapid cooling prevents crystallisation. The resulting frit is ground in a rotating ball mill either to produce a water-based slurry or a powder.

At the milling stage, other minerals are added to give the properties and colour required of the final enamel. Different enamel colours can be mixed to make a new colour, in the manner of paint. Enamel can be transparent, opaque or opalescent.

More information at: 


Metal enamelling
Modern frit for enamelling steel is typically an alkali borosilicate glass with a thermal expansion and glass temperature suitable for coating steel and other metals. Raw materials are smelted together between 1,150 and 1,450°C (2,100 and 2,650°F) into a liquid glass that is directed out of the furnace and thermal shocked with either water or steel rollers into frit. Vitreous enamel is often applied as a powder or paste and then fired at high temperature. This process gives vitreous enamel its unique combination of properties. The smooth glass-like surface is hard; it is scratch, chemical and fire resistant. It is easy to clean and hygienic.  It all started 3500 years ago in Cyprus. Since 1500 BC, enamelling has been a durable, attractive and reliable material.

More information at: 


Enamels in Ceramics
Overglaze decoration, overglaze enamelling or on-glaze decoration are all names for the method of decorating pottery, where the coloured decoration is applied on top of the already fired and glazed surface, and then fixed in a second firing at a relatively low temperature.  The colours fuse on to the glaze, so the decoration becomes durable. This decorative firing is usually done at a lower temperature which allows for a varied and vivid palette of colours, using pigments which will not colour correctly at the high temperature necessary to fire the clay body.


Glass Enamels
Glass enamels are produced in the same way as enamels for metals and ceramics.  The frit characteristics are adjusted for various applications and temperatures.  This combination of finely ground frit and metals for colouring are often combined with a binder or carrier medium.  It is similar to vitreous enamel on metal surfaces, but the supporting surface is glass. It is also close to "enamelled" overglaze decoration on pottery, especially on porcelain, and it is thought likely that the technique passed from metal to glass (probably in the Islamic world), and then in the Renaissance from glass to pottery (perhaps in Bohemia or Germany). 

Glass may be enamelled by sprinkling a loose powder on a flat surface, painting or printing a slurry, or painting or stamping a binder and then sprinkling it with powder, which will adhere.  The powdered frit can be in the ceramic on-glaze composition suitable for fusing or casting temperatures, or it can be adjusted for slumping temperatures as in the traditional glass stainers’ enamels. It can produce brilliant and long-lasting colours, and be transparent, translucent or opaque. Generally, the desired colours only appear when the piece is fired, adding to the artist's difficulties.


The term enamel is applied to a wide variety of coating materials.  The range of usage is indicated, and the manufacture and applications of vitreous enamels is indicated.  The term enamel is not properly applied to finely ground coloured glass in a medium.

Wednesday 5 May 2021

Colour Dilution of Powders


Sometimes you do not have a tone or shade of a colour you need for your project.  Other times you want to have a gradation of shade across a piece.  There is the obvious solution of mixing a colour with clear to produce lighter shades.  But there is a difficulty when mixing clear with powders to fuse. The result is often a pointillist effect with points of light coming through the colour. There are several approaches to this difficulty.

One way is to use a powder made from a tint of the colour.  But sometimes there is not a tint made. Sometimes you do not have that tint in stock. So, you must look to other solutions.

Credit: www.warm-glass.co.uk


An alternative is to use clear powder to mix with the intense colour you want to dilute.  You will need to test varying proportions of clear to colour to get the tone you need.  You may be surprised at the amount of clear needed.  And there still is the slight possibility of points of light coming through the clear.

Another possibility is to use one of the less dense white powders to mix with the colour.  White powders such as the Bullseye 000243, translucent white, or the 000113, dense white are possible.  The very dense or lacy whites are not as suitable. One is too opaque, the other is uneven in colour. Again, testing will be required, and you may be surprised at how little is required to alter the tone.

One other way I have used is to mix fine frit with the powder.  This has less control than the other methods but can provide significant dilution of the intense colours.  If you want to see if this is suitable, you can follow this process. 

Add a few drops of water to the clear frit in a small container. Close it and shake to get all the frit coated with a film of water. If after shaking the frit is not “clumping” you can add a little more. Too much water will create a slurry which is not suitable.  So, add only a small amount of water at a time until the frit is like damp sand on the beach. Any excess water must be poured off. 

Add powder to the damp frit, and shake well again to coat the frit with powder. If the frit does not seem to be fully coated, add a little more powder.  The film of water on the frit allows the powder to adhere temporarily to the frit.  

This mixture can then be applied to the surface and smoothed with a pallet knife. This will not guarantee there are no clear pinpoints, but it will reduce them to a minimum. You will not have the subtle differences in tone that sifting powder can give you, but it is a cost-effective way of diluting intense powder colours that can have advantages over mixing powders.

Of course, the various methods of diluting colour described here can be used to combine powders to produce new colours.


Wednesday 21 April 2021

Soaks Below the Softening Point

There are frequent suggestions that holds in the rise of temperature for glass are required.  Various justifications are given.  A few notes before getting to the explanation of why they are uncessary.

A note is required about the softening point sometimes called the upper strain point. There is a reasonable amount of discussion about the lower strain point.  So much that it is often simply referred to as the strain point.    Below the lower strain point, the glass becomes so stiff and brittle that no further annealing can occur.  Thermal shock can happen though, so the cooling needs to be controlled.

There also is an upper point at which the behaviour of the glass is different.  Above this temperature, no annealing can occur either, because the glass has become plastic and the molecules randomly arranged.  It is only just pliable, of course, but its molecules are no longer strongly bound to one another.  This is the temperature at which much of slumping is done.

It is disputed whether such a point exists.  Still, in practical terms it is where the glass becomes so plastic that it cannot be temperature shocked.  The temperature of this “point” is approximately 45°C above the annealing point, rather than the temperature equalisation soak. 

Note that the temperature at which Bullseye recommends that the annealing soak should occur is a temperature equalisation point, which is about 33°C below the glass transition temperature - the point at which glass can be most quickly annealed.  The average glass transition point for Bullseye is 516°C.  Most other fusing glasses use the glass transition (Tg) point as the annealing temperature for the soak.  They or you could employ the Bullseye technique on thicker slabs of the glass by setting the temperature equalisation point 33°C below the annealing point, and soaking for the same kinds of time used in the Bullseye chart for annealing thick slabs.  In fact, this is what Wissmach has recently done with its W90 and W96 fusing glass ranges.  They now recommend 482C (900F) as the anneal soak temperature.

Now to the point of the post.

The soaks that are often put into schedules on the rise in temperature are justified as allowing the glass to equalise in temperature.  Glass in its brittle phase is an excellent insulator.  This means that heat does not travel quickly through the glass.  Consequently glass behaves best with steady and even rises in temperature (and correspondingly on the reduction in temperature).  Rapid rates risk breaking the glass on the temperature rise, no matter how many or how long the holds are.  

This means a slower rate of advance will accomplish the heating of the glass in the same amount of time, and in a safer manner, than rapid rises with short soaks/dwells/holds.  The slower rate of temperature increase allows the glass to absorb and distribute the heat more evenly.  This slow heating is most obviously required in tack fusing where there are different thicknesses of glass.  


This means that it is possible for thin areas of glass to heat up much more quickly than glass covered by different thicknesses of glass.  It also applies to strongly contrasting colours such as black and white, because they absorb the heat differently - black more quickly than white.

There are, of course, circumstances where soaks at intervals are required – usually because of mould characteristics, in slumping, and in pate de verre.

Sometimes people add a soak at the annealing temperature on the way up in their schedules.  This is unnecessary.  If the glass has survived up to this point without breaking, it is highly unlikely it will break with a further increase in the rate of advance unless it is very fast.  The temperature after all, is above the strain point meaning the glass is no longer in the brittle phase.

Many people add a soak at around 540°C (ca. 1000°F) into their schedule on the increase in temperature, before their rapid rate of advance to the top temperature.  The choice of this temperature relates to the lower strain point.  This also is unnecessary, except possibly for very thick pieces. By this time the glass has reached its plastic stage and if it hasn’t broken by then, it won’t with a rapid rise in temperature either.

Further information is available in the ebook Low Temperature Kiln Forming.

Soaks at various temperatures during the advance to the upper strain points of glass are not necessary.  What is necessary is a knowledge of when the glass becomes plastic in its behaviour, and an understanding of how soaks can overcome characteristics of moulds, or how to achieve specific results and appearances of the glass.


Wednesday 14 April 2021

Smooth Surfaces on Drop Vessels


It is widely recognised that the usual results of kiln forming are one textured side and a smooth upper side. The common methods of having upper and lower surfaces both smooth is to blow the glass, avoid allowing the glass to touch the mould, and cold working the textured side to smooth.

The question arises about the possibility of getting smooth surfaces on the inside and outside of a drop vessel.  As the glass in a drop only touches the mould at the collar and edge, shouldn’t the glass be smooth on both sides?  The answer to that is in the temperatures and time used.

The temperatures used in a drop are not high enough to be certain of smoothing the outer surface.  But the soak times at drop temperatures are enough to create a fire polish on the upper/inside surface.  This indicates the blank in a drop should be placed with the texture up, facing the heating elements.  The smoother side facing the floor will be stretched and will remain smooth. 

The smoothing effect of firing with rough side up does depend a little on the depth of the drop.  Shallow drops will not have the same heat exposure that deeper drops do, assuming that a moderate heat is being used over three to four hours.


This implies that the design to show on the inside of the drop should be in contact with the separator when fusing the blank.

Wednesday 7 April 2021

Firing Records

Bullseye Glass Company


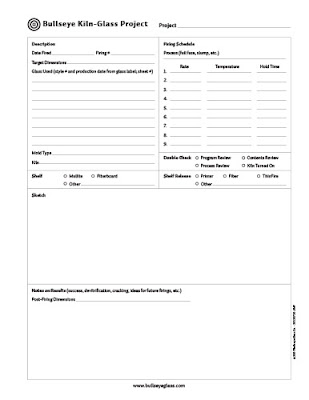
To develop your fused glass practice, you need to record lots of information about your firings.  This tells you what has gone well and not so well.  It hones your expectations about how you should be preparing, scheduling, and analysing your experiences.  It becomes your detailed memory bank of results and gives directions for the future.  This should be done whether fired in your own kiln or someone else’s.

Categories of information for the record
There is quite a bit of information that needs to be included in such a record.  This is my view of what needs to be included  in your logbook for future reference.

Date
Record the date of the firing as that will give you historical information on similar projects.  It can show you what you have changed over time and the variations you have introduced.

Glass used
This is not only the type of glass (Bullseye, Float, Oceanside, Wissmach, Youghiogheny, etc), but the colours used.  This should include the manufacturer’s code numbers to enable you to replicate the glass used.

Lay up
This can be a description, a drawing or pictures of the set-up of the piece prior to firing.  This is vital to later understanding what you did in this firing.  Record any glues or stabilising elements you use. Any frits or powders used should be recorded. The placement in the kiln is important - centred, one corner or another, level/ height in kiln, etc., can affect the results.  You can make a sketch or take a photo to attach to the record rather than writing separate descriptons. How it comes out is recorded later.

Dimensions
The dimensions (h x w x d) including any variations in height are needed to compare with other projects.  This might be included in the lay-up diagrams or pictures, but it is most useful to have the dimensions and their variations recorded as numbers too.  You might think in terms of layers, but remember to record the thickness of each layer/piece (e.g., 2mm, 3mm, 4mm, 6mm, etc)

Kiln used
This is especially important if the kiln is not yours. Every kiln has variations and it is important to compensate for that in scheduling and placing of the piece in the kiln.

Process
This is essential in gaining an understanding for planning any modifications.  The process can be described by standard terms - e.g.,  sinter, slump, tack, contour, full fuse, casting, melt – or by your own terminology (if it is consistent).

Description
A statement of your project and aims is very useful for the future.  It is a reference point to use in comparing what you wanted with the results of the firing.

Support system
This includes essential information affecting the firing – shelf type (e.g., fibre, mullite, ceramic tile), mould type (e.g., ceramic, fibre, steel), and a description or sketch including any reference codes.

Kiln furniture. The kind and quantity of kiln furniture (dams, stilts, posts, etc) can affect the firing results, so need to be recorded.

Separators
This includes kiln wash (type, whether new or the number of uses), fibre paper type and amount, mould coatings, and anything else you may use to keep the glass from sticking.

Schedule
This is the thing most everyone remembers to record.  You need to record it each time you use it – even if you have used it many times before.  You need to record each step of the program.

So many times, people report that “it [the schedule] has always worked before”, only to discover that some element had been intentionally or accidentally altered from past firings.  I normally write the schedule in a logbook and then enter it into the programmer. I use the written record to check against what I have entered into the controller.  Then I know I have programmed what I intended.  I can also check on earlier, similar firings to see the variations I have used in the past.

Results
Drawings or pictures of the finished item are essential.  A description of the results is also needed as a picture does not tell the whole story.

Comments on results
You should also give a commentary on the results of the firing.  This should include successes as well as disappointments.  Thoughts for future similar firings should be written down.  They will be forgotten soon, if you don’t.

How to keep all this information
As you can see there are many elements that need to be recorded as they each can affect a firing. I see these as a minimum, and you will add elements important to you for this list.

It does not matter much in what form you keep the information.  It can be a ledger, spreadsheet, database or your phone or tablet that you carry with you always.  There are several apps for recording the kiln firings that can be used.  What is important is that you can record the information immediately, or as you prepare the work for the kiln, into the chosen form of recording.  I use a logbook and convert that in my leisure moments to a spreadsheet (usually at new years day).  This allows me to compare information over time and especially the kinds of firings that I rarely do.  It also allows me to search by various processes.

It is important that you back up any electronically held information to the cloud or other device to protect against loss or corruption. 

Forms
It is useful to have a form for compiling this record.  A number of elements of the records can be reduced to tick boxes to ease the recording.  It helps to remind you of the information you need to log for each firing.  Bullseye have an excellent form that you can use or adapt to your needs. There are a few apps that can be used on phones or tablets which are useful for those who record everything on their phone.  Remember to back it all up to the cloud for preservation in case of loss or damage.

Wednesday 31 March 2021

Darkening leads

There are several ways to darken the leads in leaded panels. Three are to:
use patina on the leads,
brush with on stove blackening with a soft brush, and
simply brush after cementing.

A certain number of people use black patina to darken the leads after cementing and cleaning the panel.  This certainly gives a black result, but it introduces an acid to the panel. I do not do this, nor do I recommend it.

Another method of darkening is to apply stove blackening or black oil paint to the panel to make the leads dark.  I recommend that you put very small amounts on a soft brush and then brush over the leads.  It might have to have a little more colour added for a large panel, but that is better than having to clean up large areas of smudged black over the glass, especially with painted glass.

credit: PicClick UK

But...
You can darken lead came without patina or black colour.  You finish the panel with the scrubbing brush to push whiting against the fillet of lead light cement against the leads as normal.  This has the effect of cleaning the glass as well as stiffening the cement at the edge of the cames. Remove the excess whiting as normal.

But, before picking out all the excess cement once the scrubbing brush process is finished, use a soft brush, such as a shoe brush, over the whole panel.  This can be mechanised by using a soft bristled mop in a drill motor on a slow to medium speed.  This will pick up colour from the cement and spread it evenly over the lead and solder joints. It will give a dark grey appearance to the whole of the leading and solder joints as well as polish up the glass. 

The degree of shine will be dependent on the amount of time you wish to spend, but can be a polished to a very dark grey to black colour.  This will last longer than simple black colour brushed onto the leads, as it is bound by the linseed oil in the cement to the surface of the leads. Also, it quickly dries so that not so much black is transferred to your hands as you handle it.


Making lead cames black during the finishing of a leaded panel is as simple as brushing over the cames before picking out all the excess lead light cement.

Wednesday 24 March 2021

Contacting the Wholesaler


Credit: lunchshow.co.uk

Preparation

Whether preparing for a trade show or direct approach to a wholesaler, you need to get things to a good standard before making contact.

This can be a lot of work, but it will benefit your sales across all the venues you have work placed.  Wholesale gets your work out to multiple locations, develops your relations with shops and, by extension, to communities and to customers that you would not be able to reach by yourself.

Presentation materials

You need to have a clear identity to your work – something which binds the separate pieces together, making it clear that it is your sensibility that runs through the works.

You need to have a pricing strategy that runs through your range of products.  This will be connected to the target market that you have identified.  This is important to getting your work taken up by wholesalers and stores.

Excellent photographs of your work are needed in all the literature you produce for the buyers. Photography can make all the difference. Include photos that highlight your story and integrate with your products.  These should be consistent across all your materials.  They should have a unity of style whether shot on models, on background (normally plain white or black), and with props that support the story of your work.


Line sheets
credit: sewport.com


Line sheets are simple listings of each of your products with a code, title, sizes, and prices with each product line and variation on its own line on the paper. Create simple, readable line sheets with clear instructions on how to order, minimum order levels for discounts, and all your contact and banking details. If you have a required means to get in touch, make sure that is included on the line sheet.  The line sheet is essentially an order form which each of you will have a copy, and from which you will create the invoice.  The agreed payment terms, including supply dates should be written on the line sheet when agreed.


Information on product and maker


Write the material for promotion of your work and yourself clearly and concisely.  Start with the most important information about the business and products. Details and methods should come much later.

Be consistent in the way you describe your products.  Always consider the target market.  The wholesaler will be much more dispassionate about the products than the ultimate buyer will be. The descriptions show the trade what your target customer is like and so they can see what the fit between your work and the shop’s offering is.  Use the concepts and words that are familiar to the ultimate customer. 

Review your literature many times, proofread, and finally get a friend to look over the materials for style, spelling, consistency and accuracy.

Your complete contact information is required on every piece of printed material.  It also is needed on all online and email communications.


The meeting

Do the work to know who you are contacting by name and job title.  Use the person(s)’ names, refer to the business, store or shop, indicate you have followed any blog or social media postings, and if relevant, be knowledgeable about the local area.

Be selective in what of your work you present to the buyer. You don’t have to have all your lines of work in shops.  You probably could not cope if you did.  Consider what you can supply in quantity that will fit with the shop’s offering.  This will relate to the materials you can source in bulk (for discounts), and what you can produce quickly and easily.  To offer the best prices at a profit, you will need to determine processes that can be streamlined; designs that can be simplified; processes that can be done by less skilled people.


Remember the buyer’s interests during the meeting

They are looking for a range of work that has wide appeal – to both/all genders.  A price range for different works to appeal to a range of customers is needed. 

You need to demonstrate you know what is going on in the design and crafts field and can respond, keeping your offerings fresh and contemporary. Colours, themes, shapes, interests change, and you need to show you are aware of current trends.

Owners are looking for exclusivity.  Store owners want to sell items that no other venue in their area has available.  It is arguable that the more of your work a shop sells, the more exclusive the two of you should become.

Part of the appeal for the shop is signed and dated pieces.  It adds to the caché of the work.  This should be done discretely to avoid distracting from the whole of the work. 

Often owners expect not only well-made items, but displays too.  At the least, you should have presentation boxes that show off your work well.

credit: theproductmart.com


Trade Shows
The alternative to trekking around shops is to attend trade shows.

Trade shows are a place to make contacts – shop owners, fellow crafts people, and representatives.  Yes, you are there to get orders, but the people you meet may be your future customers. Your contacts might help you understand the market better, or move your work in different directions.  It is a place to gauge how your work is perceived, and what you might change or re-enforce.

Networking can help you in gaining new contacts, and even friends in the crafting community.  Visit other stands and arrange to have a coffee break during the show with those you find compatible. You can compare notes on the show or general business stories with those who are not in direct competition.

Have your product display in evidence at the show.  If that is not possible for some reason, have photographs of it in your literature that you can hand over. This enables potential buyers to see how your work might be displayed in their shop.

Take material to the show that you can hand out to prospective purchasers or representatives.  This could be inexpensive samples, the essential business cards, literature, and of course, the line sheet that you complete with the orders at the show, or be taken away if you cannot get them to commit immediately.  Be sure you get material from them too and that you record what they were interested in, so you can contact them after the show.  A contacts book for you to keep information in is essential.

-----


Selection of a gallery or shop in which to place your work is a complex interaction of commission levels; the value you place on your time in preparing for and attending craft fairs or putting your work online; the perceived prestige of the shop/gallery; the potential relationship between you and the outlet; and the relationship of the consignment, wholesale and retail prices.


Wednesday 24 February 2021

Maintaining Consignment Relationships


Stay in communication.  There are several ways to do this.
photo credit: Careers in Sport 


Get on their newsletter list and put them on yours.

Check with them occasionally as a reminder you are around.  Some pretexts for making contact are: you may need to be paid or want to know what is selling or not; to check on stock levels; you may also offer promotional opportunities and want to know what they would like to be put forward.  But do this remotely (email, telephone, etc). An in-person visit should be done by appointment.

Make sure you can restock when the shop needs it. And inquire regularly if more stock is needed.  Find out their delivery hours and stick to them. Restocking requires an inventory list.  This is also the time to bring any new lines you have developed.  Ask if it is OK to bring it before visiting.

Remove old stock. Placing new or seasonal items in the shop can help with sales.  You can get advice from the shop.

Promote the shop.  Use your social media, include them in your list of outlets.  This mutual promotion gives rewards of increased visibility and with determination, sales.

Be inventive. Create ways of communicating your continuing interest in the mutual business benefit both parties receive.  Use anniversaries, local events, things unique to their business, etc., as occasions to be in touch without any commercial objective.  There are lots of creative ways to be in touch.

Selection of a gallery or shop in which to place your work is a complex interaction of commission levels; the value you place on your time in preparing for and attending craft fairs or putting your work online; the perceived prestige of the shop/gallery; the potential relationship between you and the outlet; and the relationship of the consignment, wholesale and retail prices.

An important element of maintaining relationships with your galleries is keeping in contact, being interested in how their business is, and responding to their communications.

Other posts on consignment:

Wednesday 3 February 2021

Consignment Terminology .


You need to communicate clearly, and in writing, with a consignment sales agreement to ensure the best chance of building a positive experience that works for you and the shop owner.  This means that you need to know the terminology used and required in consignment agreements.

Meet the taxation requirements
Make sure you have complied with the legal requirements in your jurisdiction for selling.  In the United States, for example, you need a tax identification number.  In the United Kingdom, you do not need anything other than your personal tax number, unless you are selling so much that you are employing other people.

Written contract
You need more than a verbal agreement.  Ask for their consignment agreement and take it away to consider the terms.  It is not pushy to do this; the shop owner would do the same. If the gallery/shop does not have a standard contract, you need to develop one and negotiate it with the owner.  The important elements are the commission rate, payment terms and frequency, insurance, breakages & theft, inventory arrangements.

Commission rate
A direct sale to the shop is normally marked up 100% of your price plus taxes to give the retail price.  So, the commission taken should be less that than that.  If the shop wants 50% commission, counter with direct sale at that level of commission.  It would be exceptional circumstances only that 50% commission would be acceptable to you.  30% - 40% is more usual.  The agreed rate should be written in the contract.

Payment terms
How frequently will you be paid for the work sold?  This needs to be included in the agreement.  Associated with this is inventory.

Inventory
You need to provide an item and price list for the gallery and one for yourself.  It should state the name of the parties at the head. It is essential to list the date delivered, the number and description of the items. Each line of work needs to have the item price to the gallery and the total price for each line. This list gives the sums you expect to receive upon their sale.  It is possible you will want to include, by agreement,  their commission and the retail price, although the gallery may change the retail price at any time.  If they want to reduce the price, that will come from their commission.  The price on the consignment form is not to be reduced, even though they ask for it. If they want to increase the price, they will keep the additional sums – in which case, of course, you should be thinking about increasing your price to them.

Exclusivity
What about choosing between galleries with different commission levels when you would like to be in both?  How do you choose?


Generally, shops and galleries expect to have an exclusive arrangement for their area.  This means that you can’t have your items in different outlets in a defined area.  What is that area?  If you are comfortable with the area restrictions, you then can approach the decision about commission levels.

Suppose you have different shops offering to take your work, but at different commission levels.  What do you do?

First, you do not reduce your price to the higher commission place.  You set a fair price for your work in the items.  That is a price at which you can make a profit.  That is what you deserve.  So, you place the items in either place at your single, set price. That may make your product more expensive in one shop than another.  That is not your problem. That is the owner’s decision.  You can see everywhere that there are different prices for the same product.  Usually, there is a perceived difference in quality, service, prestige, etc., between the places.

Reporting
The reciprocal of this is the listing by the shop of items sold and resulting sums due.  The frequency of this reporting needs to be in the agreement. 

Loss, theft, breakage
The fact that the work on consignment remains your property until sold needs to be in the written contract.  This may affect who insures your work in case of breakage or theft.  The division of responsibility needs to be written in the agreement.

Management of stock
The shop should have a system to keep track of sales and stock. Ask about it.

Stocking
Agree restocking arrangements to be responsive to sales. An agreement on removing items due to lack of sales, or your requirement to have the item in your possession is needed.

Promotion
You hope and expect the retailer to promote your works, but you must also promote the retailer in your social media and your direct selling venues.  Participating in events related to your work is one of the ways to assist in promotion too.  Some element of this needs to be included in the contract.


Selection of a gallery or shop in which to place your work is a complex interaction of commission levels; the value you place on your time in preparing for and attending craft fairs or putting your work online; the perceived prestige of the shop/gallery; the potential relationship between you and the outlet; and the relationship of the consignment, wholesale and retail prices.

Other posts on consignment:

Wednesday 20 January 2021

Consignment – meeting the owner/buyer


When approaching the retailer keep several things in mind:

Prepare for the meeting
  • Make an appointment, as the retailers’ focus is on selling. Buying is done in down time from the sales.
  • Explain how you came to select the shop – this can include recommendations from people already represented by the store.
  • Provide a brief description of the kind of work you do.  If you sell at other locations – craft shows, online, etc. – include that and be prepared to say how well they sell.
  • Be prepared to talk about the inspirations behind your work.
  • Prepare yourself with the points you want to make about your work and its relation to the shop’s offerings.
  • Remember that you are providing retailers with unique items that fit with their customers interests and needs.
  • Be prepared with suggested retail price ranges for each line, remembering the commission the shop takes.
  • During the meeting, the retailer will be assessing both your work and the potential working relationship.
  • Be prepared for the retailer to ask for time to consider whether to stock your work.

Bring a range of materials to support your presentation.
  • Take a small but representative sample set of your work in its packaging.
  • Back up the samples with good photographs, which are essential, especially if the pieces are too large for practical transport.
  • Bring business cards, a resume relevant to the shop, marketing materials, photographs, and samples you are prepared to leave with the shop if asked.

Presentation
  • Dress to make a good impression. You are presenting yourself as well as your work.  You don’t need to be super smart.  Dress neatly in a way that suits your personality.
  •  Present your work at its best along with its packaging.

Follow up

Follow up is essential. A week or so after the meeting contact the premises with further information or even questions.  If the response is to decline to carry your work, ask for feedback about your work and its relation to the shop’s offerings. This will assist your future presentations.


Selection of a gallery or shop in which to place your work is a complex interaction of commission levels; the value you place on your time in preparing for and attending craft fairs or putting your work online; the perceived prestige of the shop/gallery; the potential relationship between you and the outlet; and the relationship of the consignment, wholesale and retail prices.