Showing posts with label Drop rings. Show all posts

Wednesday, 21 September 2022

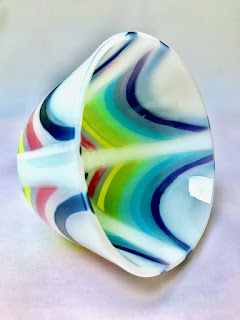
Drop Vase Design for Opalescent Glass

Credit: Missy Mac Glass on Folksy

When making a drop vase in opalescent glass, the design needs to be on the outside.  This will require ensuring the design will be on the bottom when suspended on the drop ring.

It is possible to build the whole piece as normal with the design on the top and fire it.  Then you can turn it over to make sure the design is facing downwards. 

To get a crisper design for the outside the flip and fire technique can be used.  Build from the outer layers to the inner layers.  You are building upside down. Place the design to be seen on the outside of the drop vase down on the prepared shelf first.  Follow this up by placing the inner layers in order from the most outside to the most inside layers.

These instructions rely upon firing the blank first rather than building on the drop ring.

However, you can build on the ring if you need to save one of the two long firings.  Only one modification is required.  Place a sheet of clear down first.  Assemble the design as for a flip and fire technique, i.e., outside layers first, inside layer last.  

This will require a slow heat up to ensure you have allowed enough time for the air to be squeezed from between all the layers and that all the glass at the same temperature before the drop begins.  Sprinkling a fine layer of clear powder over the clear is a good way to assist allowing the air out.  Place the design pieces down before applying the powder. 

This is not the best way to make drop vases, but it can work with care in placing the decorative pieces and applying the powder.
Wednesday, 2 June 2021

Bubbles on Drop-out Rims


Sometimes people doing dropouts get bubbles or unevenness on the rims of their pieces.  This means that it is not suitable to leave the rim on the piece.  Most times, this does not matter, as you intend to cut the rim away. But if you do want to have a rim these uneven surfaces are unsightly and not suitable for high quality pieces.

One person has indicated that they used a schedule of 250°C per hour to 520°C for a 30-minute soak and then proceeded at 330°C to the top temperature of 710°C.  This is probably too fast a heat up at the second segment.  Slower rates of advance are advisable.

One of the advantageous methods of scheduling for dropouts is to put the heat into the glass steadily.  I suggest there are two problems with the rates of advance and soaks in the above (partial) schedule.

The soak at 520°C would be more useful if it were at around 600°C.  This would allow the heat to be distributed throughout the glass before it begins to droop significantly.

The rapid advance of 330°C is much faster than needed, or desirable.  This rapid rate of advance allows the glass to move into the aperture, before the rim is plastic enough to stay on the supporting ring.

These rough drawings show how the rim initially rises from the ring, pivoting on the edge of the aperture.  This happens on all moulds (drops or slumps) where there is a rim.


With a rapid rise in temperature the raised rim edge gets more heat than the depressed middle, as it is closer to the elements.  This additional heat allows the edge of the rim to curve downwards forming air pockets as the edge touches back to the supporting ring.

Some people use fibre paper between the ring and the glass to prevent bubbles. This addition allows a passage of air from under the glass and reduces bubble formation.

Others have developed sloped drop out rings that eliminate the rising of the glass from a flat ring.  The glass is suspended above the aperture and only touches the edge of it as the glass softens. These crude drawings show the process.


To be certain of avoiding air bubbles under the rim of dropouts whatever the style of ring, you should use moderate rates of advance, with a possible soak at around 600°C which is before the glass begins any significant movement. The moderate rate of heating should be continued after this soak, rather than increased.


Wednesday, 14 April 2021

Smooth Surfaces on Drop Vessels


It is widely recognised that the usual results of kiln forming are one textured side and a smooth upper side. The common methods of having upper and lower surfaces both smooth is to blow the glass, avoid allowing the glass to touch the mould, and cold working the textured side to smooth.

The question arises about the possibility of getting smooth surfaces on the inside and outside of a drop vessel.  As the glass in a drop only touches the mould at the collar and edge, shouldn’t the glass be smooth on both sides?  The answer to that is in the temperatures and time used.

The temperatures used in a drop are not high enough to be certain of smoothing the outer surface.  But the soak times at drop temperatures are enough to create a fire polish on the upper/inside surface.  This indicates the blank in a drop should be placed with the texture up, facing the heating elements.  The smoother side facing the floor will be stretched and will remain smooth. 

The smoothing effect of firing with rough side up does depend a little on the depth of the drop.  Shallow drops will not have the same heat exposure that deeper drops do, assuming that a moderate heat is being used over three to four hours.


This implies that the design to show on the inside of the drop should be in contact with the separator when fusing the blank.

Wednesday, 8 August 2018

Glass on Drop Rings


When glass drops through a ring, you need to check on some things relating to the placement and firing.

When thinking about the relationship between the size of the flat glass and the size of the aperture, you need to remember how the glass behaves as it heats up toward the drop temperature.


Glass behaviour
The glass begins to sag at the middle of the aperture, however the glass is still relatively stiff.  The weight of the rim is not enough to keep it from rising from the ring. The rim of the disc maintains the angle from the centre of the drop to the edge, until it gets hot enough for the weight of the rim to allow the edge of the disc to settle back down onto the ring.  This is the source of a lot of the stretch marks at the shoulder of drops.


Rim width
To avoid the glass dropping through, you need to have an adequately sized rim.  The width of the rim sitting on the ring, needs to be related to the size of the hole.  

The consequence of an inadequate rim


I have found that for apertures up to 300mm diameter there needs to be at least 35mm on the rim.  The consequence of this is that your blank diameter needs to be 70mm more than the hole diameter.  For larger apertures – up to 500mm – you need 50mm, or 100mm added to the diameter of the hole.  I do not have the experience to say how much more is required for larger diameter drop rings.  There is more discussion on blank sizes here. 


Heat
The rate at which you heat the glass and the top temperature both have effects on the possible drop through.  

High temperatures. The higher temperature you perform the drop out, the more likely you will need larger rims or other devices to reduce the drop through possibilities.  It also promotes excessive thinning below the shoulder. 

Fast rates. The surface will become hotter than the bottom, but at different rates.  The glass over the hole is heating from both top and (to a lesser extent) bottom.  The rim is sitting on the ring and so heats only from the top.  The differential in heat may cause a break.

Weight. The thickness of the glass effects when the drop will begin.  The heavier the glass and larger the hole, the effective weight will be greater.  In these cases, you can use a lower temperature for the drop.


Additional methods.  You can use other methods to reduce the chance of a drop through.  Two of them are:

Weights. You can put kiln furniture on the glass rim to keep it from rising during the initial stages of the drop.  These must be placed symmetrically. Four or six pieces of kiln washed props or small dams would be sufficient up to 300mm diameter.  More would be required for larger apertures.  Of course, these will mark the rim, meaning that it must be cut off.


Inclined rings. Another possibility is to use an inclined ring, with the glass resting on the upward incline, so the glass is held above the aperture and is heating evenly until the drop begins.