Often selecting training in glass is a lottery. It most commonly is done through propinquity and incidental knowledge. Most often a course is chosen because information came to hand of a class that is being held nearby. These are not always the best criteria. It may be better to travel for a course that fits your needs better.
There are some things that you can check to help determine whether the course being offered is the one for you.
The first of course, is whether the instruction will meet your interests. Yes, the title has caught your attention, but you need to find out if the syllabus covers your area of interest adequately.
· Inquire for a syllabus or teaching outline. If there is not one, you may have a question on whether the course is well planned, as well as whether it deals with your interests.
· Ensure the course level is appropriate to your needs. Are there any prerequisites in terms of experience or ability?
Another important element in selection is the person who is leading the course. The leader may of course, may have brought in teacher for this subject, so you need to know things about both.
What is the background to the course leader? Some of the things you might want to find out are:
· Is the course leader part of a business providing materials,
· Is it in a centre of excellence
· Is it an accredited education provider
· Is the leader a studio owner or artist
· What is the history or experience in providing training courses
Who is the teacher? Some to the things you should ask about in addition to the person’s identity are:
· What is known about her/him? Is there a CV available?
· Where examples of work can be seen
· What experience does the person have in making in general and in making using the technique(s) being offered?
· What length of teaching experience does the person have?
Having satisfied yourself about the instructor(s) you need to begin doing some comparisons with other course offerings. Price is always important, but you need to know what value you are getting, so you need to know what is included in the price. Some of the things that affect price and value are:
· Tools – are they all included, or do you have to provide your own?
· Materials – are the materials included in the price or do you buy as you use?
· Equipment – is the use of all the machinery and facilities included? What is excluded?
· Food – are meals included and which ones? What refreshments are available?
· Length of instruction time – how many days are involved? What are the hours of instruction? Are there any extensions of instruction or working time?
· Numbers – what is the expected teacher to student ratio? This will affect the amount of time you receive from the teacher.
· Accommodation – if relevant, is it included? Is there any assistance in obtaining accommodation?
You should also find out about booking, deposits, cancellation conditions, and when payment is due.
Another element relevant to selection is the premises in which the course is to be held.
· Are they purpose built for the relevant activities?
· Are the premises general educational accommodation? Is it local authority classroom provision? Etc.
· Is the instructor’s studio being used? What space is available?
An obvious important element in selection is convenience.
· Location – is it near or easy to get to?
· Time - are the days convenient? Is the time of the day appropriate?
· Duration – how long are the sessions?
A really important element in selection is the evaluations by past students. These are difficult to get, and if supplied by the instructor, are open to doubt. The best source of evaluation is direct contact with past students. It is important to ask friends and other people in the field about the course being offered.
Documentation about the course is helpful in getting a feel about what is being offered. This might include information about the instructor(s), description of course, dates, times, cost, information on level of instruction, location, travel, facilities, and accommodation.
It is unlikely that you will get the best fit in every category. You will need to make compromises on various elements, so it is important that you think about what you want from the course. If there are one or two elements that you feel are important but not covered, you should contact the provider and ask about whether any accommodation to these requirements are possible.
Wednesday 24 September 2014
Wednesday 17 September 2014
Screens for Melts
You can buy various stainless steel
screens such as barbecue grids for supporting glass melts. The grids
need to be of stainless steel. Type 304 is the most common, but
there are other grades which work at high temperatures too [link to
stainless steels]
You can make your own grid as Cynthia Morgan does. This provides a more flexible arrangement for various
effects.
Instead of imbedding the rods into the
brick, you could also place them on top. Place a kiln brick or other
kiln furniture on the ends of the rods to secure the metal from
moving. Then you can put the glass on top of the rods without them
shifting as the glass is placed.
Wednesday 10 September 2014
Stainless Steel for Kiln Uses
The
reason for using stainless steel is that it differs from carbon steel
by the amount of chromium present and reduces the spalling.
Unprotected carbon steel rusts readily when exposed to air and
moisture. This iron oxide film (the rust) is active and accelerates
corrosion by forming more iron oxide, and due to the greater volume
of the iron oxide this tends to flake and fall away (spall).
Stainless
steels contain sufficient chromium to form a passive film of chromium
oxide, which prevents further surface corrosion by blocking oxygen
diffusion to the steel surface and blocks corrosion from spreading
into the metal's internal structure, and due to the similar size of
the steel and oxide ions they bond very strongly and remain attached
to the surface.
There
are a number of grades of stainless steel. Some of the ones that
perform better in hot conditions are:
300
Series—austenitic chromium-nickel alloys. Austenitic steels have a
cubic crystal structure. Austenite steels make up over 70% of total
stainless steel production. They contain a maximum of 0.15% carbon, a
minimum of 16% chromium and sufficient nickel and/or manganese to
retain an austenitic structure at all temperatures from the extremely
cold to the melting point of the alloy.
Type
304—the most common grade; the classic 18/8 (18% chromium, 8%
nickel) stainless steel. Outside of the US it is commonly known as
"A2 stainless steel", in accordance with ISO 3506 (not to
be confused with A2 tool steel).
Type
304L—same as the 304 grade but lower carbon content to increase
weldability. Is slightly weaker than 304.
Type
304LN—same as 304L, but also nitrogen is added to obtain a much
higher yield and tensile strength than 304L.
Type
309—better temperature resistance than 304, also sometimes used as
filler metal when welding dissimilar steels, along with inconel.
Type
316—the second most common grade (after 304); for food and surgical
uses; alloy addition of molybdenum prevents specific forms of
corrosion. It is also known as marine grade stainless steel due to
its increased resistance to chloride corrosion compared to type 304.
Type
316L—is an extra low carbon grade of 316, generally used in
stainless steel watches and marine applications, as well exclusively
in the fabrication of reactor pressure vessels for boiling water
reactors, due to its high resistance to corrosion. Also referred to
as "A4" in accordance with ISO 3506.
Type
316Ti—variant of type 316 that includes titanium for heat
resistance. It is used in flexible chimney liners.
Type
321—similar to 304 but lower risk of weld decay due to addition of
titanium.
400
Series—ferritic and martensitic chromium alloys
Type
439—ferritic grade, used for catalytic converter exhaust sections.
Increased chromium for improved high temperature corrosion/oxidation
resistance.
Type
446—For elevated temperature service
500
Series—heat-resisting chromium alloys
Based
on Wikipedia
Wednesday 3 September 2014
First Firing
Even
if this is not your first kiln there are a number of things to do
when starting.
The
first is to read the manual. Obvious, but in our enthusiasm to get
started, reading seems boring. It is essential to understand what
the manufacturer wants you to do and to understand how the kiln and
controller work.
Then,
you can prepare kiln. Test fire the kiln empty to make sure it works
and burn out any binders remaining in the kiln materials. You can do
this firing at about 400C/hour as there is no glass to damage. Fire
to around 800C. Then you can shut off, or programme a dummy anneal.
This also ensures you know how to work the controller.
While
waiting for the kiln to complete the fast test firing, read the
manual again.
When
the kiln is cool, apply kiln wash to the bottom (if it is brick) and
lower sides, below any side elements. If the bottom or sides are
fibre, no kiln wash is required. Kiln wash the shelf and any kiln
furniture too.
Now
is the time to test for how even the heat is in your kiln. Arrange the kiln furniture around the shelf as described and put glass over. The kiln furniture can be any refactory material, even folded 3 mm fibre paper will be strong enough to hold the small pieces of glass above the shelf. Fire the kiln as described in the Tech Note 1.
Now
try out the suggestions in the manual, especially the programming of
the controller, even if it has pre-programmed schedules. Look at
Bullseye and Spectrum sites to get sample schedules. Enter these as
trial schedules.
Then
you should be ready to fire the first piece of glass. Place the
glass in the kiln, programme it, and record the information about the
firing. Now turn the kiln on for the first real fuse.
Wednesday 27 August 2014
Cleaning Glass Before Painting
If
your glass is not really clean, you can get gaps in the paint line.
You may also have areas where the paint beads up rather than flows
evenly.
You
need to clean as best as possible first. Then just before painting
you can use a dilute solution of the paint to scrub all over the
glass with your finger or other firm material. Wipe any residue off
with a paper towel and you will find that the prepared paint will
flow evenly onto the glass.
Wednesday 20 August 2014
Fiber Paper Safety
There
are often concerns raised about safety relating to the dust from
Thinfire, a trade marked product from Bullseye. These concerns also
apply to the Spectrum product called Papyros. The main constituents
of these are cellulose, aluminium hydroxide, fibre glass and organic
binders. It therefore is mainly a nuisance dust and irritant. Greg Rawles, a certified
industrial hygenist with a scientific and common sense approach, says
that the toxicology of fibre glass is not yet determined. So the
best idea is to wear a P95 respirator while dealing with the dust –
mainly the cleaning phase of dealing with the shelf. He also
recommends keeping the kiln closed during the burn-out phase of the
binders, although others recommend venting to avoid anything settling
on the glass during the burn-out.
Some
people seem to have skin reactions to dust including that from
Thinfire and Papyros and tend to wear gloves. If you are wearing
rubber or latex gloves for extended periods, it may actually promote
a reaction to the gloves rather than a primary reaction to the dusts
of the paper. So checking on alergic reactions to the gloves is
advisable in addition to the dust.
If in fact, you are reacting to
fibre paper dust, consider using kiln wash instead. If this is not
practical or desirable there are several things you should do.
- Use gloves (for those with sensitive skin),
- wear long sleeved high necked shirts and pull the gloves over the ends of the sleeves to prevent dust getting to your skin,
- vacuum the kiln with HEPA filters,
- dampen the powder with water spray before brushing,
- take precautions against taking the dust home by changing in the studio and placing clothing in plastic bags to take to the wash.
Wednesday 13 August 2014
Black Specks in Mesh Melts
The
first time you use a mesh for a melt, it doesn't spall until it
cools. By that time, the glass has hardened enough that any black
specks of metallic oxidisation just land on the top of the melt and
can be brushed away.
But,
once a mesh has been fired previously, it can spall and drop little
bits at any time during the firing process, so some of the bits get
embedded in the glass.
The
only way I have found to prevent this is to sandblast the mesh
between firings to remove any loose flakes of metal. This is time
consuming enough that you may wish to use a new piece of mesh for
each melt. The alternative is to ensure you are using stainless steel
as the grid.
There are several options for grids.
Wednesday 6 August 2014
Applying Kiln Wash
Kiln
wash, or batt wash as used in the ceramics field, is largely made up
of alumina hydrate, kaolin (china clay), and often some colouring to
indicate an unfired shelf.
These
solids are heavy and settle to the bottom of the container quickly.
So, you have to agitate the contents with each dip of the brush onto
the liquid. To provide adequate - and even – coverage of the shelf,
mould or other refractory material, you should paint in four
directions. Up, down and the diagonals. You need to apply just
enough that you do not see the shelf surface.
Alternatively
you can spray the solution onto the surface. This is an easier way
to get an even covering, but it sometimes is overly stippled.
A
tip I was given for the smoothest kiln shelf is to level the damp
prepared shelf and spray a layer of warm water over the wash to form
a very shallow puddle. As the water is absorbed into the shelf, the
only limitation to the smoothness of the surface is the granular
nature of the kiln wash.
Saturday 2 August 2014
Layering Glass Textures
When
using textured glass there is a decision to be made on whether the
smooth or textured side is up.
Oddly,
the largest, but thin bubbles occur when putting the smooth sides
together. it seems that as the glass is not perfectly flat, it
holds air within the fused piece.
The
fewest bubbles seem to be promoted by placing the rough side down on
all pieces. This is easy as cutting is done on the smooth side
anyway, and so no reverse cutting is required. It seems that the
rough side of the glass provides ways for the air to escape during
the bubble squeeze although it does promote micro bubbles within the
glass.
If
more bubbles are desired, you can place the textured sides together.
That seems to allow the majority of the air out, but still leaves the
micro bubbles from both sheets.
I
have had good results following the Bullseye recommendation to keep
the smooth side up on all layers.
Wednesday 23 July 2014
Re-firing Poorly Annealed Items
Sometimes
you suspect a piece has not been adequately annealed and want to
re-fire it to make it sound. The question arises as to how quickly
it can be re-rfired.
These
pieces are very easy to heat shock, so the initial rate of advance
needs to be much slower than for any piece of the same size, possibly
less than half the usual rate. This slow rate should be steady
without pauses until about 540ºC, which is above the annealing point
of most fusing glasses. At this point you can speed up the rate of
advance to whatever your normal one is.
Of
course, it is best to anneal each piece on each firing to the extent
that there is no question that the piece is properly
annealed. Looking at the Bullseye project notes and the annealing of
thick slabs can help for evenly thick items. For tack fused and
items of uneven thickness, you could review this posting.
Saturday 19 July 2014
Diagnosis of Breaks in Kiln Formed Glass
Often more can be learned from failures than a number of successes. A common failure in kiln forming is broken glass. The appearance of the break will tell you a lot about the problem so that you know where to look for the solution.
Cracks and breaks can occur at various times in the kiln. These will have occurred by the time you open the kiln:
Breakage occurring long after a piece has been completed are an indication that the stress within the glass has overcome the strength of the piece. There are several possible individual and combined factors:
· improper annealing,
· thermal shock,
· incompatible glass,
· wear and tear.
But the most likely problem is inadequate annealing. Unless you have access to your firing records and can determine how the piece was fired and the materials used, you will need to accept it as experience and extend future annealing times.
The best cure for these is prevention.
First is to do a compatibility test to determine if the glasses fit together in the combination you plan for your piece.
Second, if you check the stresses of the flat piece between polarizing filters, you will be able to see if there are stresses within the piece before you do any further kiln forming with this glass or setup. If the stress is from incompatibility - where you see the stress halos around specific pieces of glass - you will need to destroy the piece. If the stress is more generalized, you can put the piece back in the kiln, reheat slowly and soak at the annealing point for a longer time and use a slower annealing cool.
Cracks and breaks can occur at various times in the kiln. These will have occurred by the time you open the kiln:
- Curved cracks and breaks are usually caused by inadequate annealing. Often the break will have a hook or sharp curve near the edge of the glass. The edges will be sharp.
- Cracks and breaks occurring where two pieces of glass meet is usually an indication of incompatibility between the two glasses. This means that you need to perform a compatibility test with the two glasses. Sometimes it is caused by a large difference in the thickness of the glass, especially when light and dark glasses are side by side. This is normally an annealing problem.
- Breaks in the piece (often more than one) with rounded edges indicate a thermal shock break caused by raising the temperature too quickly for the size or thickness of the piece.
- Breaks that cross the piece in a reasonably straight line, going across and through pieces of glass are an indication of thermal shock. The line will be rounded or the pieces even formed together again if it was shocked on the rise in temperature. If the piece was cooled too quickly, the edges will be sharp.
- Multiple breaks into small pieces - normally sharp - are an indication that the glass has stuck to the shelf or kiln furniture. This is caused by inadequate batt wash on the shelf and kiln furniture. It tends to happen with high temperature firings more than lower temperature firings.
Breakage occurring long after a piece has been completed are an indication that the stress within the glass has overcome the strength of the piece. There are several possible individual and combined factors:
· improper annealing,
· thermal shock,
· incompatible glass,
· wear and tear.
But the most likely problem is inadequate annealing. Unless you have access to your firing records and can determine how the piece was fired and the materials used, you will need to accept it as experience and extend future annealing times.
The best cure for these is prevention.
First is to do a compatibility test to determine if the glasses fit together in the combination you plan for your piece.
Second, if you check the stresses of the flat piece between polarizing filters, you will be able to see if there are stresses within the piece before you do any further kiln forming with this glass or setup. If the stress is from incompatibility - where you see the stress halos around specific pieces of glass - you will need to destroy the piece. If the stress is more generalized, you can put the piece back in the kiln, reheat slowly and soak at the annealing point for a longer time and use a slower annealing cool.
Wednesday 16 July 2014
Organic Burnout Marks
Occasionally
there is a haze at the centre of the back of large pieces of fired glass. This
seems to happen when a large piece of glass is placed over fibre
paper (of whatever thickness) that has not been pre-fired.
This is based on my experience of doing large pieces on thinfire or other fibre paper with a relatively fast rate of advance. What seems to happen is that the edges of the glass soften enough and early enough that not all the binder in the fibre papers can burn out and the combustion gasses escape from under the glass. The resulting haze is the remnants of the combustion product fired to the surface of the glass.
This is based on my experience of doing large pieces on thinfire or other fibre paper with a relatively fast rate of advance. What seems to happen is that the edges of the glass soften enough and early enough that not all the binder in the fibre papers can burn out and the combustion gasses escape from under the glass. The resulting haze is the remnants of the combustion product fired to the surface of the glass.
I
have found that flipping the piece over and taking the glass to a low
temperature fire polish is enough to return the glass to its usual
appearance. You can, for extra insurance, apply a devitrification
spray, although I have not found it necessary.
You
could, of course, work the back of the glass with pumice and cerium
oxide to bring back the original shine without firing. But my
impression is that the areas with haze are fractionally depressed into the back surface. This means that a lot of glass has to be removed
to reach and polish the hazy areas.
Wednesday 9 July 2014
Effects of Multiple Layers
Stacking
layers of glass fully or partially over the base layer has
significant effects on the firing of the whole piece.
Glass
is a poor conductor of heat, so you need to be careful to allow the
heat to penetrate to the base layer to avoid thermal shock. There
also is the effect of the (very small) insulating space between each
sheet. The effects of multiple, even layers can be seen from this
table based on Graham Stone's* work:
3mm
layers
1
sheet – Initial Rate of Advance =1000ºC to 475ºC (less than half
an hour)
2
to 3 layers – IRA = 240ºC to 475ºC (ca. 2 hours)
4
layers – IRA = 100ºC to 475ºC (4.75 hours)
6
layers – IRA = 25ºC to 125ºC, then 30ºC to 250ºC, then 40ºC to
375, then 50ºC to 475 before 150C to top temperature (ca. 15.5
hours)
This
shows the dramatic effect increasing the number of layers has on the
firing schedule to make sure the heat gets to the bottom sheet
evenly. If you compare the initial rates of advance (IRA) with the
same thickness, but fewer sheets you can see the space between layers
is important.
6mm
layers
1
sheet – IRA = 320ºC to 475ºC (ca. 1.5 hrs)
2
layers – IRA = 240ºC to 475ºC (ca. 2 hrs compared to 4.75 hrs for
4 layers of 3mm)
3
layers – IRA = 200ºC to 475ºC (ca.2.5 hrs compared to 15.5 hrs
for 6 layers of 3mm)
These
are the fastest safe firing speeds for evenly covered sheets.
This difference in firing times for stacks of thicker glass, shows how important it is to fire sections of the stack before the final firing of all the layers together. It also reduces the risk of bubbles developing within the stack.
If you are thinking of tack fusing with thicker and thinner areas, you need to take account of the differences in thickness in the various areas of the piece when preparing your schedule. You will need to decrease your IRA by quite a bit. So you might want to be thinking of firing some of your pieces to be added to the base layers before tacking them in an additional firing to reduce the risk of thermal shock to the base layer.
*
Firing Schedules for Glass; the Kiln Companion, by Graham Stone, ISBN
0646 39733 8
Wednesday 2 July 2014
Cleaning
A
lot of devitrification resembles dirty smears over the glass that
will not clean away. This kind of devitrification results from
inadequate cleaning.

The
glass needs to be made “squeaky clean”. The glass needs to be
free of dust, oils and minerals before firing. An initial wash of
the glass with a minimum amount of liquid soap will dispose of the
dust and oils. However it may leave behind minerals and additives
from the soap and water, so a rinse in clean water followed by a
polishing with unprinted paper towels or lint free cloths washed
without softeners. As the glass dries you may very well hear the
squeak of glass that is well polished to dry.

If
there are still residues of labels or markers, use of a spirit may be
required to remove these marks. Then the glass will have to be
cleaned again in the normal way to remove the residues from the
spirits.

If
you are fortunate to be in an area with very few minerals in the
water, you will not have to take as many precautions as those in
areas with hard water. If you have hard water, you may need to think
about using distilled water for the final rinse if you have streaks
of devitrification after the standard cleaning process. The use of
spirits is not necessary. The glass still needs to be polished dry
with unprinted paper or dedicated towels.
An
alternative (that I use most often) is to use a window cleaner
without additives, such as supplied by glaziers. This avoids the
local water supply, and most often is sufficient to remove dust and
oils.
Wednesday 18 June 2014
Slowing the Rate of Advance
The
question is sometimes asked whether the rate of advance in a firing schedule should be
slowed when re-firing; for a fire polish for example.
Cynthia
Morgan contributes four circumstances where you would want to slow
the rate of advance:
“1)
On the previous firing you were fusing a whole bunch of little pieces
into a much thicker piece, so you need to reduce your ramp to avoid
thermal shocking the thicker glass
“2)
You think you might not have annealed the piece well enough on the
previous firing, so you're playing it safe
“3)
You suspect there's a crack somewhere in the piece (from cold working
or whatever) so you're reducing the chance it will expand quickly and
open the crack
“4)
You've got to do something to the glass/kiln at a certain point in
the firing cycle, and if you go at your normal rate you'll wind up
doing it at 3AM...so you slow down the firing and get more sleep.
“Otherwise,
well-annealed is well-annealed. If none of those four conditions
obtain, I don't see why you'd need to slow down”.
Wednesday 11 June 2014
Cleaning Frit and Powder
If
you make your own fine frit and powder, make sure it is clean to
avoid black specks, or a grey appearance caused by metal dust and
fragments.
Clean
the glass you are going to break up before you start the process.
Use
mild steel or other magnetic metal to break up the glass, or protect
the glass from the breaking tools with layers of paper, plastic,
cloth or combinations of these materials.
Then
with a powerful magnet remove any metal residue from the frit and
powder. The magnet will need to be passed over and through the glass
particles a number of times, cleaning the magnet after each pass. To
ease the cleaning you may wish to put the magnet in a plastic bag.
Then move the bag over the waste bin and remove the magnet. The
particles fall into the bin.
Do
not use stainless steel to break up the glass as it will not be
attracted to the magnet. Stainless steel particles will result in
the same discolouration as if you left the glass uncleaned.
Wednesday 4 June 2014
Super Glue Safety
Super
glue is frequently used as a temporary fixative in assembly of kiln
forming projects. There is some concern about safety, as it is known
that super glue is made from cyanoacrylate, which it is feared will
break down in the kiln into cyanide gas.
Greg
Rawls, a certified industrial hygienist says "I looked at the
MSDSs for several forms of super glue. The main component is Ethyl
2-cyanoacrylate, which has a TLV of 0.2 ppm which is relatively
toxic. [However,] the thermal decomposition products are carbon
monoxide and carbon dioxide. I did not see a reference to cyanide
gas. However, as I recall cyanide gas dissociates into elemental
carbon and nitrogen at about 800 F. Since you use it in such small
quantities, I would not worry about it. In my opinion the worst thing
that could happen is you glue your fingers to the glass."
Safety
issues
To
treat the safety issues seriously and determine if you feel Greg Rawls' view is justified, you need to look at the issues of
toxicity, reactions, adhesion of tissue, ventilation, first aid and
decomposition products in the whole context.
Toxicity
The
fumes from cyanoacrylate
are a vaporized form of the cyanoacrylate monomer that irritate
sensitive membranes in the eyes, nose, and throat. They are
immediately polymerized by the moisture in the membranes and become
inert. These risks can be minimized by using cyanoacrylate
in well ventilated areas. About 5% of the population can become
sensitized to cyanoacrylate
fumes after repeated exposure, resulting in flu-like symptoms. It may
also act as a skin irritant and may cause an allergic skin reaction.
On rare occasions, inhalation may trigger asthma. There is no single
measurement of toxicity for all cyanoacrylate adhesives as there is a
wide variety of adhesives that contain various cyanoacrylate
formulations.
The
United States National Toxicology Program and the United Kingdom
Health and Safety Executive have concluded that the use of ethyl
cyanoacrylate is safe and that additional study is unnecessary.
2-octyl cyanoacrylate degrades much more slowly due to its longer
organic backbone that slows the degradation of the adhesive enough to
remain below the threshold of tissue toxicity, so the use of 2-octyl
cyanoacrylate for sutures is preferred.
Reaction
with cotton
Applying
cyanoacrylate to some materials made of cotton or wool results in a
powerful, rapid exothermic reaction. The heat released may cause
serious burns, ignite the cotton product, or release irritating white
smoke. Users should not to wear cotton or wool clothing, especially
cotton gloves, when applying or handling cyanoacrylates.
Adhesion
of the Skin
Various
solvents and de-bonders can be used. These include:
Acetone
commonly found in nail polish remover, is a widely available solvent
capable of softening cured cyanoacrylate
Nitromethane
Dimethyl
sulfoxide
Methylene
chloride
Commercial
de-bonders are also available.
Warnings
include:
- It is a mild irritant to the skin.
- It is an eye irritant.
- It bonds skin in seconds.
- Any skin or eye contact should be copiously flushed with water and medical attention be sought immediately.
- Do not attempt to separate eye tissues – the bond will separate naturally within a few days.
Precautions
- Use goggles.
- Do not wear cotton or wool clothing while using super glue
- Ventilate the area well. Since cyanoacrylate vapours are heavier than air, place exhaust intake below work area. Activated charcoal filters using an acidic charcoal have been found effective in removing vapours from effluent air so the bench top air filters are suitable for use while using super glue.
- Avoid use of excess adhesive. Excess adhesive outside of bond area will increase level of vapours.
- Assemble parts as quickly as possible. Long open times will increase level of vapours.
Evaporation
Effects
- The effects of heating cyanoacrylate are not completely known. The flash point is known to be greater than 85ºC. As a precaution do not remain in the area of the kiln after that temperature has been reached.
- The decomposition products are carbon monoxide and carbon dioxide. There is no reference in the literature to cyanide gas. It is highly unlikely that heat will cause the release of cyanide gas at any time during the heating. To be certain, you should make sure the evaporation of the glue is be complete before firing the kiln.
See
this tip for the use of super glue in kiln forming.
Wednesday 21 May 2014
Pre-Set Schedules
Moving
on from pre-set schedules
If
your kiln has come with pre-set schedules, the first thing to find
out is what rates, temperatures and times are set for the fast medium
and slow fuse, tack and slump schedules.
Then,
rather than just pressing the appropriate button, enter the numbers
into the controller for each firing. This will give you confidence
in programming the firings. Alter one element (such as the rate of
advance, or the soak length) each time you enter the schedule and
record the results. This will enable you to see what different
rates, temperatures and soaks will do to your glass.
Make
quick observations for fusing from about 750C every quarter of an
hour to see how the glass is reacting. For slumping the observations
should start about 600F. If the glass has reached the state you want
before that segment of the schedule has completed, just advance the
programme to the next segment (read your manual to find out how to do
that on your controller).
It
is only by making alterations and observing the results that you will
gain the confidence to do your own programming when you do something
the manufacturer didn't think about. There are so many factors, the
programmes work for a limited range of possibilities.
Wednesday 14 May 2014
Temperature conversions
The
internet is dominated by North America which continues to use the
traditional imperial measurements, although the rest of the world
uses the metric system with its length, volume and weight units
inter-related. Until North America catches up with the rest of the
world, we will continue to need to convert temperatures from one
system to another.
The
conversion factors relate to the reference points of water's freezing
and boiling points.
The
Fahrenheit system has these at 32 and 212 – 180 degrees apart.
The
Celsius system has these at 0 and 100 – 100 degrees apart.
This
means the conversion rate is 9/5 to go from C to F or 5/9 to go from
F to C.
Instead
of dealing with the fractions, it is easiest to multiply or divide by
0.555 which is accurate enough for kiln forming purposes. Multiply
the Fahrenheit by 0.555 to get the Celsius equivalent. From Celsius
divide by 0.555. So a rate of advance of 200F/hr becomes 111C/hr(
20*0.555) and a rate of 80C/hr becomes 144F/hr (80/0.555). This
works fine for calculating the rate of advance.
It
does not work for temperatures. The complicating factor is the
water freezing point in the Fahrenheit system which is 32F. To
calculate the Fahrenheit temperature in Celsius, you first have to
subtract 32 from the Fahrenheit temperature. So to convert 212F to
C, you first have to subtract 32, giving 180 which is converted by
multiplying 180 by 0.555 which results in 99.9 which is close enough
to 100C.
To
convert from C to F you divide the C temperature by 0.555 and add 32
to the result, e.g., 515C becomes 960F (515/0.555=927.9+32=959.9)
Alternatively
you can bookmark one of the conversion sites and go to it for the
calculation, but make sure that you distinguish rate from temperature
when this calculation is done.
Some
of the common (approximate) equivalents are:
515C
= 960F a common annealing temperature
650C
= 1200F low temperature slump
677C
= 1250F standard slump temperature
750C
= 1380F angular tack/ lamination
770C
= 1420F rounded tack
800C
= 1470F full fuse
830C
= 1525F casting temperature
900C
= 1650F low temperature pot or wire melt
925C
= 1700F higher temperature pot or wire melt
Wednesday 7 May 2014
Capping
This
term most often refers to placing a single piece of glass over the
whole of the project. The decisions relate to whether to do it at
all, in what circumstances and in what order. Whatever you place on
top of the project is what the eye will first see. A tinted top
layer will give that tint to all the pieces making up the object. So
most often the top is a piece of clear glass.
Many
times the purpose of capping is to give the volume of glass required
to keep the piece contracting as a result of the surface tension of
the glass trying to pull itself up to 6mm thickness.
When
using opalescent glass as the main component in the work, you should
consider capping with clear. Opalescent glass is slightly more prone
to devitrification than transparent glasses, so any work to be fired
a number of times might be best fired with a clear cap. It also
protects against any bubble formed between the other glass and the
cap showing as a clear spot within the opalescent as it pushes the
colour aside and reveals the clear below.
There
are some times when you should consider placing the clear on the
bottom. If your design layer is made up of lots of pieces where air
might be trapped, but is uneven enough to be the likely cause of
bubbles, then the clear should go on the bottom to ensure there is
sufficient volume. An alternative is to do a high tack or full fuse
of the whole upside down on fibre paper, then clean up and fire right
side up with the capping glass.
Wednesday 30 April 2014
Annealing High Temperature Items
Every time you go above the annealing temperature, you must anneal again. You cannot skip or skimp on the annealing. You cannot rely on the annealing in the final firing to make your piece durable. Each time you fire a piece you are putting a lot heat stress into the piece. If it has not been adequately annealed in the previous firing, it is much more likely to break on the heat up phase of the firing than if you annealed well on the previous firing.
The annealing at each stage in multiple firings is just as important as the previous one. In addition, pot melts and other high temperature items are inherently more delicate than those fired at their designed temperatures, so more careful annealing (including the annealing cool) is advisable. This is because the compatibility of glass alters a little at high temperatures. For example, you will observe that hot transparent colours opalise in the 900C range. This opalisation in itself will have altered the compatibility a little, because the opalescence alters the viscosity from what it was as a transparent. Other factors are at play too, such as some minor burning off of the colouring metals. So, careful annealing is required to ensure the maximum amount of stress is relieved. You also need to have a slower than usual initial rate of advance for any fire polish or slump firing after any high temperature process.
Even when firing at fusing temperatures, but beyond the tested number of firings, more careful annealing is required. In the case of Bullseye they have tested for three firings, although people get many more firings than that without difficulties. When taking glass beyond the design limits, more care is required in all phases of the firing to get durable results.
Wednesday 23 April 2014
Writing Your Own Schedules, Part 2
Time
Versus Rate
Schedules
can be expressed as a rate per hour, or a time to get to the target
temperature. What you feel most comfortable with relates largely to
your background and teaching. Most ceramics based people use the
time to get from one temperature to another. Most kiln formers
without a background in ceramics tend to use rates per hour when
writing schedules.
The
rate of 100/hour to 100 degrees is the same as 1 hour to 100. 2.5
hours to 200 is the same as 80/hour to 200. So the conversion to a
time to get to a target temperature is a simple one of dividing the
temperature by the rate per hour to give the number of hours to
achieve the target temperature. Some controllers will allow hours and
minutes to be programmed; others allow only minutes – in which case
multiply by 60 to give 150 minutes.
This
is the same thing you do to find out how long a firing will take. If
you see a schedule expressed as time e.g.,
3
hours to 677 for 0.5 hour,
1.25
hour to 800,
asap
to 482 for 1 hour,
2.5
hours to 370
you
already know approximately how long this firing will take – a bit
more than 8.25 hours (3+0.5+1.25+1+2.5) plus cool down.
It
can also be expressed as
225/hr
to 677 for 30 mins,
102/hr
(800-677=123/1.25) to 800,
afap
to 482 for 30 mins,
45/hr
(482-370=112/2.5) to 370.
The
time to target temperature method of writing a schedule comes into
its own when dealing with thick castings that require very slow cool
downs. For example, a 60mm thick casting calls for an initial
annealing cool of 2.4 degrees per hour over the range 482 to 428. I
don't know of a programmer than can deal with decimals. So the
alternative is to programme in time to target. In this case it would
be a time of 22.5 hours.
The
reason for avoiding the choice of 2 or 3 degrees per hour is
accuracy. If you had put in 2 degrees per hour you would have spent
27 hours, possibly excessively long. If you had put in 3/hour it
would have taken 18 hours, possibly not enough time for the glass to
adequately anneal. So, for very slow rates of advance, time to
target is much the most accurate method of writing the schedule.
Wednesday 16 April 2014
Making Billets
One
of the uses of cullet (small pieces of glass) is in casting.
However, simply placing the glass into a mould and firing, leaves
many bubbles and often shows the edges of the original pieces of
glass. Billets (ingots of glass) are more useful because they have
fewer of the small bubbles and fewer edges than cullet.
It
is possible to make your own billets. This can be done in a fashion
similar to pot melts, although the temperature does not have to be so
high. And the results are easy to store, if the dimensions are kept
regular.

You
need to have a mould for the melting glass to be contained within.
These moulds can be made from plaster. A simple way is to use old
margarine tubs placed upside down and fastened to the base within a
dammed area. Pour the plaster of paris over the tubs to make the
moulds. An alternative is to use strips of refractory material (fibre
board or cut up kiln shelves) surrounded by heavy bricks to stop any
movement due to the weight of the glass.
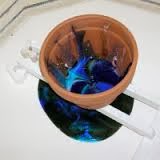

The
glass to be formed is put into ceramic flower pots and can be
directly onto the plaster of paris or dammed areas. You should put
at least one piece of glass to cover the hole at the bottom of the
pot. All this glass must be clean. Calculate the amount of glass
required by determining the volume of the containment area (in cubic
centimetres) and multiply by the specific gravity to give the number
of grams required.

Don't
get too ambitious about size, as these billets need to be fitted into
the mould reservoir for filling the mould. A small margarine tub is
approximately 12 cm wide, 7 cm deep and 7 cm high. This is as large
as required, and smaller may be better. If you are making your own
from dams, something like 4 cm by 8cm by 2cm may be better. This
size is convenient for filling a reservoir, and has the advantage of
being able to compare the intensity of colour the different
thicknesses will give to the casting.
Remember
that the thicker you make the billets, the longer you have to anneal.
So the annealing time of the billet may be the factor that determines
time. A 2 cm billet will take at least 9 hours of annealing time;
one of 4 cm will take 28 hours of annealing.

When
setting up the kiln for making the billets, remember that in general
the higher the reservoir above the billet mould, the fewer bubbles
you will get in the billet, although you are confined by the height
of the kiln. Although there still will be some bubbles, these will
further reduce by the second flow of the glass during the casting
process.

To
fire the set up, you can advance the temperature rapidly to 650/670ºC
with a long soak there (possibly 3 hours). The final temperature can
be below pot melt temperatures, so a casting temperature of 830ºC
with a long soak (possibly 6 hours) will be sufficient. Take note of
your final thickness – including any containment material – to
determine the annealing soak and schedule.
Wednesday 9 April 2014
Writing Your Own Schedules
Most
introductory kilns are now being supplied with pre-set schedules.
This can make moving on to the schedules you need for the new work
you are doing appear to be difficult.
The
first thing is to get the print-out of the pre-programmed schedules
and determine what each stage of the programme is designed to
achieve. If you compare the programme temperatures with a
description of what is happening with the glass at that temperature,
you will be going a significant distance to making your own schedule
with an understanding of what you will be achieving with each stage
of your purpose made schedule. A very good guide to what is
happening to glass at various temperatures is this note from
Bullseye. This
also has the advantage of telling you what happens with different
thicknesses of glass.
Next
compare the pre-programmed schedules with those printed on the
manufacturer's website, for example:
So,
now you know what temperatures you are trying to achieve, how fast
should you go to get to that temperature? I have developed a
guideline that
the initial rate of advance should be no more than twice the rate of
your initial cooling rate for the final piece. This means that you
start planning the schedule from the annealing portion of the full schedule. If you will have a final flat thickness of 6mm, the annealing
rate will be around 80ºC, so the initial heat up rate could be about
160ºC. This is a conservative rate, and experience will guide you
to how much quicker you can heat up the glass. This initial heating
phase can be all the way up to the bubble squeeze/ slumping
temperature, but must be to a temperature at least 40ºC above the
annealing point.
There
are at least three elements that will reduce this initial rate to
less than this general guidance: Thicker pieces need more care. The
more layers, the more difficult it is to get the heat to the bottom
layer, so slower rates of advance are needed. The greater the
unevenness in thickness, the slower the rate of advance.
There
are, of course many other variables relating to the kiln, some of
which are:
Side
or top elements
Distance
to the elements – side or top
Distance
to the sides of the kiln
Placement
in the kiln – e.g.,floor or shelf and how high
Nature
of the firing surface – e.g., ceramic, fibre board, fibre paper
Placing
in relation to the hot and cool spots in the kiln
How the glass is supported - especially on a slump or drape
At
the initial stages of learning about fusing schedules, you need to
make notes of all these things (and the results) on your firing
records so that you can refer back to get guidance on what rates of
advance are acceptable for any given firing.
Part 2
Part 2
Subscribe to:
Posts (Atom)