Showing posts with label Dams. Show all posts

Wednesday 20 June 2018

Pot Melt Formers


There are several suppliers of stainless steel and ceramic formers for pot melts.  They are not always necessary.

If you only want a circle, you do not need a former at all.  The shelf must be kiln washed and level.  The glass will pool in a circular manner ranging in thickness – thickest at the centre and 6-7mm at the edge. The variation in thickness depends on the time the glass is kept at the working temperature after the pot has emptied.

If you are wanting a thicker melt, you do need a dam of some sort.  You can purchase what you want, or you can make some from the materials you have at hand.
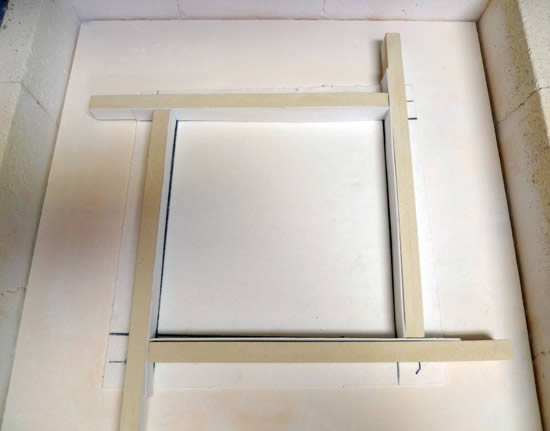
You can make a rectangle or square melt from existing straight dams.  You need to make sure the dams are kiln washed and lined with 3mm fibre paper.  You do not need to cut the dams to a predetermined length.  Instead, you can arrange them so that one end of the dam starts at the edge of your rectangle.  The next dam is butted at right angles to the first at the length wanted.  The other pieces are fitted similarly, until the last one passes the end of the first, so that they are butted together.  Then line with the fibre paper.  If you feel the dams are too light, you can back them up with bricks to prevent movement.

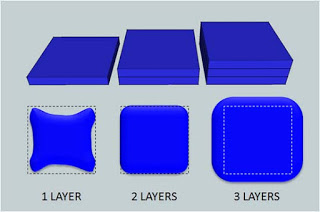
Using fibre paper, fibre board, or vermiculite board you can make any shape of melt that you can cut out of these materials.  If you don’t have refractory board, you can make your former out of layers of 3mm fibre paper.  It is possible to make a template for cutting of the multiple layers.  Cut your shape from the required number of layers of fibre to be as thick as your pot melt will become, according to your calculations.  Pin these layers together with stainless steel pins to be sure they do not move or float with the glass.  If you like, you can weight the layers of fibre paper with kiln furniture.

If you have refractory board – fibre or vermiculite – you can cut the required shape from them.  If you do not harden the fibre board, you do not need any further separator.  But you can line the shape with a thin fibre paper to ease the release and refine the edge.  Vermiculite always needs a separator, as it sticks to glass.  You should line the vermiculite board to get an easy release from the glass.


Using refractory materials releases you from the restrictions of commercially available forms and allows your imagination to take over.  It may not be cheaper than the bought ones, but will have the greater feeling of achievement.  In addition, you can develop all sorts of forms and depths not thought of by the commercial suppliers.

Wednesday 13 June 2018

Volume control

Glass has a surface tension (viscosity) that draws the glass toward 6-7 mm thick at kiln forming temperatures. 

To test this out, prepare three stacks of glass squares.  They all should be the same size.  Record the measurements. Place them in a stack of one, a stack of two and the last of three squares.  Fire them to a full fuse.  Compare the sizes of the original to the fired. Note the expanded size of the three-layer stack, the same size of the two-layer stack and the reduced footprint, and dog-boning of the single layer.

Credit: Paul Tarlow

Glass in a single layer behaves differently from the thicker set-ups. When the glass is hot it begins thickening at the edges. The viscosity of the glass is drawing from both from the edge and from the centre.  This means the footprint of the glass is getting smaller. The result is needling. The glass retreats leaving small threads where the glass was held in the small imperfections in the separator’s surface. 

If you do not need a full fuse, you can reduce this needling effect. Reduce the temperature and extend the soak.  This means that the glass does not expand on the heat up so much, and the greater viscosity reduces the needling effect.


If you need a thick piece of a certain size, you need to dam the glass to overcome the tendency to expand.  With experience, you can get to know how much a three-layer (or more) set up will expand and cut the glass accordingly.  In this way, you can often do without dams. There will be some thinning at the edges and a rounding of the corners.


An excellent document on volume control is the Bullseye Tech Note 5.  


Note that this 6mm rule applies at normal kilnforming temperatures.

At higher temperatures, the viscosity is less so the glass will become thinner than 6-7mm.  My experience has shown that at around 1200°C the glass will spread to about 0.5mm thickness.  This is just to point out there is a relationship between temperature and viscosity, and therefore thickness. As the temperature rises, so the viscosity reduces. This relationship allows the glass to become thinner.  At normal kilnforming temperatures, the 6mm rule applies, at higher temperatures it does not.


Further information is available in the e-book: Low Temperature Kilnforming.

Wednesday 15 April 2015

Dams for Melts

There are a number of commercial moulds, dams and rings to contain pot and screen melts.

You can, of course, make your own. A simple one is to use 10 or 15 mm fibre board to contain your pot or screen melts. Cut the size and shape of hole you want into the board and that will contain the glass.


You can place this directly onto the kiln washed shelf. No fibre paper is absolutely required unless you want to. You can weight the board by placing the supports for the screen or post directly onto the board.


If you want to use the board more than once, you need to harden it with colloidal silica and fire it. Then you always need to put a separator on it at each firing to ensure it does not stick to the glass melt.


This process allows you to make custom shapes and sizes without great expense. With a bit of ingenuity, you can provide your own textured bottom to the melt.


Sunday 10 March 2013

Glues in Kiln Forming


Glues have two major uses in fusing. One is to stick things together after being fused (cold fusing). The other is to hold things together before fusing.

Holding things together while preparing the piece to be transferred to the kiln is a major use of low tack adhesives and glues. All of these burn off a lot lower than the temperature at which the glass begins to stick together. So, if you are gluing overhanging pieces, for example, they can move after the glue has burned off.  If you are assembling pieces that will not stay in place while you are putting it together, glue will not help get the final result you want.  If you are gluing to keep things stable while you move it to the kiln, you may find everything is ok.

However, glue tends to boil off if the temperature is raised too fast. During this process, the effect of the boiling will move the glass pieces that are most unstable. This also occurs if you use too much glue. You should only use as much as will stick the pieces together. Also too much glue leads to black spots and sometimes bubbles between the layers of glass.


The adhesives commonly used are the Bullseye product “Glastac”, Elmer’s glue, diluted PVA - or school - glue. All of these take varying times to dry and hold the glass pieces in place. So, a popular alternative is hair spray. This is a lacquer which dries almost instantly. It provides a thin film of adhesive and burns off in the kiln with no residue. You should use the varieties with no additives.


Glue most often leads to problems or unexpected results, so several ways have been used to achieve the desired results.

One way to deal with unstable components on small pieces is to make a large piece with a repetition of the design and cut it up after fusing in to the sizes you want.  Clean the pieces very well, and then fire them again to at least fire polish to remove any cutting or grinding marks.

An alternative to using glue, especially at the edges where the pieces are likely to move, is to use dams. My practice is to make the dams slightly taller than the unfired piece and line with fibre paper. I put 3 mm fibre paper against the dam, and thinfire against the glass. Both of these should be 3 mm narrower than the final height of the fused piece will be. This is to allow the glass to make a rounded edge as it will not be able to stick to the fibre as it sinks down to its final height.

Bullseye hot dams as an example of damming

Another alternative to using glue is to fire the piece upside down, so that the pieces do not have to be supported. This does require some planning and forethought. You can draw the design in reverse on thinfire, using different coloured pencils for the various layers to help in building the piece up in reverse. You then cap the assembled pieces with the piece that will become the bottom. Take the whole to a tack fuse. Then clean very well to remove any residues from the shelf. It is possible to sandblast and then clean to make sure there are no residues left. Of course this is not possible if you are using dichroic or iridised glass. Also note that iridised surfaces and thinfire do not get on well – there is extreme pitting in the iridised surface. 


Example of pieces glued and ready for the flip

 Once the piece is cleaned, fire again to get the desired surface texture.


Cleaning a piece after first firing

Sunday 12 September 2010

Lining Dams

Dams should normally be lined with Thinfire and fibre paper to get the best release. If you are using fibre board that has not been hardened, you do not have to line, but you will get smoother edges if you do.

As described by Helios


The lining papers should be about 3mm shorter than the expected final thickness of the finished panel. I find that 3mm paper against the dam provides the required standoff between the dam material and the glass. The lining of the fibre paper with Thinfire provides a smoother surface than just the fibre paper. Both of these liners should be the same height – 3mm less than the final height of the finished piece.

To calculate the expected final height you need to do a few calculations in the metric system.  Weigh the glass in grams.  Divide by specific gravity (2.5) to get the number of cubic centimeters.  Divide the cc by the area enclosed by the dams in square centimeters. This will give the fraction or multiple of centimeters thick the glass is predicted to be.  

Example:
The weight of glass = 500 gms
The specific gravity = 2.5
The area is 10cm by 10 cm = 100 square cm.

Divide 500gms (the weight) by 2.5 (the specific gravity) = 200 cubic centimeters.  Divide 200 (the volume in cc) by 100 (the area) = 2 cm thick final piece for the amount of glass put into the pot.

This indicates the fibre paper should be 1.7cm high to allow enough space for the bullnose edge to form.


Wednesday 8 September 2010

Height of Dams

Dams can be of any height available, but if it is easy to adjust the height, you should consider the ease of working with the glass inside the dams and the possibility of anything falling off the dams onto the glass.

The dam should be higher than the glass in its un-fired state. It should be high enough to contain the moving glass should anything go wrong, so it cannot be the same height as the fibre paper liners – those being 3mm shorter than the glass is high. As a rule of thumb, when I have the choice, I would make the dams at least 6mm higher than the unfired glass. This allows you to handle the sheets of glass and any components without having to reach over high walls. It also ensures containment should anything go wrong.