Showing posts with label Bubble squeeze. Show all posts

Wednesday 3 May 2017

Removing Bubbles

Inclusions and Bubbles

The inclusion of material between two or more sheets of glass has the risk of creating bubbles.  The size of these often relate to the size of the inclusion.  The inclusion can be glass (powders, frits, cut pieces), mica, metals, foils, etc.

The important element in eliminating bubbles is to have a long slow bubble squeeze from the bottom of the forming temperature to the top slumping temperature.  If this is combined with supports at the edges or a fine film of clear powder, it will help reduce the interior bubbles to a minimum.  The supports at the edges may be as small as fine frit (and some use powder over the whole surface).

But, once you have bubbles in the piece, what can you do?

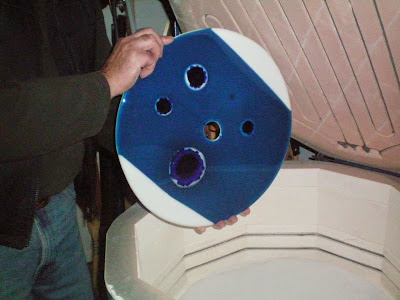
You can drill a hole in the bubbles, or break the bubbles and fuse again, but there will be distortions visible in the resulting piece.

Another method to reduce the effect of bubbles, is to flip the piece and fire upside down to drive the bubbles to the bottom of the piece.  Be careful to use low fusing temperatures to avoid enlarging the bubble.  At the finish, the bubble will still be in the glass but will not be protruding above the top surface.

It may also be possible to combine the two processes.  Drill a small hole in the bubbles and fire upside down.  If you do this you need to place the glass on porous fibre paper, not just Thinfire or Papyrus, to allow the air to be compressed out of the bubbles.  You also need to allow a significant amount of time around the slumping temperature for this to happen.

Once you have fired upside down, you will need to fire polish the surface again. Do not despair at multiple firings.  A lot of people fire their pieces many times to achieve the effects desired.


Wednesday 12 April 2017

Firing wire inclusions

Wire and other metal inclusions often cause bubbles to occur around them.  The standard solutions are to add frit to the corners, or powder or fine frit around the inclusions.   You can also flatten the wire or metal to reduce it height. These most often work well.  Sometimes though they don’t eliminate big bubbles around the metals.


In this case think about firing upside down. This is not the whole piece; it is only the inclusion and the bottom layer of glass.  Place the wire or other inclusion on the prepared shelf. It will be most successful if placed on 1mm or thicker fibre paper to allow any trapped air to escape through the fibre.  Place the base glass on top and take to a tack fuse with a bubble squeeze included.  You might even want to consider cutting the base larger than the final piece to be able to cut off the thickened edges and make a more successful piece at the end.


After tack fusing upside down, the inclusion will be imbedded in the glass with an almost flat surface and little in the way of air pockets at the edges.  Clean very well, especially any spalling from the metal and of course, clean the glass thoroughly.  Cap and fuse with a bubble squeeze again.  The bubbles around the inclusion should be minimal if not eliminated.


This method will allow the glass to sink around the glass making a much flatter piece for the capped full fuse. It should also make for a flatter finished piece with many fewer bubbles.


Wednesday 28 September 2016

Bubbles in Casting Mould Firings


There seems to be an increasing popularity for re-useable ceramic casting moulds.  One of the common problems with these moulds is bubbles.  

Frit size 
It rather depends on the sizes of the frit and cullet used as to how many and what kind of bubbles are created. The converse of expectations is what happens.  You get more small bubbles with powders and fine frits than with coarser frits.  The small bubbles rise and coalesce to form larger bubbles which rise more slowly as they have to push through a greater mass of material (just as in a liquid). Since glass is viscous, these little bubbles usually do not have time to push their way through the glass at fusing temperatures.  But at casting temperatures, there is less resistance from the glass, as it is less viscous, and so the bubbles can clump together and form the larger bubbles that burst through the surface.

Temperature range and rate of advance
The amount and kind of bubble also depends on the speed of the ramp and the bubble squeeze you give it. If you proceed rapidly to top temperature, you will have to go to a higher temperature, allowing the surface to become more plastic and be pushed out of the way by the expanding air that almost certainly is in the mix. A slow rise will allow all the glass to become the same temperature throughout without using a high top temperature, so reducing the risk of the bubbles pushing through the more viscous glass to the surface.

Vents
All these problems would be reduced by having a vent or sprue to allow the air out from the bottom. Almost all purpose made casting moulds have these things. Sometimes they are as thin as a few hairs (from somebody with long hair) to as thick as a toothpick. As you have to do some cold work on the results from these moulds anyway, a few little strands of glass should be no problem to clean up. If the manufacturers won't do it, it is possible to take your Dremel or similar drilling tool and with a fine drill bit and make these tiny holes in appropriate places.  

I do not understand why these casting moulds do not have tiny air vents at the bottom of the depressions. Yes, there would be a tiny pimple on the surface of the final piece, but this can be cleaned away easily. The holes could be really small diameter ones. They just need to be opened after each coating of separator with a fine wire. I'd be sending the ones without vents back to the manufacturer as not fit for purpose. If these moulds had vent holes, they would be a lot less bubble prone. 

Master moulds
If the mould continues to give trouble with bubbles, it might be best to take a negative of the mould that you can keep as a master.  Then make one-use investment moulds from this master positive as you need. Investment moulds usually allow air to move through the material pretty well, but you can add sprues if you want.

Reservoirs
A further possibility is to drip the glass into the mould.  To do this you need to place a ceramic pot, supported by kiln furniture, above the mould with the glass for the casting in it.  Take to a temperature between 850°C and 900°C, depending on how long you wish to wait for the glass to flow out of the pot and into the casting mould.  The action of the glass forming in the pot eliminates many of the bubbles caused by frits and powders.  A further advantage is that this forming in the pot eliminates the possibility of the edges of the original glass pieces being seen. It would also allow you to add a different colour causing swirls or wisps of colour to move through the main colour.


The main effort is to eliminate the bubble formation.  This can be done with vents, adjusting the schedule, modifying the method by melting the glass into the mould, or making a master and individual investment moulds.  You can also combine several of these methods in one firing if you wish.

Wednesday 11 May 2016

Bubble Squeeze

What is a bubble squeeze?

The term bubble squeeze refers to the process of allowing the glass to relax gradually allowing the air to escape to the edge of the piece.

The exact temperature is dependent on the softening point of the glass, its weight, and the complexity of the layup.  Normally the bubble squeeze is performed with a soak of about 30 minutes at the slumping temperature. 

Of course, glass being glass, the slumping point of any glass is a range temperatures.  This can be taken advantage of for complex layups or potentially difficult projects.  Pick the temperature about 50°C below the standard slumping point.  For example, Bullseye recommend 677°C as the slumping point.  Programme a slow rise - say 50°C per hour - from 625°C to 677°C where you also soak for at least 30 minutes.  This slow rise allows an even more gradual and progressive relaxation of the upper glass toward the lower.


For more information look at this post

Wednesday 4 May 2016

Mica - Kiln Forming Myths 23

Mica will not stick to glass unless it's capped with clear.

Almost by definition, any material that needs to be encased, does not stick to glass.

However, mica does stick to glass.  But it is only the surface that is in contact with the glass that sticks.  Mica shears into very fine sheets and particles (almost microscopic), meaning that there many layers of mica even with a thin layer.  So only a minor portion of the mica you sprinkle, sift or paint onto the glass can stick. 

It is possible to add a flux such as borax to the mica solution to soften the surface of the glass, allowing more mica to sink into and stick to the glass.

Of course you can encase much more mica than will stick to the surface.  However, you have to be very careful about avoiding bubbles.  There is so much air (relative to the volume of the mica) that bubbles in encased mica is a constant problem.  Very good bubble squeezes and supporting the edges on shards of glass to keep the glass open while beginning to slump are required.


All myths have an element of truth in them otherwise they would not persist.
They also persist because people listen to the “rules” rather than thinking about the principles and applying them.  It is when you understand the principles that you can successfully break the “rules”.


Wednesday 14 October 2015

Bubbles are Art - Kiln Forming Myths 6

Big thin bubbles are art


Unless you have designed the bubbles, they are mistakes, not art.  Even when designed, they are delicate and when broken are very sharp.  So, they cannot be sold or used as they are even by yourself. 


Bubbles within the glass in a plate.
fusing101.files.wordpress.com


People frequently make the suggestion that the bubble should be broken and the cavity filled with frit.  Of course this can be done, but almost always appears a fix rather than a design choice.


The more important thing is to learn the cause so it can be prevented in the future.  Bubbles can be between layers or from underneath the whole piece.

Bubbles between the layers of glass are usually the result of inclusions or layup and firing rates.  Anything which holds the upper layer above the lower one has the potential to induce bubbles.  Most often, with a bubble squeeze, these are relatively small and are 2mm or more thick.  These may be acceptable or seen to be unsightly, but are not dangerous.  The bubbles can become large and/or thin with high temperatures or fast rises in temperature.  Be sure to have a good bubble squeeze, and a moderate (ca. 300°C) rise in temperature from there.

Bubbles can also rise between the shelf and the glass.  This happens most often when firing single layers above a low temperature tack fuse.


A single layer piece with large, burst, healed and emerging bubbles.
www.warm-glass.co.uk

It can also occur when there is either debris between the glass and shelf, or when there is a depression in the shelf.  Both these cases allow air to remain trapped between the shelf and the glass.  Slower rates of advance and bubble squeezes can help reduce these, but the shelf needs to be checked for debris and high or low spots.

The piece below is disfigured by the random bubbles at the left and in the centre of an otherwise acceptable platter.


fusedglass.files.wordpress.com


Evaluate your pieces before you declare a single or series of large thin bubbles art.  Of course, you should play around with the piece to learn from the mishap.  You can use the pieces of it in other projects.  But unless it is truly exceptional, it is a mistake, not art.


All myths have an element of truth in them otherwise they would not persist.

They also persist because people listen to the “rules” rather than thinking about the principles and applying them.  It is when you understand the principles that you can successfully break the “rules”.

Wednesday 9 September 2015

Bubble Formation - Kiln Forming Myths - 1

This short series on the so-called rules of kiln forming looks into their accuracy.

Wet shelves cause bubbles

The common sense observation that water turns to steam as the temperature rises above 100C and so could affect the glass, does not apply in kiln forming (in most cases).

Firing at around 200°C per hour will give approximately 2.5 hours for any moisture to evaporate.  This is because the glass only begins to move after about 540°C. So, unless you have a lot of water in your mould or shelf, the vapour will have disappeared some time before the glass begins to move and conform to the shelf, or round up at the edges.  You may wish to leave the plugs out or crack the lid a little to allow the moisture to escape more easily.

  3.bp.blogspot.com

The holes in this piece result from a combination of factors, not all of which might apply – layup, contaminants on shelf, firing too high or fast, low spots in shelf – but not moisture on shelf.  Note that some of the holes have been filled with frit and refired.


bstiverson.files.wordpress.com

  
These holes are more clearly the result of the layup, top temperature and speed of firing. The three strips did not allow air to move out before the edges conformed to the shelf.  The bubbles at the joints of the dark and yellow green seem to be the result of a poor fit, so having a thin area where the air could push through the softened glass at top temperature.

Two circumstances where this moderate rate of advance does not apply are 

- where extremely fast initial rates of advance, such as in small jewellery scale firings are going to be used. Here the distance for the air or steam to escape is very small so there is little concern about causing bubbles from any cause.


- The other case is in casting, where there is a lot of both free water and chemically bound water in the moulds. Special considerations are required for investment moulds.  In summary, the requirement is to dry the mould in some manner before the firing of the glass on top of, or in it. Plaster moulds require two kinds of water removal.  One is to remove the moisture by air drying in a warm area for a week or longer.  The second is to remove the chemically bound water which is usually done at about 200°C for a couple of hours before proceeding up in temperature.  The length of time required for these two dryings relate to the size of the mould.

For shelves, you can air dry on top of a firing kiln, or fire in the kiln at a rate of about 200°C per hour to 200°C and soak for 10 minutes, if you decide the shelf must be dry before firing.  The plugs should be out, or the door cracked a little to allow the moisture to escape easily. After the soak, just turn the kiln off.  You can open the lid or door if you need a quick cool down.  The shelf will then be ready for a rapid rate of advance firing as there is no moisture to be trapped by the glass conforming to the shelf.  This of course, is rarely necessary although you may be more comfortable in using a pre-fired shelf. 


All myths have an element of truth in them otherwise they would not persist.
They also persist because people listen to the “rules” rather than thinking about the principles and applying them.  It is when you understand the principles that you can successfully break the “rules”.

Wednesday 20 May 2015

Firing Quickly

Firing quickly is often our desire, in spite of the mantra of the experienced – slow and low. How to do this safely – without fractures or bubbles – is the requirement.

Firing quickly on smaller things (say, up to 100 mm) is not normally a problem.  Difficulties can arise due to the kind of layup, but usually the mass is not great enough to be thermally shocked, nor the size enough to trap air that would cause bubbles.

Firing quickly for larger pieces is where difficulties arise. These relate to the initial rate of advance to the softening point, the bubble squeeze, advance to top temperature, and annealing.

Advance to softening point
The first place this occurs is to the upper strain or softening point.  This is the range where the glass is solid and does not transmit heat well, leading to the risk of thermal shock.  You need to find a rate of advance that is a little slower than that which would cause the glass to break.  My guidance is to use no more than three times the annealing rate for the glass of that thickness to reach the softening point.  This temperature is approximately 40C above the annealing point. The glass is certainly plastic above that temperature, so the rate of advance can be faster.

Bubble squeeze
Strategies from the softening point to bubble squeeze vary.  You can go quickly, say 1.5 times the previous rate of advance, to the bubble squeeze heat soak of around 30 minutes.  The other is to go quickly to 50C below that temperature and advance at 50C per hour to the bubble squeeze heat soak.  This is often used on more complex and thicker lay ups. There are numerous variations upon these two strategies depending on the circumstances.

Top temperature
Ways to get to top temperature from the bubble squeeze vary, but as fast as possible risks bubbles due to excessive softening the surface, over firing due to the controller not shutting off quickly enough, and a lack of control of the surface texture.  Twice the initial rate of advance is quick enough, but still allowing the controller to shut off when the top temperature is being reached.

The s
oak at top temperature does not need to be more than 10 minutes.  If you can achieve the desired results in less that time, you should consider reducing your top temperature.

Annealing cool
A s
oak at the bottom end of the annealing range will reduce the anneal cooling time.  The lower temperature of the annealing range is about 40C below the annealing point, so to be safe the annealing soak can be set to be 30C below the annealing temperature.  This reduces the range of temperature over which the slow anneal cool takes place. 

The initial anneal cool should be to 55C below the soak, the second stage of the anneal cool to 110C below the soak can be at twice the initial anneal cool rate.  The rate of cool can be increased to 370C, where for pieces of 9mm or less, the kiln can be turned off.


However, you need to think carefully about firing quickly.  When realistically will you be able or actually need to take the piece out of the kiln?  If it is the next day or after work, then a slower firing reduces the risks of rapid firing and still enables you to take the piece out when needed.