Showing posts with label Stephen Richard. Show all posts

Wednesday 6 December 2023

Dog Boning During Slumping

Does the size of the rim affect the amount of dog boning when slumping rectangular items?

This question was prompted by previous testing on the amount of distortion by adding additional elements. I found that single layer pieces stacked 15mm/0.6” or more from the edge do not affect its shape.

This led me to think: “how wide a rim would be required to avoid dog boning of rectangular pieces while slumping?” The premise was that there must be some relation to the width of the rim and the amount of dog boning.


Method

The method I chose was to make two vermiculite moulds. One with an almost square aperture and the other with a rectangular one. These were not large pieces. 

  • One was 27cm by 22cm/ 10.6” by 8.66” with an opening of 10cm by 10.5cm/4” by 4.12”. 
  • The other was 25cm by 22cm/9.84” by 25cm/8.66” with an opening of 19.5cm by 13cm/7.68” by 5.1”. 
  • Both had a drop of 25mm/1”.

The sizes of the rim were proportional to the opening of the mould. The remainder of the mould was merely a support to the rim.

The firing schedule for all pieces was kept the same.

  • Ramp 1   220˚C/396˚F to 677˚C/1252˚F     hold for 1.75 hrs
  • Ramp 2   Full to 482˚C/900˚F                     hold for 1.0 hours
  • Ramp 3   83˚C/150˚F to 427˚C/800˚F         Hold for 0 hours
  • Ramp 4   150˚C/270˚F to 371˚C/700˚F        Hold for 0 hours
  • Ramp 5   300˚C/540˚F to 50˚C/122˚F         Off

Results for single layer slumping

Various widths of single layer rim were tested from 1cm/0.4” to 3cm/1.18” at 2.5cm/1” deep. The 2cm/0.79” rim was also tested at 3cm/1.18” and 3.8cm/1.5” deep.

Square openings

The results showed there is no further reduction in dog boning with rims greater than 2cm/0.79” for square apertures of this size. The dog boning of a 1cm/0.4” rim was 1.5mm/0.6”. The amount of deflection from straight was 0.5mm/0.02” for both 2cm/.079” and 3cm/1.18” rims.

There was no effect of increasing the depth of the slump to 3.8cm/1.5” on a 2cm/0.79” rim.

Rectangular openings

The results were different for slumps into rectangular apertures. The glass on the long side of the opening had greater dog boning at all rim widths from 1.25cm/0.5” to 3cm/1.18” than the shorter side.

  • ·   A 1.25cm/0.5” rim deformed 3mm/1.18” on the long side and 2.5mm/0.98” on the short one.
  • ·   With a 2.5cm/1.0” rim the deformation on the long side was 2.5mm/0.98”. The short side of the opening was 1.5mm/0.6”.
  • ·   A rim of 3cm/1.5” deformed 1mm/0.02” on the long side. The short side of the opening deformed 0.5mm/0.02”.

Results for Two Layer Slumping

The big surprise for me was the greater amount of dog boning on the slumping of two layers. I expected less.

The two-layer slumping was done on the same moulds with the same schedule. The results of greater rim widths showed gradual reductions in the amount of dog boning. But there was significant sensitivity to the difference in the square opening.

Square Opening

The square opening is only slightly rectangular by 5mm/0.02” but the 6mm/0.25” glass reacted to that small difference. The amount of dog boning with a 2cm/0.79” rim was 4.5mm/0.18” on the long side. But 2mm/0.18” on the side only 5mm/0.02” shorter. 

This amount of dog boning reduced gradually until with a 5cm/2” rim the deflection was 3mm/0.12” on the long side. The deflection was too small to measure on the short side.

Rectangular openings

The rectangular opening was 1.5 times longer than wide. This had significant effects on the extent of dog boning. Although increasing the rim width did reduce the deformation, the long side continued to exhibit greater deformation than the short one.

  • ·   With a 3cm/1.5” rim, the long side deformed by 4.5mm/0.12”. The short side by 3.5mm/0.14”.
  • ·   A rim of 3.5cm/ reduced the deformation to 4mm/0.16 on the long side. But 2mm/0.08” on the short side.
  • ·   At 4cm/1.57” the rim deformed 2mm/0.12” on the long side and 1mm/ on the short one.
  • ·   Strangely, a 4.5cm/1.77” rim had a little larger deformation than the 4cm/1.57” rim. It was 3mm/0.12” on the long and 2mm/0.08” on the short side. It may be that the greater length of the rim contributed to increased dog boning.


A general reflection on the two-layer tests. 

It is possible that there was too long a hold at 677c for 6mm. I did not do a check on the time it took to reach full slump. The long soak was required to get the single layer to conform to the mould. At the time, my requirement was to keep the firing of single and double layer slumping the same for comparison. Perhaps keeping that hold constant was the wrong decision. Further testing will be required.


Summary

I learned some things from these (incomplete) tests that I did not expect. This is good for my learning. The things I found out are:

  • ·        In general, the wider the rim is, the less dog boning occurs.
  • ·        The extent of dog boning is more sensitive to the dimensions of the opening than to the size of the rim for both single and double layers.
  • ·        The depth of the slump of a single layer has less influence than the size of the rim. Once the rim is of sufficient size to minimise the dog boning, the increase of the depth by 20% or 50% did not affect the dog boning.
  • ·        Thicker glass with the same schedule deforms more than single layers. This does need more investigation, though.


More Informaton:

The basic cause of dog boning is related to volume control.

The causes of dog boning other than volume control.

More about the effects in slumping.

Much more information is available in the eBook Low Temperature Kilnforming.


Wednesday 29 November 2023

Stuck Kiln Wash


Moulds

Kiln wash on ceramic moulds lasts a very long time. But sometimes you want to use a different separator. First you need to prepare yourself and the area for the process.

Preparation

It is best to wear a mask while removing kiln wash or other separators to reduce the amount of dust you inhale. Wearing an apron or other outer wear will keep the dust off your clothing.

Spread a cloth, newspaper or other covering around the area. This is to be able to easily gather the removed kiln wash and place it in the waste.  Have a vacuum sweeper at hand to remove powder rather than blowing it around the workspace.  Of course, if you can do this outside, there is much smaller risk of contamination.

Removal Methods

The method of removing kiln wash depends in part on what the mould material is.

Metal

You can sandblast, manually sand, or wash off the kiln wash from metal moulds.

Ceramic


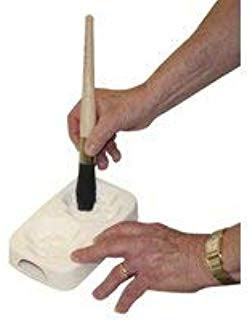
Sandblasting is not a safe method for ceramics, as it is so easy to damage the surface of the mould. Removing the kiln wash while dry is a good first approach. It saves having to wait long times for air drying and long kiln drying of the damp mould. You can lightly sand off the kiln wash from smooth surfaced
moulds, and for detailed areas use rounded point wood and plastic tools. This can be backed up with a stiff nylon brush to clear out the narrow or detailed areas.

When these dry methods are insufficient, there are wet approaches. I recommend dampening the kiln wash rather than immersing the mould in water. The same tools can be used as for the dry removal.

Soaking or washing the mould does not remove the kiln wash as easily as you might think.  It is especially to be avoided where the mould has an internal hollow, as it may take days to dry sufficiently to apply other separators.  To put it in the kiln risks breaking the mould by the steam build up during the initial rise in temperature.

If you must soak the mould, I recommend that you use a 5% solution of citric acid because it has a chelating action on the kiln wash.

More information on removing kiln wash from moulds.

Remember that once the mould or shelf has been coated with boron nitride, it is almost impossible to go back to kiln wash again.  The boron nitride irreversibly fills the porous element of the ceramic, making it difficult for the kiln wash to adhere to the mould.

Shelves

The easiest surfaces to remove kiln wash from are flat or ones nearly so.

Dry Methods

Abrasive methods work well with a variety of tools. They can range from large paint scrapers to smaller ones with a Stanley blade inserted. 


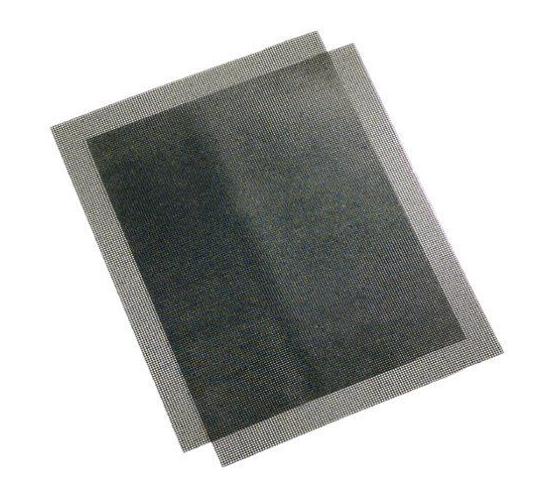
Coarse open mesh plaster board (dry wall) sanding sheets are very useful. There are frames that you can fix them to, but sanding without the frame works well too.


Using power tools to sand the shelf is not advisable.  It is too easy to remove lots of material, including the surface of the shelf – even the hard, ceramic ones.  This leads to minor depressions in the shelf and consequent bubble difficulties when firing.

Do not be tempted to sandblast either, as that can easily create the small depressions in the surface of the shelf that subsequently lead to bubbles. 

Wet methods

Wet methods can be used if you are concerned about the dustiness of the process.  You can dampen the kiln wash on the shelf and sand or scrape as with the dry methods.  You will create a paste or slurry which can be bagged and put in the waste. You can also use the green scrubby washing up pads.  Unless you frequently rinse the pads, the kiln wash builds up and clogs the pads. making them ineffective.


Some people use vinegar or chemicals such as lime away with the water. The material that makes the kiln wash stick to the shelf is China clay and the separator is alumina hydrate. Both of these elements are almost impervious to the chemicals available to kiln workers. Instead, use citric acid. It has a chelating action which will incorporate the particles of the kiln wash. This will require some scrubbing, but avoids the smells of vinegar and the risks of other chemicals.

Do not be tempted to use pressure washers. Yes, they will remove the kiln wash. But it will also leave divots in the shelf which will cause later problems with bubble creation.

A big drawback to using wet methods, is that the shelf becomes wetted throughout and needs careful drying before use. 

Both the wet and dry methods can be used on smooth, gentle curved moulds. These include wave moulds, shallow moulds without flat bottoms, cylinder moulds, and such like.

More information on Kiln Wash Removal from shelves is available here,

and here.

Boron Nitride

A note on the reversibility of boron nitride. This is sold under a variety of trade names such as Zyp, More, MR97, etc., and sometimes under its chemical name.

Some people are applying boron nitride to ceramic moulds for the "smoother" surface.  Boron nitride is an excellent separator for metal moulds and casting moulds whether metal or ceramic. But it has limitations, including the price and the requirement for a new coating at each firing.  Some are beginning to wonder if they can go back to kiln wash after having used the boron nitride.

The general experience has been that you can't apply kiln wash on top of the boron nitride. It just beads up and flows off, because the boron nitride creates a non-wetting surface that survives relatively high temperatures. The kiln wash which is in water suspension has no opportunity to adhere to the mould.

The most accepted way to get rid of the boron nitride is by sandblasting. Sandblasting risks pitting the mould. Manual sanding seems to enable the ceramic mould to accept kiln wash. Perhaps enough of the surface is removed to reveal the porous nature of the ceramic mould. You do need to be cautious about taking the surface of the mould away when using abrasive removal methods. The ceramic is relatively soft in relation to the abrasive materials.

The difficulty of removing boron nitride from ceramic moulds means that you must think carefully about which moulds you coat with it.  If the mould has delicate or fine detail, removing the boron nitride risks the removal of the detail.  This indicates that this kind of mould, once coated, should not be taken back to the bare mould.

If you are using boron nitride to get a smoother surface to the object, consider using a lower slumping or draping temperature. This will minimise mould marks very effectively. And without the expense of boron nitride.

More information on removal of boron nitride is given here. 

More information about mould treatment is available in the ebook: Low Temperature Kiln Forming and at Bullseye ebooks

Wednesday 22 November 2023

Slumping Schedules


 When slumping fired pieces, it is most often appropriate to use a slow ramp rate to avoid too rapid expansion of the glass that might lead to a break. Most glass breaks on the ramp up are below 300°C/573°F. It is in this range that there is a rapid expansion of ceramic. This means a slow rate is protective for both glass and ceramic moulds.


Slumping Schedules by Profile (Celsius)

Flat Fuse and Contour Tack

Actual thickness

Ramp 1 rate to 260°C

Soak time (min)

Ramp 2 rate

Slumping  temp. for mould *

Soak time (min)

Anneal as for contour:

6

240

20

240


30

9mm

Rounded Tack

Actual thickness

Ramp 1 rate to 260°C

Soak time (min)

Ramp 2 rate

Slumping  temp. for mould *

Soak time (min)

Anneal as for round tack:

6

150

20

150


30

9mm

Sharp Tack

Actual thickness

Ramp 1 rate to 260°C

Soak time (min)

Ramp 2 rate

Slumping  temp. for mould *

Soak time (min)

Anneal as for sharp tack:

6

120

20

120


30

9mm


Slumping Schedules by Profile (Fahrenheit)

Flat Fuse and Contour Tack

Actual thickness

Ramp 1 rate to 500°F

Soak time (min)

Ramp 2 rate

Slumping  temp. for mould *

Soak time (min)

Anneal as for:

0.250”

432

20

540


30

0.375”

Rounded Tack

Actual thickness

Ramp 1 rate to 500°F

Soak time (min)

Ramp 2 rate

Slumping  temp. for mould *

Soak time (min)

Anneal for:

0.250”

270

20

270


30

0.375”

Sharp Tack

Actual thickness

Ramp 1 rate to 500°F

Soak time (min)

Ramp 2 rate

Slumping  temp. for mould *

Soak time (min)

Anneal for:

0.250”

216

20

216


30

0.375”


*Of course, the slumping temperature will be altered for the glass according to the manufacturer’s stated range. The nature of the mould will also have a big effect on temperature and time. The soak times at the slump soak are those appropriate for the mould. The annealing soaks are related to the profile of the glass.


Rates

It is most often best to use a slow ramp rate to at least 500°C/933°F. This avoids the risk of inducing a too rapid differential expansion within the glass as it heats up. Experiments relating to the first ramp rate have shown firing as for two layers thicker than indicated by the profile schedule provides the best results. It is then possible to increase the rate as determined by the profile schedule.

The rates for the anneal soak and cool are those that are one layer thicker than determined by the schedule for the profile. This has been shown by experimentation to give the best annealing result – i.e., least stress.

Temperatures

The slumping temperature needs to be altered for two factors:

  • ·        the glass according to the manufacturer’s stated range, and
  • ·        the nature of the mould.

Many manufacturers are giving recommended temperatures and times for slumping in their moulds. An example is the Bullseye “Quick Tip” which gives suggested temperatures and times for various sizes and natures of moulds that can form the basis for scheduling of slumps. The rates are normally for flat uniformly thick pieces. This will need alteration for tack profile pieces.

Take note of the soak time in these recommendations. If it is less than 10 minutes, it is possible to reduce the temperature by about 10°C/18°F by using a 30-minute soak. This will reduce marking on the back of the glass.

Soaks / Holds

Slumping schedules tend to be more difficult to devise than many other operations in kilnforming because of variations in moulds and what is placed on them. This, consequently, makes observation of the slump more important. It is needed from a point below the target temperature – say 20°C/36°F – to ensure the slump is stopped when it is complete.  If it is not complete, the soak can be extended. The controller manual will give the information on how to do these operations. In general, you schedule slower ramp rates for thicker pieces in combination with the half hour soak. This means for each thickness greater than 6mm, the top temperature can be reduced and still achieve a full slump.

The schedules here are applicable for pieces up to 9mm actual thickness.

Slumping of thicker pieces needs to apply the underlying scheduling method:

  • ·        Apply the rate for two layers thicker for the advance to 260°C/500°F.
  • ·        Increase the rate after that to one for a single layer thicker than calculated all the way up to the slumping temperature.
  • ·        For annealing, also select the rates and times for one layer thicker than indicated by the profile.


For example:

  • ·        Rounded Tack of Bullseye, 12mm/0.5” thickness
  • ·        Schedule for 25mm/1” (2 times multiplier)
  • ·        Initial ramp rate for 31mm/1.25” (two thickness greater)

Celsius schedule for up to 9mm actual thickness:

Segment >

1

2

3

4

5

6

7

Rate

150

150

ASAP

15

27

90

off

Temp

260

Top

482

427

370

RT


Time(mins)

20

30

240

0

0

0


and in Fahrenheit:

Segment >

1

2

3

4

5

6

7

Rate

270

270

ASAP

27

49

162

off

Temp

500

Top

900

800

700

RT


Time(mins)

20

30

240

0

0

0


A further example:

  • ·        Sharp Tack of Bullseye, 0.5” thickness
  • ·        Schedule for 31mm/1.25” (2.5 times multiplier)
  • ·        Initial ramp rate for 38mm/1.5” (two thickness greater)

 Celsius schedule for up to 9mm actual thickness:

Segment >

1

2

3

4

5

6

7

Rate

78

78

ASAP

11

20

65

off

Temp

260

Top

482

427

370

RT


Time(mins)

20

30

300

0

0

0


and in Fahrenheit:

Segment >

1

2

3

4

5

6

7

Rate

140

140

ASAP

20

36

117

off

Temp

500

Top

900

800

700

RT


Time(mins)

20

30

300

0

0

0


These examples show that considerable differences in scheduling are needed for different tack profiles. It also shows longer annealing soaks and slower cooling rates are required for sharp than rounded tack pieces.


More information is given in the e-Book Low Temperature Kilnforming. and at Bullseye eBooks