Saturday, 25 February 2012

Cut Running Pliers

Cut running pliers are intended to assist with the running of long straight or gently curving scores.  Sometimes they are referred to simply as running pliers.

There are a wide variety of these made for different purposes.  The following are illustrations of some of the styles.


This plastic cut runner is an economy version of the metal one below
 To use these cut runners, you align the raised line on pliers with the line of the score and squeeze gently.  The single line on the bottom jaw acts a fulcrum, allowing the two raised parts on the upper jaw to provide pressure to the score and run the break along the score line.


Metal cut running pliers

The metal cut runners are pliers with curved jaws. When looking at the pliers from the nose toward the handles you will see the curve like a down turned mouth. These assist the breaking of the score by putting tension on the glass.

Cut running pliers almost always are supplied with covered jaws. This are normally two pockets of flexible plastic that fit snugly onto the slightly flared, curved jaws. Keep these on. When worn they can be replaced by buying more, or by wrapping the jaws with tape using "liquid plastic" or sometimes even using them bare.

There is a spacing screw on top which allows adjustment for different thickness of glass. It is intended that the jaws should not close completely – which can place excessive pressure on the glass – but be adjusted so that there is about 1mm less opening than the thickness of the glass. So when cutting 3mm glass there would be a 2 mm gap. On 4 mm glass the gap would be 3 mm, and so on. experience will show what relationship is best for you. The principle is that the pliers perform a gentle tensioning of the glass. Using your hands exerts more tension on the glass and cannot be so delicate.

Use
Align the centre of the top of the jaws - often the pliers have a centre line on the top to assist – along the direction of the score. Squeeze gently and the score will begin to run.

I have found my best success when using cut running pliers is to avoid trying to run the whole score from one end. With a bit of practice you get the feel for how much pressure you should be applying and so when to stop. Then turn the glass around and start the run from the other end. Usually the open ends of the score will meet and the break is completed. Occasionally the two runs will not meet. Then it depends on how complicated the curve is as to whether you use your hands to complete the break or start tapping the score line to finish the break.


More that one tool

There is a second variety of cut running pliers designed to run long scores near the edge of the glass.  These can be used in the same way as the cut runners pictured above.


The Ring Star cut runners
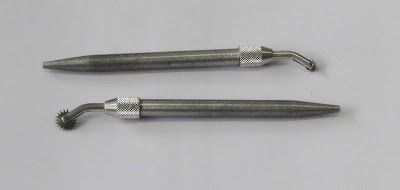
These cut runners made from plastic have a pad with a central raised point on the bottom jaw and a circular pad on the top jaw.  Placing the point directly under the score line will begin running the score.

 A more durable, but also more expensive version is the Silberschnitt cut runner.


Moveable pad oriented to run scores in line with the pliers orientation

The advantage of these is that the upper pad can be rotated to accommodate any angle, allowing shallow curves to be broken out.  If progressively deeper curves are scored, this too can assist in breaking out deep inside curves.


Pad oriented at about 60 degrees for running score at an angle to the plier's orientation
This allows a score to be run gently over a long distance. This is especially advantageous when the score is a curving one.  

Use

The upper pad is rotated so that it is at a right angle to the score.  The lower pad has a point to act as the  pressure point when the pliers are squeezed.  As you move along the score, you continue to adjust the upper pad to maintain a right angle to the score.  This is a much more gentle breaking action than the standard cut runners and runs the score in shorter distances.  However these short runs make it more certain to run the score successfully. 

Tools for Thick Glass

There are a variety of tools for breaking thick glass - usually 6mm and thicker.  Some examples are illustrated.


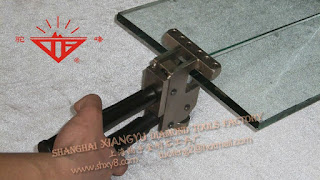
Note: these running pliers are pictured upside down.  The two plastic pads should be on the top of the glass.


These are used in the following fashion:


Adjusting cut running pliers for different thicknesses of glass.

Wednesday, 15 February 2012

Pounce Wheel

The pounce wheel is used in reproducing images and comes from a time before photocopying or carbon papers. It gets its name from its use together with a pounce bag. In the past the pounce wheel would make holes through the paper or card along the design lines. The paper or card is put over the material which is to have the imaged copied onto it. A small bag of black powder would be dabbed (pounced) on the cover paper leaving black dots on the surface below. These could then be used to trace the same image many times in what ever medium was being used.


Two Pounce Wheels of Different Sizes

As the photo shows, the pounce wheel consists of a pencil-like holder with the spiked wheel at the end. The wheel is on an angled axle similar to a bicycle to make it easier to follow straight lines by pushing away from your body. This allows a clear view of the line being copied. The smaller wheel is useful for tight curves.

The pounce wheel still retains a use in transferring images through opaque materials, although the full pounce process does not need to be used.

To copy part of one stage of a design onto a new one without using tracing or carbon papers you only need to layer a new sheet of paper under the current design and run the pounce wheel over the parts you want to copy. As you move the wheel along, it punctures through the top layer into the lower layer. Normally, the puncture marks are all that are needed to be able to reproduce the original lines.

A crude pounced design

You can also get symmetrical images by folding the paper along the centre line and running the pounce wheel over the line. Unfold the paper and use the puncture marks to make lines symmetrical to the other side.

You can use the wheel to create mirror images by running the pounce wheel over the card, turn the card over and draw using the puncture marks.

Friday, 10 February 2012

Lead knives

The advantage of lead knives over lead dykes are that a wider variety of angles can be made with the knife. There are a number of varieties of lead knives - ranging from adapted paint scrapers to specially made sophisticated tools.


The technique in using a knife is to wiggle or rock the blade with some moderate pressure down through the lead came. Excessive pressure will twist the came rather than cut it cleanly and squarely. When you find the effort or time required to cut through the came has increased, it is time to sharpen the blade. The sharpening angle should be very acute. You can use a fine oil stone or wet and dry sand paper to hone the cutting edge. You can also use a little bit of wax or soap on the blade to ease its passage through the came.

The most simple knife is a stiff paint scraper. The blade should be of good steel so that it takes and retains the sharpening that is needed from time to time. This blade works best by wiggling through the came.

A range of cutting tools:  left - lead snips/dykes; middle - curved knife; right - paint scraper type.


Another style of lead knife has a curved blade. This has a number of variations. This knife works both by wiggling and by rocking.
Experience and personal preference will determine which style you settle on. The important elements are to make sure it is made from good steel and that it fits your hand comfortably.
You can add a metal end to the handle to provide a tool with more uses, especially as a hammer to put the nails into the board, or to snug up wooden borders, sometimes even gently tap the glass into place.

Also look at the use of lead dykes.

Sunday, 5 February 2012

Large Edge Cames

The purposes for large perimeter cames are several.

Easy adjustment on site. It is often the case that windows are not totally regular in their dimensions, even though you have taken the measurements carefully. Variations in width and height can be accommodated by shaving the lead in appropriate places. This avoids having to take the panel back to the studio to reduce the size of the glass and put new perimeter came on the panel.

The width of the rebate has an effect on the width of the came to be used. The wider the rebate, the wider came you will want to use. The minimum width of came you want to use with a 10mm wide rebate is 10mm came. This will give a maximum of 2.5 mm of came showing if you have a glazing allowance of 5mm. Often 12 mm came is better. In general the came should be wider than the rebate is, but not so wide that the heart of the lead is outside the rebate. In church windows, where the panels are installed into the stone, the cames are frequently 16mm or 25mm wide to accommodate the variations in width and the flexibility needed to get the panels into the slots.

Aesthetics have an effect on the width of the perimeter came too. Various people want more or less came showing. The important limitation is that the heart of the lead should be within the rebate.

In autonomous panels the need for large edge cames is to act as a framing device. Zinc might be used but there are other possibilities than using a different metal that will provide as good or better solutions.


Monday, 30 January 2012

Light Box Lighting

Light is a central consideration in building the light box. 

The best way toward even light distribution even with good dispersion sheets, is to have multiple light sources. I recommend placing them at the same distance apart as the depth of the box. It would be possible to pack the box with light fixtures, but this is expensive and generates a lot of heat. It also may make the light too intense to be comfortable to work with. If you can control the general lighting of your studio and you can turn it off or down, you will not need such intense lighting in your box.

An alternative, but more complicated method is to build the light box with baffles so the light is never directly under your work. Commonly, this would require the box to be built wider than the glass upon which you will be working. The light reflects from the sides and bottom of the box to give an even light. In this case, the single sandblasted surface would be sufficient to disperse the light and keep your eye focused near the surface of the glass or cartoon on which you are working.

You need to have daylight corrected light sources for you light box, especially if you are doing any glass selection on it. Fluorescent tubes are easily available, but other light sources can be used if they can be found in daylight colours. Fluorescent tubes do not generate much heat and are available in daylight corrected colours. So these are the common choice.

You still need to have ventilation to allow the heat to disperse, though. Ventilation can be provided in a number of ways ranging from drilling holes in the sides, to providing a slot in the side or bottom.

You need to have access to the light fittings to replace bulbs. It is easiest if this is by removing the glass top. You can provide tabs on or under the glass to lift it with, but these often interfere with other uses. You can use the ventilation holes if they are high on the box to stick a lifter under the glass to be able to grasp the edge. You can have a removable section to the beading that holds the glass top in place. You can provide a couple of finger holes at the top edge of the box to enable more direct lifting of the glass without disturbing any of the box fittings.

Another important element in getting the maximum amount of light out of your box is to paint the inside white. This should be a matt or at most silk finish. Any glossier finish will produce bright reflective areas. Shiny surfaces such as aluminium foil also produce these unwanted bright areas. In fact, a matt white surface gives more apparent light than aluminium foil in the light box.

The lights should be wired in series so they all come on at the same time. It is of course possible to have a switch for each fitting, to vary the intensity of the light for the work you are doing. This does add a bit to the expense, but may be valuable for your way of working.


Additional information:
Uses
Requirements
Flexibility
Top surfaces

Wednesday, 25 January 2012

Light Box Tops

I recommend your top should be 6.4 laminated or 4mm toughened glass for anything up to 610 by 1000mm. If it is larger, you should go to 6mm toughened, as 8.6mm laminated glass is pretty expensive. I suggest glass because it is strong, rigid, scratch resistant and easy to clean.

You can use a router to form a ledge for the glass to sit on. You can use a less machine intensive method, by nailing thin battens or quarter rounds around the glass. But the structure which confines the glass should be no higher than the glass surface. If it is higher than the glass, you can simply plane or sand it down. Insure there is no part of the fixings of the glass higher than the glass surface This is especially important when cutting glass on the light box. If the surround is higher, you run the risk of breaking glass that is for one reason or another overhanging the edge. It also makes it easier to get the glass on and off the light box.

To get the appropriate diffusion you need to do more than sandblast the under side of the glass. While this will provide some diffusion, it is not enough. You can put another sheet of glass, sandblasted on both sides, underneath the top sandblasted sheet to provide good dispersion of the light. However, I have found a 3 or 4 mm sheet of white acrylic that is 70% -80% opaque provides the best diffusion of the light elements, even tough it is more expensive than glass.

You also need to have a method to be able to get at the lights. This can be by having a removable section of the boundary. You can also make use of the ventilation holes, if appropriately placed, to lift the glass. A portion of the box sides can hinge to allow access to the lights through the side, although this is more awkward than fitting from above.

Additional information:
Uses
Requirements
Flexibility

Friday, 20 January 2012

Light Box Flexibility

Light boxes can be constructed in a variety of ways. The simplest to construct is the free standing, horizontal, single purpose light box.

You need to consider the size of the box in terms of surface area. This will relate to the space you have available and the scale that you work at. Having determined the surface area required or possible, you need to think about the height. The top should be of a height so you can stand or sit with a straight back while drawing, cutting or painting. This will vary according to your height and whether you will be standing or sitting. Typically these heights will be the heights of the benches and desks you already use, but you need to check again that you are actually working with a straight back, as this will reduce the fatigue you might otherwise experience.

Note that if the box is going to be sat at, it will need to be narrower to be able to reach to the opposite side. If you will be standing at the box, it can be at least half again as wide as the sitting version. A sitting version will also affect the depth of the box containing the lights. It may not be possible to have anything deeper than 100mm. This will produce some problems with the evenness of the light, but nothing that will make it unusable.

Then you need to consider the depth of the box. In principle, the deeper the box the better diffusion of the light. But there are limits. If the box is really deep, more lights will be required, and potential storage space is lost. I recommend about 150mm for the depth of the box. I then place the fluorescent tubes at 150mm centres across the box. It does not matter which direction they are oriented. That will be more determined by the available fittings and the dimensions chosen.

The flexibility you have in building your own box includes a number of things which could be constructed separately or in combination.

You can cover the light box with a sturdy work board to do all kinds of work on top. So this makes a combination light box and work bench. This top can be hinged so you don't have to lift it off each time you want to use the bench. It should have some support mechanism so it does not fall on your or your work. I have used a chain that allows the board to go back just beyond the vertical. These chains can sometimes get in the way of your work.

In addition to a separate surface the box can be an area of the work bench. The important element is that the rest of the surface of the bench should be at the same level as the light box top. Any variation runs the risk of breaking the glass you may be working on. The cover for this can be hinged to protect the surface when the light is not needed.

Often you will be working on pieces smaller than the illuminated area. It is possible to arrange things so that each light fitting can be turned on and off independently to allow light reduction or intensification as you need. It is simpler to have sheets of opaque card to place around your work area to reduce the extraneous light that will overwhelm the glass that you are selecting or painting, for example. In the case of too much light the glass or the painted lines and shading look darker than they really are as a result of your pupils contracting against the light.

You could add a variation to allow the light box to be used as a near vertical illuminated glass easel. This requires a set of hinges, a ledge on the hinged side and a support of some kind at the back, similar to a piano lid support. This is most useful in painting and in waxing up the pieces to view the whole panel before leading or foiling.

You need to think about the amount of flexibility you require the box to have when considering the materials to be used. If you want to use it as part of your display equipment, it needs to be mobile and so relatively light. This will interact with the materials to be used in construction. In this case you may want to make greater use of metals for their strength in relation to weight. 


 You probably will use opaque acrylic sheet as the surface. If you do, you will need to give it internal support to keep it from bowing. The best for this is another piece of acrylic – clear this time – glued to the top sheet and to the bottom of the box between the light fittings.


Additional information:
Uses
Requirements
Top surfaces

Sunday, 15 January 2012

Light Box Requirements


Once you have determined that you need a light box, buying or building seem to be the two options available.

It used to be that when hospitals were changing from film to screen based x-ray results, that the light boxes were available on the second hand market very cheaply.  Now there are many light sheets in A2 format that work well and are portable/storeable.

The alternative is to make one for yourself. The materials are easily available and can be assembled with a little knowledge of wood working and basic electrical knowledge. The first element is to decide on what you want – the requirements.


Requirements

The top surface needs to be firm and scratch resistant. Toughened or laminated glass is good for this. The larger area covered, the thicker the glass needs to be, or there needs to be support under the glass to avoid breaks. The toughened or laminated glass resists breaking from dropping material onto or leaning against the light box, but not from standing on it!

You need to have daylight corrected light sources for you light box, especially if you are doing any glass selection on it. Fluorescent tubes are easily available, but other light sources can be used. You need to have ventilation to allow the heat generated by the lights to disperse. Fluorescent tubes do not generate much heat and so are the common choice.

You need diffused, even light across the whole surface. This requires a diffuser and there are a number of solutions. You can sandblast the back of the top sheet, but I find this does not provide enough dispersion. You can sandblast both sides, which gives better dispersion of the light, but is difficult to clean and so needs another sheet on top. The best dispersion of light comes from using a sheet of opaque acrylic with about 80% light reduction. The difficulty with this is that it is flexible and needs support if any glass cutting is going to be done on the surface. I place the acrylic sheet underneath a sheet of 6.4mm laminated glass. This gives both solidity and dispersion.

Light is a central consideration in building the light box. The intensity is controlled by two things mainly – The number of lumens and the intervals of the light sources. The best way toward even light distribution even with good dispersion sheets, is to have multiple light sources. It would be possible to pack the box with light fixtures, but this is expensive and generates a lot of heat. It also may make the light too intense to be comfortable to work with. In general, fluorescent tubes placed at about 150mm centers apart will provide all the light you will need.

To make sure you get all the benefit of the light you need to build an enclosed box with ventilation holes or slots that is painted matt white on the inside. This allows the light to be reflected upwards through the surface with out bright spots that can be caused with gloss paint.

You need to consider the size of the box in terms of surface area. This will relate to the space you have available and the scale that you work at. In addition to a separate surface the box can be an area of the work bench, or covered by a separate work board – whether permanent or temporary.

The height of the box will need to be considered, Will you be sitting or standing while working at the light box. It needs to be high enough in either case for you to maintain a straight back.

You need to consider the ability to screen parts of the light so the light is directed only at the work area. Large areas of light will overwhelm the glass, making it appear darker than the finished piece will actually be.

You need to think about the amount of flexibility your box requires to have. If you want to use it as part of your display equipment, it needs to be mobile and relatively light. This will interact with the materials to be used in construction.


Additional information:
Uses
Light box requirements

Tuesday, 10 January 2012

Light Box

Light boxes are in many ways a development from the glass easel. These were used in studios to wax up the painted glass and display it as it would be seen in a window. Sometimes the glass painters painted across all the glass at once, so this method enabled them to see the results immediately.


Nowadays people tend to use back lighting for these and other purposes, so the light box has become more popular. Some of the uses are outlined here:

The light box is very useful when tracing or altering designs. The back lighting enables you to use other paper than tracing papers to transfer the design elements. You can fold the paper along the lines of symmetry to check on how the lines match, or to copy the lines from one side onto the other side at the designing and cartoon stages.

The light box can help select glass colours either initially or when the main pieces have already been established. The combination of the glass over light shows how they interact with each other. At later stages when the main glass is cut, it can help avoid unwanted bright or dull areas.

Possibly the most common use is in cutting dark or opalescent glass. The additional light allows you to see the cartoon through the glass and so cut directly from the cartoon. This can be enhanced by blanking out the excess light from around the glass or cartoon.

The light box enables the arrangement of the cut glass pieces to be assembled to view the colour balance and have a virtual view of how the panel or window will look as a finished piece. An additional step toward the result is gained if each piece is outlined in white-board markers – use black pens - to represent the lead or copper foil and their widths. This stops the light between the pieces from causing you pupils to contract, and gives a more accurate representation of the appearance of the final pane.  White-board markers can just be wiped off the glass without using spirits.

The light box is important in painting. The back lighting shows the effect of the painted line or level of shading immediately. This allows adjustments to be made quickly and accurately before firing,

Depending on how the light box is built, it also can be used as display lighting. This can be as up-lighting or backlighting.

Additional notes:
Light box requirements
Flexibility
Top surfaces
Lighting

Thursday, 5 January 2012

Paper

The traditional approach to cartoons meant three versions were necessary. One with all the drawing details, one with the cut lines, and one for layout and leading.

If you are doing a leaded or copper foiled panel without details for painting on glass two copies are the maximum required. I make do with one original, as I have no place to keep the glass pieces laid out while cutting and beginning to lead, nor do I make templates for cutting.

The paper you need is one that is stiff enough to avoid changes in shape or wrinkling with changes in humidity. The paper also has to be robust enough to stand up to lots of movement. Cartridge paper from a roll works well, but is often seen as expensive. Brown wrapping paper is usually stiff enough, although thinner than cartridge paper.

Tracing paper is very useful, if you do not have a light box, as you can trace details from one version of a cartoon – whether new or from an old one – into another. However it changes shape when exposed to high humidity. To transfer the cartoon to more stable or more opaque paper, you can use a pounce wheel to transfer through the tracing paper for the final cartoon.

Two pounce wheels

If you have a light box you can use it to make the transfer, or you can stand at a window with the two sheets of paper taped together to trace the design onto the final cartoon paper.

If you need to make pattern pieces you will need a second copy to cut up. Here you need paper or card that lies flat. You may also find it useful to cover the main cartoon with a water proof covering if you are going to do a lot of grinding and fitting over the cartoon. You can do this by oiling your paper (as for stencils) or by sticking clear vinyl over the cartoon.

Friday, 30 December 2011

Soldering Radiating Lines

Some times no matter how you try to avoid it in the design, you end up with multiple solder lines joining at one point.

In copper foil work, I find it best to tin all the copper foil before assembly, as this means you can use a minimum of solder to tack solder the pieces to one another.

You will be left with less solder at the joint if you start from the joint and move away from it while soldering. This drags the solder into the bead line rather than letting the solder build up at the joint of the multiple lines and give a resulting high point resulting from the accumulation of solder there.


Monday, 26 December 2011

Kiln Furniture

You do not have to buy all your kiln furniture. Any refractory material – any heat resistant material that will stand up to the forming temperatures – that you have from broken shelves or used material will do.
The advantage to home made kiln furniture is that you can have exactly the shape you want. There are a number of possibilities.


Example of broken shelves

 Broken kiln shelves can provide supports and dams. They can be cut with a tile saw to give long strips that can be used as dams. Smaller squares and rectangles can be stacked to give height to other supports for the glass.

Cutting a shelf with a hand saw
25mm vermiculite board

Vermiculite in the form of a pressed board provides a medium strength kiln furniture. It can be cut with a wood saw, although it dulls cutting tools quickly. The board can also be carved with wood working tools although it is very abrasive, requiring tools to be sharpened before use on wood again.

25mm ceramic fibre board

Fibre board is not as strong or rigid as kiln shelves and vermiculite are, but is much more adaptable to curves and undulations. They can be cut with a knife and used with or without hardener – colloidal silica. If the hardener is used some kind of separator will be required to keep the glass from sticking. Dust masks are required for working with ceramic fibres.


Soft fire brick

Soft fire brick can be cut with a hand saw into many shapes and and sizes. They are suitable as supports and braces for dams.  There are also higher density bricks that are much heavier to resist the movement of dams.


3mm fibre paper

Fibre paper can be cut and stacked to provide shims to level shelves and moulds. Shapes can be cut into stacked layers of the material to provide dams for irregular shaped projects.

Thursday, 15 December 2011

Uneven Slumps

Uneven slumps are an occasional feature of kiln forming. There are a number of possibilities that can cause this.
A mould that is not level will lead to an asymmetrical slump. You need to make sure on each firing that the mould is level, as well as your kiln and the shelf or supports. A three-way level can check this quickly.
Glass that is placed unevenly on the mould can cause uneven slumps. The glass should be placed on the mould so that it is equidistant from the edges of the mould all the way around. The glass needs to be level too. Again the three way level can help.

A slight bevel on the bottom edge can help avoid any catching of the glass as it moves within the mould.
Baffling or shielding parts of the glass can keep the heat off areas that tend to heat up faster than the rest and so begin moving before other parts of the blank.

Deep moulds most often present difficulties with uneven slumping. The best approach here is to use multiple, progressively deep slumps.

It also is possible to reach in with a wet stick and move the glass back to an even slump during the firing. Please observe all the safety requirements.

Most importantly, slow temperature rises solve most of the problems of uneven slumps. Fast temperature rises allow the component parts of the piece to absorb heat differently for different colours and glass of different viscosities. Slow rises in temperature help avoid any unevenness in the way the kiln heats the piece. Slow rises give more control and achieve the result at a lower temperature.

Note that a number of the solutions require observation while firing. The best results come from observing what is happening in the kiln. It allows you to make corrections either while firing, or – more often – in the next firing of a similar project.


Saturday, 10 December 2011

Leaking Cutters


People sometimes comment that their cutters are leaking. Most cutters of the pencil type are not prone to leaking. Some of the pistol shaped cutters seem to have more difficulty.
One possibility is that the oil being used is too thin for the system that dispenses the oil. In that case a little thicker oil may cure the problem.

It may be that the oil is leaking from some where else than the valve or wick that is intended to dispense the oil. This sometimes happens when excessive pressure has been put on plastic handled cutters whether pencil or pistol. In this case, the alternative is to replace the cutter or use another method.

The other method could be called the dip and cut method. In this case you leave the reservoir empty and have a shallow container filled with oil soaked cotton wool. Dip the cutter wheel into the cotton wool before each cut and this will give you enough lubrication for the score. A variation on this is to dip a brush in a container of oil or turpentine substitute and paint along the line of the cut before scoring. Both are effective.

Although it is not a repair, you can push a cotton wool lump down to the valve or wick, saturate it with oil and then there is enough oil to lubricate the cutter wheel, without an excess to leak out. You do need to renew the oil for the lump of cotton wool from time to time.

Monday, 5 December 2011

Reworking Designs

Principles of design practice for stained glass, 5

Having created the design, you should consider re-working the designs for a variety of reasons. Some of these are:

- to save time in the later stages of the work. It all too easy in the excitement of creating a new piece to want to get directly on with making, however this often gives construction or design difficulties that have to be solved in the making, leading to compromises. In general far too little time is spent in the design stage. Time spent on the design will be more than saved in the construction and will produce a more satisfactory piece.

- to ensure the structural stability of the piece. Although reinforcement should be considered from the beginning of the design, this is the time to ensure that the piece will stand up to the use it will receive during its – expected – long life.

- Make sure you have investigated every possibility to answer the challenges of your design.

There are a number of activities that can help with these elements.

Reworking will enable you to maintain the essence of the design while simplifying lines and easing the labour of the construction of the panel. Often the design contains a number of lines that are not essential to the whole design.

As you re-work the design, you can make sure every curve, dip and angle are to your liking and so improve the whole. Redrawing also helps understanding of the design and the placing of lines. It will also help in considering the placement of lead came and the widths to be used.

Make sure the design is still structurally sound. The design should avoid long nearly straight lines with few interruptions, especially those that go from edge to edge in any direction. The lines should interlock rather than have many joins onto long lines.

It gives an opportunity to ensure that you can cut all the pieces. This is the time to look at the negative or background pieces to make sure you can cut them as well as the foreground pieces. Usually people are so concentrated on designing the main image that the background becomes too complicated to cut easily.

Make successive tracings with each change, so there is a record, allowing you to step back wards to an earlier version if necessary.

If this re-working stage leads to the realisation of design problems, there are some things that can be tried:
  • Cropping the design can transform it. The focus of the design can be enhanced by removing some of the surrounding “information”. The change of proportions say from landscape to portrait can make significant differences.
  • Enlarging and using only a portion of the original design can be a solution. This is similar to the cropping operation, but has the added advantage of making the pieces larger and easier to cut.
  • Further simplification of background design lines can be considered. This will bring the focus back onto the main part of the image.
  • Changing relative proportions can transform the design, e.g., by enlarging a busy background, it can be made simpler and easier to read the whole panel.
Elements of Design:

Wednesday, 30 November 2011

Design Sources

Principles of design practice for stained glass, 4

Use the everyday visual experience and make interpretations and adaptations. E.g.,
  • draw lead lines on an illustration to make it suitable for stained glass, using the fewest lines possible
  • Use your photographs of interesting subjects and scenes
These may never become useable designs or cartoons, but will increase you abilities to design from the real world toward the abstract.

Make and keep sketches as personal references. These do not need to be finished drawings, just a reminder of the thing(s) that caught your eye. Many artists always carry around a notebook to record these observations. Even if you only make drawings on paper napkins, make a folder to keep these separate sketches together.

Take photos of shapes and interesting images. These can then be used later to develop images.

Make up composite images by using overlays or collage. This helps develop your compositional abilities.

Work on abstraction in your design practice:
  • Study abstract representations. Dissect – decomposition is a popular word - and analyse how the work is put together.
  • Use geometric design as an introduction to abstract design. This forces your attention to structure, balance and colour.
  • Once the distribution of the physical and visual weights is understood, this enables the jump to more free forms of abstraction.

Friday, 25 November 2011

Beautiful Design Lines

Principles of design practice for stained glass, 3

Stained glass is a graphic medium where line and colour are very important. Achieving pleasing lines and forms requires practice and use of various approaches and techniques.

The two dimensional world is one of abstract thought. Work and development are the way to creativity – there is no mystical talent. Practice drawing every day – set aside time to do it, if you normally shy away from drawing as an exercise.

Study and learn from what has gone before. Look at the images and objects you admire and analyse what you like about them and why. Also consider what things could have been done differently. Consider how those changes would affect the character of the piece.

Of course, maintaining your creative attention is difficult, so when blocks occur try some or all of these things:
  • Put the work aside for a day or two before taking it out and looking at it again.
  • Alternatively, pin up the design on a wall where you can look at as you pass by. When you see a change to be made, do it immediately and pin it back up.
  • Get a new perspective, e.g.:
    • Turn it upside down. This will enable you to observe differences and spot inconsistencies
    • Look at it in a mirror. You might see people studying still life or live subjects together with their drawing in a hand mirror to get a new perspective that will help spot difficulties.
    • Put the design on the floor and climb a ladder to look at it. This provides distance and changes the angle at which you look at your design.

Remember that design tends toward realism or abstraction. You need to work on both forms, remembering that glass is a graphic medium that tends toward abstraction. Working on both forms develops your flexibility and knowledge. Having a working knowledge of both enables you to have a responsive approach to the client.