Found moulds are often ceramic bisque or greenware, sometimes glazed and fired for house or other final use. Many other materials, usually metals can also act as moulds. This article will address ceramic materials.
Shape
Pick out a mold that is not too complicated, detailed or deep. A shallow bowl or plate with a rim is ideal. When choosing bisque ware to use as a slumping mold, avoid complicated and deep shapes. Do not choose molds with intricate carvings or patterns for slumping. Those shapes would be better for frit casting. Instead, choose shapes with a rim or with gentle curves rather than steep slopes.
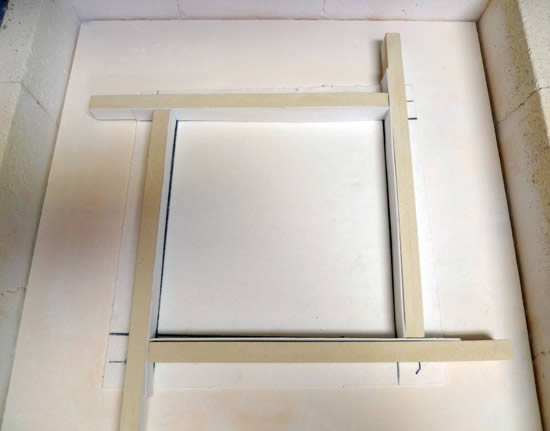
Slumping or Draping
Glass has a higher expansion and contraction rate than ceramics. This means that any draping has to be done over gently curved ceramic materials. So the general advice is to avoid draping over ceramics. If you do drape anyway, it is advisable to cover the ceramic with fibre paper in addition to the kiln wash.
Vent holes
You need to drill holes in the proposed mould to allow the air to escape as the glass slumps. You might want to see what holes are drilled on similar plates online. The holes should be small – about 1.5mm. Much smaller and they will get clogged up with kiln wash; much larger and they will mark the glass. The drilling should be from the inside to avoid any break out into the moulding surface.
Greenware is easy to drill, so don’t press hard; let the drill bit do the work.
Ceramic forms that have been glazed require more care to start the hole. The surface is so smooth the drill bit will tend to skitter around. You can place a bit of tape where you want to drill to reduce the movement of the drill. You can also start the hole by using a masonry drill bit and rotate it by hand at the point you want to drill. This will create a “divot” in the glaze to hold your drill. It is also easier to drill, if you sandblast the glazed surface first. This will give a bit of “tooth” for the bit to grip.
You should drill the hole(s) at the last place the glass will fall. In a completely round bottom you drill at the centre. If there is a right angle or steep part near the bottom of the form, that is the last place the glass will touch and so is where the holes should be drilled. Three, spaced equally apart, should be enough.
Preparation for use
Take the greenware and clean it with a mild abrasive pad or nylons to eliminate the mold marks and scratches on the piece. Have any greenware fired to at least bisque temperatures at a ceramics studio. Explain what you are doing and the working temperature. The ceramic does need to be fired high enough to be robust. The ceramics people can give you information on the performance of the ceramic when fired to various temperatures. The bisque mold must be kiln washed before use.
If you are using an already glazed form, you need to remove or roughen up the glaze enough to take the kiln wash. A sandblaster does a good and quick job, but it can be done by hand with wet and dry sandpapers. The process should be done wet to keep any dust from the glaze (a vitreous power) getting into your lungs
Test
Finally, you should test your mould with glass that has little value, before committing you best efforts to the mould.
Thursday, 14 October 2010
Sunday, 10 October 2010
Thick Glass Firing
by Tony Roberts
My schedule for 50mm (2 inch) Pilkington’s Opticlear in a top-heated flatbed kiln is:
0 to 600C - 6C per hour rise - takes 6 days (if you start with a solid slab) (I start with smaller pieces, so can raise the temp much faster)
600C/hr to your soak temp - as fast as you like (I go to 840C and hold 4hours)
Soak temp to 565C - drop as fast as you can, then hold for 14hours
Anneal: drop at 0.75C per hour to 365C - this takes 11 days
Then drop at 1.5C per hour to 300C - another 2 days
Then drop to 60C at 4C per hour - 2 days and a half
A total of 16 and a half days
Thursday, 7 October 2010
Glass Selection
I have produced some notes on some of the elements in the selection of glass.
Here are the links:
Glass Density
Clarity
Advancing and Receeding Colours
Light and Dark
Colour Combinations
Here are the links:
Glass Density
Clarity
Advancing and Receeding Colours
Light and Dark
Colour Combinations
Wednesday, 6 October 2010
Choosing Glass for a Harmonious Appearance, 3
Different colours, of course, have different appearances. The most commonly known one is the hot/cool colour combinations. This still applies when dealing with opalescent glasses, where reflection is the dominant experience of the colour.
But in glass where there is quite a bit of light transmission, the receding and advancing colours are not exactly the same as in painting and opalescent glass. The greatest separation comes with intense red (close) and intense blue (distant). In some circumstances these can be experienced as apparently being in different planes.
There are a few distinct advancing and receding colours, but most are much more subtle and are not all as expected from the experience of reflected colour. Clear, for example appears nearer than a strong blue. It is up to each person as to how far they wish to take these combinations.
Those who do want to investigate, should go to a place where they can view windows with small pieces and a variety of colour in strong light. They can then record which colours appear to “float” above others, or recede.
Saturday, 2 October 2010
Choosing Glass for a Harmonious Appearance, 2
Clarity of colour
When considering the representation of distance or depth you need to look for glass that is less pure. The colours that are muted or have a touch of white, blue or grey will provide a good representation of distance. The pure colours will appear more brilliant among the more muted colours.
This is where glass samples can be most useful. By holding them up to the light, you can see the effects one glass has on another and how one colour will appear among the others.
Tuesday, 28 September 2010
Choosing Glass for a Harmonious Appearance - 1
There are at least two major elements in choosing glass: density and clarity. A third is the “hot/cool” effect of colours. The appropriate combination of these elements leads to a panel with bright or hot spots where you want them. You can create a dramatic image or a more restrained one with more gradual gradations of light without obvious bright or dark areas.
Density
Density relates to the amount of light the glass allows through. Clearly black is the most dense glass – allowing no light through. In general, glass can be divided into opalescent and transparent.
Opalescent glasses range from the very dense opaque to less dense translucent glass.
Transparent glasses have a variety of densities too, although almost always less dense than opalescent glass. The density of transparent glasses relates to the intensity of the colour and the texture of the glass.
Colour intensity
The intensity of the colour is related to the amount of light allowed through. The intensity is directly related to the saturation of the colour. A further effect on colour intensity is the thickness of the glass. If you look at a handmade sheet of glass with different thickness on one end to another end, you can see the gradation of the colour and the amount of light that comes through.
Glass Textures
The texture of the glass affects the density of the glass. A smooth glass will have less density as the light passes through without dispersion. As the glass becomes more textured, the light is more dispersed and so appears more dense.
Friday, 24 September 2010
Glass Breaking While Soldering
Some report breaking pieces of glass while soldering. This may happen more on pieces that have big differences in width or taper to thin points. What is happening is that the glass is being heated too much locally in relation to the rest of the piece.
The solution is to solder at a steady pace. This allows the solder to cool without transferring so much heat to the glass as to break it. Some recommend that you do not rest your soldering iron on the foil while soldering. However it is the solder which is the heat sink, so the effort of holding the iron above the foil is not really necessary if you move at a reasonable pace.
This means that you do not stop with the iron on the seam. It is best to solder in one continuous movement along the seam, leaving an even bead behind. Sometimes the bead is not even. This may be because of wider parts to the seam, or inadequate flux, or many other reasons. Do not try to repair this before going on to the rest of the seam as this builds up heat in the adjoining glass. Since glass cannot dissipate heat well, the glass breaks when the temperature differential between the hot and cold parts of the glass is too great. Instead, complete the soldering of the seam before coming back to it. This gives you time to decide why the bead is not as good as you want it to be. It also gives time for the heat to reduce and even out through the piece of glass.
As you become experienced you will find a pace that suits the kind of bead on the joint that you want to achieve. If the seam is too flat, slow your pace or increase the rate at which add the solder to the iron. If the seam has too big a bead, increase your pace or reduce the rate at which you feed the solder. It is also possible to consider other methods of soldering.
You also need consider the usual problems relating to cleanliness and insufficient flux. Sometimes the soldering iron is not hot enough, but you should notice this early as the solder will not be melting at its usual rate and will be grainy in appearance.
Monday, 20 September 2010
Temperature Rise Rates
I am always concerned when people recommend soaks on the way up in order to equalise temperatures. If the soak is required because the ramp rate is too fast, there are breakages going to happen sometime - maybe not now, maybe not tomorrow, but certainly sometime. If you need that extra time, add it into the schedule. E.g., a ramp rate of 200C from 20C to 520C with a 20 min soak could also be written as 176C/hr from 20C to 520C - both take 2.833 hours to achieve the same temperature. A controlled heating rate is preferable to one or more rapid rates with soaks.
I am also concerned about very rapid temperature rises after the bubble squeeze. The controllers often cannot adequately control such rapid rises. The rapid rise also often requires a higher target temperature to achieve the desired effect. This can mean that it is easier for bubbles - large and small - to form and rise to the surface during the overshoot of the target temperature. Temperature increases are about heat work - the combination of temperature and time. This means that you can achieve the desired result in two ways:
1- fast rise to high temperature or
2- Slow rise to lower temperature.
The second strategy may also require a longer soak at the target temperature than the one with a fast rise to a high temperature.
The aim in kiln work should be to achieve the effect you want at the lowest practical temperature. This is because glasses tend to change their characteristics more at higher temperatures than at lower temperatures.
Saturday, 18 September 2010
Dams - Links to Tips
There are a number of tips on damming kiln formed glass scattered around the blog. This is an attempt to provide links to them.
Damming Options for Ovals
Description of Needling
Prevention of Needling
Damming Options for Irregular Shapes
How High Should the Dams Be?
Separators for Dams
Damming Options for Ovals
Description of Needling
Prevention of Needling
Damming Options for Irregular Shapes
How High Should the Dams Be?
Separators for Dams
Thursday, 16 September 2010
Releases between the Glass and the Dam
An alternative to fibre papers or kiln wash separators between the dam and the glass is to use iridised glass. This of course, only works on pieces with straight lines on the sides. If you place the iridised side toward the fibre paper, you will get a clean release with a minimum of texture. If you do decide to use iridised glass as the release, you must not use Thinfire. It will cause awful pitting in the iridised glass.
Sunday, 12 September 2010
Lining Dams
Dams should normally be lined with Thinfire and fibre paper to get the best release. If you are using fibre board that has not been hardened, you do not have to line, but you will get smoother edges if you do.
The lining papers should be about 3mm shorter than the expected final thickness of the finished panel. I find that 3mm paper against the dam provides the required standoff between the dam material and the glass. The lining of the fibre paper with Thinfire provides a smoother surface than just the fibre paper. Both of these liners should be the same height – 3mm less than the final height of the finished piece.
To calculate the expected final height you need to do a few calculations in the metric system. Weigh the glass in grams. Divide by specific gravity (2.5) to get the number of cubic centimeters. Divide the cc by the area enclosed by the dams in square centimeters. This will give the fraction or multiple of centimeters thick the glass is predicted to be.
Example:
The weight of glass = 500 gms
The specific gravity = 2.5
The area is 10cm by 10 cm = 100 square cm.
Divide 500gms (the weight) by 2.5 (the specific gravity) = 200 cubic centimeters. Divide 200 (the volume in cc) by 100 (the area) = 2 cm thick final piece for the amount of glass put into the pot.
This indicates the fibre paper should be 1.7cm high to allow enough space for the bullnose edge to form.
 |
| As described by Helios |
To calculate the expected final height you need to do a few calculations in the metric system. Weigh the glass in grams. Divide by specific gravity (2.5) to get the number of cubic centimeters. Divide the cc by the area enclosed by the dams in square centimeters. This will give the fraction or multiple of centimeters thick the glass is predicted to be.
Example:
The weight of glass = 500 gms
The specific gravity = 2.5
The area is 10cm by 10 cm = 100 square cm.
Divide 500gms (the weight) by 2.5 (the specific gravity) = 200 cubic centimeters. Divide 200 (the volume in cc) by 100 (the area) = 2 cm thick final piece for the amount of glass put into the pot.
This indicates the fibre paper should be 1.7cm high to allow enough space for the bullnose edge to form.
Wednesday, 8 September 2010
Height of Dams
Dams can be of any height available, but if it is easy to adjust the height, you should consider the ease of working with the glass inside the dams and the possibility of anything falling off the dams onto the glass.
The dam should be higher than the glass in its un-fired state. It should be high enough to contain the moving glass should anything go wrong, so it cannot be the same height as the fibre paper liners – those being 3mm shorter than the glass is high. As a rule of thumb, when I have the choice, I would make the dams at least 6mm higher than the unfired glass. This allows you to handle the sheets of glass and any components without having to reach over high walls. It also ensures containment should anything go wrong.
The dam should be higher than the glass in its un-fired state. It should be high enough to contain the moving glass should anything go wrong, so it cannot be the same height as the fibre paper liners – those being 3mm shorter than the glass is high. As a rule of thumb, when I have the choice, I would make the dams at least 6mm higher than the unfired glass. This allows you to handle the sheets of glass and any components without having to reach over high walls. It also ensures containment should anything go wrong.
Saturday, 4 September 2010
Damming Irregular Shapes
The assumption is that these pieces will be open-face thick fusings/castings rather than enclosed castings.
There are two basic types of dams: a shape cut from a single surrounding piece, or multiple pieces held in place.
Single piece dams
A large, thick fibre board with shape cut out will confine the glass. If very thick, you may need to weight the fibre board, as it is lighter than the glass.
Another variation is to use thick fibre paper cut out to shape and layered up to the desired height with stainless steel pins to hold the whole in place. This also may need to be weighted down. A variation on this is to place the whole on a fibre board and pin the layers of fibre paper into the fibre board to maintain the position of the fibre dams. This will not normally need weighting.
Multiple piece dams
If the shapes are not extreme, you can use pieces of fibre board or fibre paper backed up with kiln furniture, bits of broken kiln shelf or any other heavy material that will withstand the heat of fusing.
You can use thick fibre paper held in place with kiln furniture, if the piece is not thick. You do have to be careful that the glass does not float the fibre paper and run underneath, so about 10 mm is the maximum for this kind of damming. It also helps if this kind of dam is made larger than the glass – or alternatively the glass smaller than the dam. This allows the glass to flow out toward the dam, giving nice curved edges.
Moulds, stainless steel and other refractory materials can be specially made for shapes that will be repeated.
Note that all these variations will benefit from being lined with Thinfire backed up with fibre paper. This gives a smoother edge and also gives some cusioning between the dam and the glass.
Monday, 30 August 2010
Coating Metal Moulds
Most metal moulds are stainless steel as it spalls less while at forming temperatures. The techniques here can be applied to any metal, although spalling will be a common occurrence on any metal other than high grade stainless steel.
On many single curve moulds, such as a partial cylinder, you can just lay fibre paper over the form and place the glass on top of that.
Metal moulds that have more complex shapes require a separator that will conform to those shapes. Applying liquid kiln wash requires you to heat the steel to somewhere between 150 and 200C before applying the kiln wash. Any hotter and the kiln wash will boil off on contact, leaving an uneven coating.
The kiln wash can be applied with a brush or by spraying. Spraying gives a smoother less streaky application. After giving the mould the first coat, return the mould to the kiln and re-heat the mould. Repeat this until you have covered the whole mould with a thin layer of separator. Be careful and avoid applying too much kiln wash at once, as that will cause the separator to run and reveal bare spots on the mould, causing you to need to clean and begin again.
Thursday, 26 August 2010
Cleaning Glass
Glass with dust, oil or other residues promotes devitrification. So first try to remove any excess of these.
Cutting without oil can avoid introducing more oils. Specially formulated cuttings fluids are available that are not oil.
Wash with only a few drops of washing up liquid of the kind without additives to keep you hands soft, or smell good. If there are soap bubbles on top of the water, you are using too much soap.
Window cleaning products are not usually appropriate, especially if they contain ammonia. A few products do not have additives that promote devitrification. One that works well for me is the Bohle aerosol cleaner (but not the concentrate).
Be careful about your rinsing water. If it has mineral salts in it, it can form nucleation points for devit.
Polish dry using plain paper towels or microfiber cloths. Change frequently and wash without softeners.
If you are grinding the edges, clean immediately before any part dries to avoid the powdered glass filling the scratches caused by grinding. Some put the ground pieces into a bowl of water immediately to keep the edges wet until cleaning can be done.
Sunday, 22 August 2010
Moving Pieces
To keep pieces from moving about as you solder them, use pins or nails to keep them in place. The best is to assemble the whole panel and then keep them in place with a frame or lots of nails/pins around the outside. This keeps pieces from moving and also keeps the panel to the original size.
The type of nail or pin will depend on the work board you are using. Softer boards allow push pins of various sorts to be used. Harder boards will need nails.
If you don’t like assembling the whole before soldering, you can confine the pieces you are currently soldering with nails/pins in the same fashion as for the whole panel.
It also helps to do a little tack soldering before the process of running a bead begins. A small amount of solder on the copper foil where pieces join will keep the pieces in exact alignment while you are running a bead.
Wednesday, 18 August 2010
Devitrification of Edges
Devitrification often occurs on the edges of glass, and can be seen as a thin line of devitrification -often looking like smudges that won't wipe off - where the edge has flattened during the fusing. There are some ways to avoid this.
Avoid grinding if at all possible.
If you must grind, use fine heads/grits. Then clean immediately before any part of the glass dries. You may need to clean part of the glass piece before the grinding is complete to avoid any drying of the powder on the edge of the glass.
Clean well with a minimum of soap and rinse with water that does not have a lot of minerals in it. Polish well with plain paper towels or frequently changed microfiber cloths.
Window cleaning products are not usually appropriate, especially if they contain ammonia.
Avoid introducing oils from the cutter by scoring with a dry cutter or use a specially devised cutting fluid. Cleaning solutions that have additives to be kind to hands or scents should be avoided.
The edges of some glasses devitrify more easily than others. If this continues to be the case after all cleaning efforts have failed, then use a devitrification spray, but continued cleaning is still necessary. There are no short cuts in cleaning.
Saturday, 14 August 2010
Effect of Variations in Size on Bead Annealing
When annealing beads with varying thicknesses, I apply a rule of thumb to be safe.
I take the difference between the thickest and the thinnest part and add that to the thickest part to get the diameter at which I should anneal.
So a bead with a thickest part being 8mm and the thinnest 2mm, gives a difference of 6mm which I add to the 8mm (thickest) part giving 14mm as the diameter to which I anneal.
Tuesday, 10 August 2010
Annealing Beads of different sizes and shapes
It is possible to anneal beads of different sizes and shapes at the same time, if you anneal for the beads which require the most care. It will not matter for the smaller beads or easier shapes if they are annealed longer than the minimum requirement.
Friday, 6 August 2010
Effect of Shape on Bead Annealing
The shape of the bead has significant effects on the annealing time required. This is because the shape has an effect on the speed at which the centre can cool. Spheres have the most even transmission of heat, because the heat can radiate equally in all directions. Cylinders are more restricted in heat radiation because they can radiate heat from the circumference but not so effectively along the length. Flat shapes can radiate heat in only two directions, making them the most difficult to anneal.
As indicated, spheres can be annealed most quickly. The annealing schedules given in this blog apply to spheres as this is the most common form for beads.
Cylinders which by definition are longer than the diameter need to be annealed at two thirds the rate of spheres. So, from the tables you choose the annealing rate for a piece 1.5 times larger than the diameter of your cylinder.
Flat shapes require the most care in annealing so you should choose the rate that is three times the thickness of the piece you are annealing.
These cautions will help to adequately anneal your beads, what ever their shape.
Monday, 2 August 2010
Bead Annealing Schedules for Spectrum Beads
Bead Annealing Schedules for Spectrum Beads
This table is based on James Kirwin’s work on bead making with variations. This is for cold beads being heated for a secure anneal.
Up to 10mm dia.: afap to 520C, 30 mins; anneal at 300C/hr to 370C; afap to 40C
12mm dia.: 1000C/hr to 520C,30mins; anneal at 210C/hr; 600C/hr to 40C
14mm dia.: 1000C/hr to 520C, 30mins; anneal at 155C/hr; 460C/hr to 40C
16mm dia.: 950C/hr to 520C, 30mins; anneal at 120C/hr; 350C/hr to 40C
18mm dia.: 740C/hr to 520C, 30mins; anneal at 94C/hr; 280C/hr to 40C
20mm dia.: 600C/hr to 520C, 30mins; anneal at 75C/hr; 230C/hr to 40C
22mm dia.: 500C/hr to 520C, 30mins; anneal at 62C/hr; 185C/hr to 40C
24mm dia.: 420C/hr to 520C, 30mins; anneal at 53C/hr; 155C/hr to 40C
30mm dia.: 270C/hr to 520C, 36mins; anneal at 33C/hr; 100C/hr to 40C
38mm dia.: 165C/hr to 520C, 39mins; anneal at 21C/hr; 60C/hr to 40C
50mm dia.: 95C/hr to 520C, 46mins; anneal at 12C/hr; 36C/hr to 40C
Remember this table is for spheres. For cylinders choose the diameter that is 1.5 times the diameter of your cylinder, and for flat shapes choose the diameter that is 3 times the thickness of your piece.
For other information on annealing of beads go here
Friday, 30 July 2010
Bead Annealing Schedule for Effetre Beads
This table is based on James Kirwin’s work on bead making with variations. This is for cold beads being heated for a secure anneal.
Up to 10mm dia.: afap to 530C, 30 mins; cool at 280C/hr to 360C; 840C to 40C.
12mm dia.: Go at 1000C/hr to 530C, 30mins.; cool at 194C/hr to 360C; at 580C/hr to 40C
14mm dia.: Go at 1000C/hr to 530C, 30mins.; cool at 142C/hr to 360C; at 425C/hr to 40C
16mm dia.: Go at 870C/hr to 530C, 30mins.; cool at 109C/hr to 360C; at 330C/hr to 40C
18mm dia.: Go at 690C/hr to 530C, 30mins.; cool at 86C/hr to 360C; at 260C/hr to 40C
20mm dia.: Go at 560C/hr to 530C, 30mins.; cool at 70C/hr to 360C; at 210C/hr to 40C
22mm dia.: Go at 460C/hr to 530C, 30mins.; cool at 57C/hr to 360C; at 175C/hr to 40C
24mm dia.: Go at 390C/hr to 530C, 30mins.; cool at 48C/hr to 360C; at 145C/hr to 40C
30mm dia.: Go at 245C/hr to 530C, 36mins.; cool at 31C/hr to 360C; at 95C/hr to 40C
38mm dia.: Go at 155C/hr to 530C, 39mins.; cool at 19C/hr to 360C; at 60C/hr to 40C
50mm dia.: Go at 90C/hr to 530C, 46mins.; cool at 12C/hr to 360C; at 36C/hr to 40C
Remember this table is for spheres. For cylinders choose the diameter that is 1.5 times the diameter of your cylinder, and for flat shapes choose the diameter that is 3 times the thickness of your piece.
For other information on annealing of beads go here
Monday, 26 July 2010
Bead Annealing Schedule for Bullseye Beads
This table is based on James Kirwin’s work on bead making with variations. This is for cold beads being heated for a secure anneal.
Up to 10mm dia.: afap to 540C, soak for 30min., cool at 300C/hr to 370C; afap to 40C.
12mm dia.: 1000C/hr to 540C, soak for 30min., cool at 220C/hr to 370C; 600C/hr to 40C
14mm dia.: 1000C/hr to 540C, soak for 30min., cool at 165C/hr to 370C; 480C/hr to 40C
16mm dia.: 1000C/hr to 540C, soak for 30min., cool at 125C/hr to 370C; 375C/hr to 40C
18mm dia.: 900C/hr to 540C, soak for 30min., cool at 100C/hr to 370C; 300C/hr to 40C
20mm dia.: 600C/hr to 540C, soak for 30min., cool at 80C/hr to 370C; 240C/hr to 40C
22mm dia.: 535C/hr to 540C, soak for 30min., cool at 67C/hr to 370C; 200C/hr to 40C
24mm dia.: 450C/hr to 540C, soak for 30min., cool at 55C/hr to 370C; 165C/hr to 40C
30mm dia.: 280C/hr to 540C, soak for 36min., cool at 36C/hr to 370C; 110C/hr to 40C
38mm dia.: 180C/hr to 540C, soak for 36min., cool at 22C/hr to 370C; 66C/hr to 40C
50mm dia.: 100C/hr to 540C, soak for 46min., cool at 13C/hr to 370C; 36C/hr to 40C
Remember this table is for spheres. For cylinders choose the diameter that is 1.5 times the diameter of your cylinder, and for flat shapes choose the diameter that is 3 times the thickness of your piece.
For other information on annealing of beads go here
Thursday, 22 July 2010
Bead Annealing Schedule for Borosilicate Beads
This table is based on James Kirwin’s work on bead making with variations. This is for cold beads being heated for a secure anneal.
Up to 10mm dia: afap to 570C, soak 30 mins; anneal at 900C/hr to 500C; afap to 40C
12mm dia: 1000C/hr to 570C, soak 30mins; anneal at 630C/hr to 500C; afap to 40C
14mm dia: 1000C/hr to 570C, soak 30mins; anneal at 468C/hr to 500C; 1000C to 40C
16mm dia: 1000C/hr to 570C, soak 30mins; anneal at 355C/hr to 500C; 1000C to 40C
18mm dia: 1000C/hr to 570C, soak 30mins; anneal at 280C/hr to 500C; 840C to 40C
20mm dia: 1000C/hr to 570C, soak 30mins; anneal at226C/hr to 500C; 675C to 40C
22mm dia: 1000C/hr to 570C, soak 30mins; anneal at 187C/hr to 500C; 560C to 40C
24mm dia: 1000C/hr to 570C, soak 30mins; anneal at 157C/hr to 500C; 470C to 40C
30mm dia: 800C/hr to 570C, soak 36mins; anneal at 100C/hr to 500C; 300C to 40C
38mm dia: 500C/hr to 570C, soak 39mins; anneal at 60C/hr to 500C; 180C to 40C
50mm dia: 285C/hr to 570C, soak 46mins; anneal at 36C/hr to 500C; 100C to 40C
Remember this table is for spheres. For cylinders choose the diameter that is 1.5 times the diameter of your cylinder, and for flat shapes choose the diameter that is 3 times the thickness of your piece.
For other information on annealing of beads go here
Sunday, 18 July 2010
Bead Annealing
There are two approaches to annealing beads.
One is to keep them warm as you make them and when the session is finished, anneal all the beads sitting in the kiln. Assuming you are using soda lime glasses rather than borosilicate, you need to have the kiln idling at around 500C. When you have evened the heat throughout the bead, you place it in the kiln. Gloves and other heat protection attire will be needed when you open the door/lid to put the bead on the mandrel into it.
When you have finished the bead making session, you then take the temperature up to about 520C – 540C and soak there for about half an hour – both depend on the type of glass and the thickness and shape. The object is to take the glass up to a temperature where the annealing process can work, but without being so high in temperature that the bead takes up marks from the kiln shelf. More information on the soak and annealing of various shapes, sizes and types are given in later tips.
The second method applies if you have cooled the beads in vermiculite, blanket or other means to cool them slowly and you now have a group of cold beads that you wish to ensure are correctly annealed. You need to start the kiln from cold. Place the beads in the kiln and begin the firing. You need to take the beads up slowly – not more than 300C/hr - to between 520C and 540C, and soak there for about an hour. More information is given in further tips.
In both the cases described you now have the beads with the temperature equalised throughout the bead, and the annealing can begin. The annealing is the controlled cooling below the annealing soak. It is generally safe to take the temperature down at about 80C/hr to 360C. After this point you can speed up the cool down to something like 200C/hr, or if you kiln cools slowly enough, just turn it off and wait for the temperature to come down toward room temperature. This again depends on the type of glass, its size and shape.
Variations according to glass type used, sizes and shapes follow in further tips.
Annealing of Borosilicate Beads
Annealing of Bullseye Beads
Annealing Effetre Beads
Annealing Spectrum 96 Beads
Effect of Shape
Effect of Size
Effect of Variations in Sizes
Wednesday, 14 July 2010
Removing Beads Stuck to the Mandrel
You may need to hold the mandrel in pliers or in vice grips while holding the bead with a scrubbing pad or jar opening rubber pad.
If this does not work, try soaking the bead and mandrel in water for a few hours. This often is enough to release the bead.
A little more drastic method is to then place the bead and mandrel in the freezer. After being frozen, the bead will most often come off as the water in the bead release thaws.
A final attempt can be made with a pop rivet gun. Insert the mandrel and operate the levers, and it will push the bead off the mandrel.
If all other things fail and you really want your mandrel back, you can warm the bead in the flame and dump it in water. It will break apart with the shock from the water. You can then clean up the mandrel for future use.
Saturday, 10 July 2010
Bubble Squeeze
One of the most effective ways of reducing bubbles is to adjust the schedule to allow the top glass to slump down onto the bottom sheet before the glass is soft enough to stick at the edges and trap air. This is commonly referred to as a “bubble squeeze”.
A common method is to insert a soak at the slumping temperature of the glass. You will have found that the glass will take up the form of a simple slump at a lower temperature than more angular forms. Use this lower temperature for 30mins to an hour. You may want to extend that soak time depending on the thickness and complexity of the layup.
Another method is to start the squeeze about 55C above the annealing soak temperature and increase the temperature slowly (27-55C per hour) until you are at the slump temperature.
You can also combine the two above methods by soaking at the slump temperature for 30 minutes to an hour – or longer for thick and complex pieces – after the slow rise.
If your kiln is a side fired one, you need to be especially careful, as the edges of the glass become hotter than the centre. Two options are available - fire more slowly, or place baffles around the outside of the piece to prevent direct radiation of the heat onto the edge of the glass.
Tuesday, 6 July 2010
Uneven Heating Effects
If the glass is heated unevenly, it can lead to bubbles between the shelf and the glass, causing large bubbles with thin structures, if not actually burst. This can happen especially with side or side and top firing kilns. The solution to this is to [baffle] the edges of the glass from the direct heat of the elements.
Friday, 2 July 2010
Rapid Firing Effects
Bubbles between the glass and the shelf can be caused by firing too quickly. Fast firings can cause the glass at the edge to soften early and trap air underneath the glass. At fusing temperatures the air blows a bubble through the glass. Solutions for this are described in
[bubbles between the glass and the shelf]
[bubbles between the glass and the shelf]
Monday, 28 June 2010
Effect of Combustion Gasses
Some materials will partially or completely combust at fusing temperatures. This gives off gasses which expand and blow big bubbles from under the glass.
Some kiln washes, especially for ceramics, give this problem. If you believe this is the cause, try a different brand of kiln wash or pre-fire the kiln shelf.
Sometimes organic materials have been introduced accidentally or purposely onto the shelf. Either clean the shelf of the old kiln wash, or support the glass on beads, or frit to allow the gasses to burn out before the glass slumps to trap the gasses.
Thursday, 24 June 2010
Damaged Shelves
Shelves that have gouges or pits can give rise to bubbles from trapped air. Since air expands much more than glass, it will force its way out through the most plastic material. At fusing temperatures, this is the glass.
To determine if this is the problem, note where the bubbles form in relation to the shelf. If it is always in the same area, there is reason to believe it is related to the shelf. By noting the location you now have an area to inspect for damage.
If you can see no damage, it may be that the shelf is warped, or has a low spot. These can trap air, just as the pits and gouges can. But these are difficult to determine by direct visual inspection. You can place a straight edge on the shelf and look for any gap as you move the edge along the shelf.
Possible solutions are:
- Avoid fusing over the shelf "pits".
- Fill shelf scratches and nicks with kiln-wash.
- Mend the shelf with cement fondue or other refractory materials.
- Fire on fibre paper - this will provide an escape path for the air.
- Flip warped shelves, as the opposite side is likely to be equivalently bowed, but in the opposite direction. The degree of bowing is imperceptible, so will not affect the appearance of the fused result.
-Grind the shelves flat. This can be done commercially with a milling machine, or you can do it manually. Place two shelves with their concave faces together with some sandblast grit between. Rub the shelves together and this will reduce the convex areas on each to flat.
Sunday, 20 June 2010
Bubbles Between the Glass and Shelf
Eliminating the bubbles that can occur between your kiln shelf and the glass is important because these are the bubbles that can rise up through your work, blowing a large hole through the entire piece – Australians call these space helmets.
Common causes relate to damaged shelves, firing too rapidly, uneven heating, and combustion gasses.
Common causes relate to damaged shelves, firing too rapidly, uneven heating, and combustion gasses.
Monday, 14 June 2010
Bubbles Between Layers – “Flip and Fire”
Another approach to avoiding bubbles is to plan on two firings. This works well for pieces that have multiple layers, with glass or other inclusion in the middle.
For the first firing, put the middle pieces flat on the kiln shelf with one layer of glass on top. Take this to at least a tack fuse, although full fuse temperature is better as there should be no remaining gaps for air to be trapped within. Now turn this over and clean it well. Place this part in the kiln with the middle layer up. Place the top layer over this piece – now right side up – and take to the full fuse. Remember that now you are firing a thicker piece than in the first firing so take the temperature up more slowly.
This is most often applied to three layer pieces, but in principle can be applied to any number of layers.
Using baffles
Supporting the edges
Design elements
Arrangement of glass sheets
Thursday, 10 June 2010
Bubbles Between Layers – Baffles
Bubbles are often caused by the edges of the layers sealing before the air can escape from between. This frequently happens in side fired kilns, and top and side fired kilns.
Set up heat baffles around the edges of the sheets being fused to decrease the chance of the edges getting more heat than the centre and trapping air between layers. The baffles can be made from kiln furniture, strips of fibre board, cut pieces of old kiln shelves, etc. - anything that will witstand the top temperature.
Arrangement of glass sheets
Designing for fewer bubbles
Edge supports to reduce bubbles
Sunday, 6 June 2010
Bubbles Between Layers - Supports
A common way to reduce bubbles that appear between layers of glass is to support the edges of the glass allowing the middle of the top sheet to sag before the edges so pushing the air in front of the collapsing glass.
You can do this with small beads - especially useful for large glass sheets. These beads are prepared in advance by firing small pieces of glass during a previous fuse firing. The glass draws up into a bead-like structure. You place these beads around the edge of the glass sheets. Use glass that is the same colour as the base glass to avoid strong colour spots in the finished work.
Make sure you advance the temperature slowly enough to allow the glass to slump from the middle outwards, allowing the air to escape. Note that even clear beads will leave a trace, so design your work to take advantage of these faint marks.
Another method is to put small pieces of frit every few centimetres around the edge of the bottom piece of glass. Place the top piece of glass on top of these spacers. When fired, the middle of the top sheet will sag first and the area of contact between the two sheets will spread from the middle pushing the air out as it goes, just as with the beads. But the evidence is not so marked as with the use of beads. However the frit is not so useful on large pieces.
Design factors
Arrangement of layers
Using baffles
Friday, 4 June 2010
Fibre Papers
As there always is concern about the health effects of ceramic fibre paper, the report I prepared for a supplier may be of interest. It can be found here.
Wednesday, 2 June 2010
Bubbles Between Layers - Design
Design your work to minimise the possibilities of trapped air.
One way to do this is to use strips. Lay thin strips of glass on edge and fuse these together, instead of layers stacked on each other.
Another is to design work with many smaller pieces, rather than large ones. These create more pathways for air to escape.
Some advocate cutting the bottom layer in several strips to allow the air exit spaces from between the glass layers.
Note that all these methods leave marks of where the edges of the cut glass was, so they need to be planned to fit with the design.
In general terms, you need to think about how the air will move out of the piece. Are there places where there is no escape for the air? Allow a channel for the air to move from the centre to the outside.
Glass arrangement considerations
Supports
Using baffles
Friday, 28 May 2010
Bubbles Between Layers - Arrangement
There are a variety of ways to minimise bubbles between layers.
You will have noted that there are smoother and rougher sides to the glass. Putting the two rough sides together will increase the number of small bubbles in the finished piece. But the opposite –smooth to smooth – does not produce the smallest bubbles. The fewest small bubbles are produced when one smooth side is touching the rough side of the other layer of glass. This “roughness” allows any air to find a way out. Smooth to smooth tends to produce fewer but much larger bubbles.
Design factors
Supports during the forming stage
Using baffles
Monday, 24 May 2010
Attaching a Spider to a Lamp
To get the maximum support from the spider, bend the legs to fit the shape of the lamp. Then clean the spider assembly well with steel wool, or if particularly dirty with fine sandpaper, until it is bright again.
Apply flux and run a film of solder onto the legs where they will be in contact with the lamp. This will give you an indication of the amount of heat required to solder the legs to the lamp. It will also make it easier to fix the legs to the lamp once the appropriate temperature has been achieved in the legs.
You need to use the full power of your soldering iron, as the brass soaks up a lot of heat. If your iron is small you may need to change to one with higher wattage for this work.
As the heat is transferred quickly to all parts of the spider, wear gloves or hold with pliers while soldering.
Thursday, 20 May 2010
Hanging Panels from the Borders
The hanging method for copper foiled and leaded panels depends to a large extent on size and weight. The larger and heavier the panel is, the stronger support that is required. Smaller light weight panels are not usually a problem as the solder lines and joints can take the weight. Leaded panels require more support than copper foiled panels once they are over a few kilos, or are anything but rectangular.
For heavier panels you need to have stronger supports than just the perimeter calmes or solder beading.
For rectangular panels you can use a stronger edge came such as zinc or brass. Solder this to each meeting joint throughout the length of the panel. This distributes the hanging stress across the panel more effectively. Simple soldering at the four corners of the calme will rely on just those solder joints to carry the whole weight of the panel.
You need to make the vertical borders of single pieces so that you are not relying on the strength of a single solder joint at some point along the side. Although the joint may be strong enough at present, it must stand up to the weight of the panel over a long period of time.
All this relies on secure attachment of the hanging hooks or wire
Sunday, 16 May 2010
Glass Weaving
In its essence, weaving is creating a series of strips with waves, moving alternate ones a half step along and inserting straight strips into the channels provided.
It can be as sophisticated as you can devise, but remains the shaping of a series of strips through which other, straight strips are threaded at right angles to the shaped ones. As in cloth weaving, there are a great many variations that can be devised.
You can use a variety of material to slump over – covered steel pipe, cut up kiln shelves, brick, fibre board, etc. - but you must remember that you will need at least 10mm height, as the upper and lower pieces of glass are 3mm each and the one inserted will also be 3mm, leaving only 1mm tolerance. You also need to ensure the material slumped over is far enough apart to accept the width of glass you will be threading through. If you are using 20mm strips, you probably will need at least 25mm intervals between the slumping strips. Make sure they are parallel as well as evenly spaced. You will need to soak at slumping temperature longer than for a simple shape, as you want the slump to be close to vertical.
When threaded, you can tack or full fuse the piece and subsequently slump it if desired. The amount of space between the “threads” will depend on the steepness of the slump. If the slump is too deep you will find the lines of the “threads” will be uneven and may even fold over one another.
So this is yet another area of kiln forming that is simple in principle, but requires a lot of experience to get a really good looking piece at the end.
Thursday, 13 May 2010
Drilling Glass, 2
Using a Drill Press
It is best to have a drill press if you are doing a lot of drilling. It provides a stable drilling action and the pressure on the bit can be controlled. It is important to ensure the bit is running true without wobble. The drill press should have instructions to help correct any untrue running of the chuck. Make sure the drill bit is secured firmly. Core drill bits are easier to keep true, as they normally have a threaded fixing.
With a drill press, you can drill continually until the hole is completed, or until a white paste or dust begins to appear. This indicates the drilling is being done dry and will in a few moments heat up the glass too much. When the white paste appears, back out of the bottom of the hole a little to allow water to flush the glass out. Then continue.
Keep a firm grip on the glass being drilled. Maintain its position, especially if you are intending to back off intermittently to allow water to the bottom of the hole. This enables you to get back into the hole without scratches.
If possible, submerge the piece. But if that isn’t possible, just squeeze a little puddle of water on the surface and watch it swirl around. You can see if it is pulling ground glass out of the hole by watching the circulation. Placing a plasticine or clay dam around the drill area will keep the water confined.
Don't push down any harder than you comfortably can with the tips of your fingers. Keep it steady. Listen for the sound of diamond grinding glass
If the core gets stuck in the bit, knock it out with some stiff wire or a nail. Always remove each core right after drilling. They are very difficult to remove if there is more than one in there.
Every diameter drill bit has an optimum drill speed. The smaller they are the faster the speed required. Based on what the manufacturers recommend, a Dremel running at top speed is way too fast. When using a Dremel for drilling glass, slow it down with the speed control. Drill presses do tend to be on the slow side for glass drilling so it takes a bit longer, but there are big advantages in other respects.
For other tips on glass drilling see:
Keeping things wet
Using a drill press
Drilling with a Flushing Head
Avoiding chipping
Drilling holes with copper tube and grit
Drilling tools
Drilling glass without a drill press
Hole Placement
Drilling speeds for diamond bits in glass
Wednesday, 12 May 2010
Keeping Wire Hangers in Place
Even though it is normal to place the wire between two layers of glass, it often moves from its original placing.
Using glue only keeps the wire in place while moving the piece(s) to the kiln. The glue will burn off at just under 500C, which is before the sticky point of glass, so it cannot hold the wire in place at the critical temperature – from about 700C. In fact, if you fire quickly the glue can “boil” and cause the wire to move.
There are a variety of methods to help keep the wire where you placed it. Some of them follow.
You can try weighting the wire down with small scraps of glass to keep the wire in place until the glass sticks to the wire. The scrap will often form a small bead that can be used in other projects. Sometimes though, the scrap sticks to the wire.
Another method is to place a small piece of 3mm fibre paper under the wire to support it during the firing. This will be enough to keep the wire from moving, and the scraps of fibre paper can be reused many times.
You could also bend the wire loop so that the end touches the shelf. The part in between the glass needs to be flat with the bend starting after the wire emerges from the glass. You can bend the wire straight after firing.
Flattening the wire by tapping the wire – placed on an anvil – with a hammer will reduce the possibilities of movement, and certainly any rolling possibilities. It will also have a greater area of contact with the glass.
You can also make a shallow groove in the glass where the wire is to go. This can be done with a Dremel type tool with a diamond bit, or on the small diameter bit on the top of a glass grinder.
Lay the glass in the groove and cap with the top piece.
Drilling Glass 1
Keeping Things Wet
It is important always to keep the drill bit and glass wet, otherwise the glass gets too hot and will break. There are a variety of things you can do to achieve this.
Keeping things wet
Using a drill press
Drilling with a Flushing Head
Avoiding chipping
Drilling holes with copper tube and grit
Drilling tools
Drilling glass without a drill press
Hole Placement
Drilling speeds for diamond bits in glass
It is important always to keep the drill bit and glass wet, otherwise the glass gets too hot and will break. There are a variety of things you can do to achieve this.
- Drill with the glass under the surface of the water in a container.
- Drill in a ring of clay, plasticine, etc., holding water. To do this, you need to make a ring about 50mm / 2 inches in diameter and press it around the drill site. Fill the ring with water to cool the drill site and glass. Diamond coolant is not necessary, but can extend the life of the bits.
- Use a recirculating water pump such as those made for indoor water features. Direct the small flow of water to the drilling site and catch the water in the bucket in which the pump is submerged.
- Use a glass drill with hollow core bits and an internal water feed. This is the most expensive but it is the best equipment with which to drill many holes or large ones.
Keeping things wet
Using a drill press
Drilling with a Flushing Head
Avoiding chipping
Drilling holes with copper tube and grit
Drilling tools
Drilling glass without a drill press
Hole Placement
Drilling speeds for diamond bits in glass
Drilling Glass, 3
Drilling with a Flushing Head
A flushing head with a re-circulating pump will deliver water to the drill site through the core of the drill. These are supplied complete or as a fitting for an existing drill press. This is suitable for holes of 4mm and larger. Smaller core drills are impractical both because the glass is easily trapped in the drill and the wall thickness of the drill makes them almost solid anyway.
An additional requirement is to have a means to direct the water back to the reservoir.
Every diameter drill bit has an optimum drill speed. The smaller they are the faster the speed. Drill presses do tend to be on the slow side for glass drilling, but often have ways of altering the speed. So it takes a bit longer, but there are big advantages in other respects.
Don't push down any harder than you comfortably can with the tips of your fingers. Keep it steady. Listen for the sound of diamond grinding glass
If the core gets stuck in the bit, knock it out with some stiff wire or a nail. Be careful not to damage the edges of the drill bit. Always remove each core right after drilling. They are difficult to remove if there is more than one in the core of the bit.
For other tips on glass drilling see:
Keeping things wet
Using a drill press
Drilling with a Flushing Head
Avoiding chipping
Drilling holes with copper tube and grit
Drilling tools
Drilling glass without a drill press
Hole Placement
Drilling speeds for diamond bits in glass
Drilling Glass, 4
Avoiding Chipping
There are a number of methods to avoid chipping out the back of the glass when drilling:
All these things will help to avoid chipping out the glass at the bottom of the hole.
Keeping things wet
Using a drill press
Drilling with a Flushing Head
Avoiding chipping
Drilling holes with copper tube and grit
Drilling tools
Drilling glass without a drill press
Hole Placement
Drilling speeds for diamond bits
There are a number of methods to avoid chipping out the back of the glass when drilling:
- Placing a piece of scrap glass under your good glass will help avoid chipping on the backside. By pressing firmly but gently on the glass (not the bit) the bit will go through the upper piece of glass without chipping the back. This can be a difficult process to keep stable when both the pieces of glass are wet.
- Another method is to put duct tape under the glass to help minimise chip out.
Drill from both sides to avoid chip out as the bit breaks through. Go slowly toward the bottom of the hole. When the hole is almost through, turn the glass over and drill back to front. - Sometimes the glass is curved and drilling from the back is not easy. This is when the drill press mechanism to stop the bit sliding comes into its own. Before switching the drill on, lower it to the surface supporting the glass. You can adjust the mechanism to stop the press just as it reaches the support surface. Then place the glass under the press and the turn the drill on to begin the drilling.
- Don't push hard as you come to the end. Don't push down any harder on the drill press levers than you comfortably can with the tips of your fingers throughout the process. Keep it steady. Listen for the sound of diamond grinding glass.
All these things will help to avoid chipping out the glass at the bottom of the hole.
Keeping things wet
Using a drill press
Drilling with a Flushing Head
Avoiding chipping
Drilling holes with copper tube and grit
Drilling tools
Drilling glass without a drill press
Hole Placement
Drilling speeds for diamond bits
Drilling Glass, 5
Drilling holes with copper tube and grit
You can drill holes by using loose grit and a copper tube of the correct diameter. It can take quite a while. You will need to have a chuck big enough to take the tube, or have a means to reduce the tube diameter to the chuck size. Alternatively, use core drills that have had the diamonds worn away.
Prepare the glass as for a drill press without a flushing head, so the water and grit are confined. The dam can be putty, plasticine, clay, or other mouldable material put around the area to be drilled.
The grit can be sandblast grit or other abrasive of about 100 to 200 grit.
Drill as normal.
If the core gets stuck in the bit, knock it out with some stiff wire or a nail. Always remove each core right after drilling. They are very difficult to remove if there is more than one in the core of the bit.
For other tips on glass drilling see:
Keeping things wet
Using a drill press
Drilling with a Flushing Head
Avoiding chipping
Drilling holes with copper tube and grit
Drilling tools
Drilling glass without a drill press
Hole Placement
Drilling speeds for diamond bits in glass
Drilling Glass 6
There are a variety of tools that can be used to power glass drills.
Dremmel and similar craft motorsThese are light duty high-speed drills. Those with variable speed controls are especially useful. They work best for small diameter holes. They must have the speed turned down for drilling, especially for larger holes.
These can be combined with a flexible drive shaft for lighter weight.
Drill pressHowever, the most important thing to have when drilling glass is a drill press. Doing it by hand is very difficult and wears out diamond bits very fast. Dremmel and others make drill presses for their tools.
Drilling machinesPurpose made glass-drilling machines are important for larger holes and production work. Flushing head adapters are available from suppliers that will convert a standard drill press into a glass-drilling machine. These tend to be much slower than the Dremmel style motors, but are very steady. The important thing about these is that they use hollow core drill bits, allowing the water to be fed through the drill bit directly to the glass-drilling site.
Drill bits
The other tool needed is drill bits. The recommended type depends on the size of hole to be drilled.
Small diameter holes, up to and including 3mm require solid bits. These can be spade (unusual) or solid diamond-tipped bits. A number of manufacturers make solid drill bits from 2-6mm and some (especially lapidary suppliers) make the very small diameter bits from less than 1mm to 2mm.
Larger diameter holes are best drilled with hollow core bits, as less glass needs to be removed to achieve the hole. These can be used with a flushing head or simply by directing water to the drill bit, with a dam to hold the water around the site.
The bits will last longer if you use a drill press. The press keeps the bit wobble to a minimum and maintains the vertical, both helping to reduce the wear on the bit.
Hollow core bits
Hollow core diamond bits are of two types:
One -where a heating process attaches the diamond - is called sintered in Europe and a number of other countries.
The second – where the diamond is bound to the metal with resins and other chemical attractions – is called bonded in Europe.
Bits of the first type are longer lasting and more expensive. These can be dressed with an aluminium oxide dressing stick to maintain their effectiveness.
Bits of the second type wear quickly and should not be dressed.
In general a diamond core drill breaks out much less glass at the bottom of the hole than a solid drill bit.
Water pumpA further tool that is useful to have is a re-circulating pump. This can be a small fountain pump with a flexible spout to aim the water on the drilling site. A foot switch can control the water flow. A large tub is required to act as the catch basin for the water that comes off the drill and as the reservoir for the pump.
For other tips on glass drilling see:
Keeping things wet
Using a drill press
Drilling with a Flushing Head
Avoiding chipping
Drilling holes with copper tube and grit
Drilling tools
Drilling glass without a drill press
Hole Placement
Drilling Speeds for diamond bits
Drilling Glass, 7
Drilling glass without a drill press
It is best to have a drill press for drilling holes in glass, but there are ways of doing it with a hand drill.
Make a ring of modeling clay, plasticine, putty or other mouldable material about 5cm/2" in diameter and press it around the drill site. Fill the ring with water to cool the drill site and surrounding glass as well lubricate the drill bit. Buying sinered (more expensive) bits is worthwhile as they work much better than the cheaper resin bonded ones.
Use a paint pen to mark the spot where the hole is to be. Without a drill press, starting at an angle with a slow drill speed will stop the bit from sliding around as you establish the drilling point. As the glass surface is roughened, bring the drill to vertical. Move the drill up and down a little as you drill to allow the water into the hole. If you are using a solid or spade drill, a little oscillation keeps the bit from jamming in the hole. Do not do this with a core drill.
A Dremel running at top speed is way too fast. Slow it down with the speed control.
Every diameter drill bit has an optimum drill speed. The smaller the bit is, the faster the speed required.
For other tips on glass drilling see:
Keeping things wet
Using a drill press
Drilling with a Flushing Head
Avoiding chipping
Drilling holes with copper tube and grit
Drilling tools
Drilling glass without a drill press
Hole Placement
Drilling speeds for diamond bits in glass
Drilling glass, 8
Hole Placement
The general rule on drilling holes in glass is that the edge of the hole should be further away from the edge than the thickness of the glass. This means that the edge of the hole on a 6mm thick piece of glass must be more than 6mm from the edge of the glass.
The calculations are simple arithmetic.
Remember this is the minimum distance. For safety and durability in architectural or heavy circumstances, an additional margin must be added.
For other tips on glass drilling see:
Centering the drill bit
Keeping things wet
Using a drill press
Drilling with a Flushing Head
Avoiding chipping
Drilling holes with copper tube and grit
Drilling tools
Drilling glass without a drill press
Hole Placement
Drilling speeds for diamond bits in glass
The general rule on drilling holes in glass is that the edge of the hole should be further away from the edge than the thickness of the glass. This means that the edge of the hole on a 6mm thick piece of glass must be more than 6mm from the edge of the glass.
The calculations are simple arithmetic.
- calculate the centre point of the hole by adding the radius of the hole to the thickness of the glass plus at least 1mm.
- For example, to drill a 10mm hole in 6mm glass, you add 5mm (radius of hole) to 6mm (thickness of the glass) plus 1mm = 12mm as the minimum distance from the edge of the glass to the centre of the hole.
Remember this is the minimum distance. For safety and durability in architectural or heavy circumstances, an additional margin must be added.
For other tips on glass drilling see:
Centering the drill bit
Keeping things wet
Using a drill press
Drilling with a Flushing Head
Avoiding chipping
Drilling holes with copper tube and grit
Drilling tools
Drilling glass without a drill press
Hole Placement
Drilling speeds for diamond bits in glass
Subscribe to:
Posts (Atom)