Monday, 25 February 2013

Hanging Sun Catchers


Unless you are using some manufactured system or a frame, the most frequent way to provide hanging points is to create a loop from copper wire.


Hangers should originate in a solder bead that goes some way into the piece. The loop's tail should lie a significant distance into the solder line to ensure it does not pull the piece apart. If this is to remain invisible, some planning will be required to allow the small extra space between the foiled glass.


The loops for hanging a piece of any size should not be soldered to the perimeter foil without reference to the solder bead lines, as the adhesive and foil are insufficient to hold the weight of the piece without tearing.

Here the hanging loops could have been moved just a little to engage with the solder joints at the left ear and at the tail to make stronger hanging points

Here the hanging points are at the solder joints giving strong hanging points

Reinforcement of free hanging or projecting elements can be done by placing wire around the piece with a significant excess going along the perimeter in both directions. The supporting wire can go into the solder line, if it is a continuation of an edge of the free hanging piece.

In this case a twisted copper wire around the perimeter gives strong hanging points

The strongest method is to wrap the wire around the whole perimeter of the piece. Choose easily bent copper wire. This will be pretty fine, but when soldered, will be strong enough support the whole piece.

The hanger can be made by leaving a loop of wire free. This way you can hang from any convenient place on the perimeter. This loop can be made by a single 180 degree twist in the wire, or by bending a loop into the perimeter wire. In all cases you will need to tin the wire to blend it with the rest of the piece.

This perimeter wire can be simply butted at the start/finish of the wire. It could be overlapped, but this is unnecessary on any piece where this method is adequate for support. The start can be at the top or bottom, although I prefer the top, so the wire is continuous from loop to loop. The reason for continuing beyond the loops is to provide support to all the edges of the sun catcher.

This single point hanger is at the strong point of the piece

The left hanger is strong, but the right is weaker than if it had been attached to the right of the body

This piece needs wire around the piece, especially to stabilise the tail and ears

Wednesday, 20 February 2013

Cleaning Magnets


When making frit in steel containers the metal fragments need to be removed using magnets. It can be very difficult to get the fragments off the magnets.


A solution has been suggested. Put the magnet into a small plastic bag before use. After cleaning all the metal from the frit, take the bag to the bin and remove it from the bag. The metal fragments will drop off into the waste bin, leaving a clean magnet.

Friday, 15 February 2013

Single Layer Firing


Preparing a Single Layer for Further Kiln Work

There can be circumstances where you do want to fire a single layer in building up your project. This is more often difficult on rectangular than round pieces.

Some of the considerations are:
Temperature
Heat work
sizing
Cleaning after firing

Firing a 3 mm piece to anything over a laminated tack fuse normally leads to the edges drawing in creating a “dog bone” effect and often leading to bubbles in the interior at higher fusing temperatures. So one approach is to fire at low temperatures and accept relatively sharp edges on the piece.

Diagram of the full fused results of different thicknesses 


However the concept of heat work can help in this situation. Glass reacts to the accumulation of heat, so that slow advances or long soaks can achieve the desired results at a lower temperature without – in this case – getting the “dog bone” effect. This does require a bit of experimentation. Keep good records of all the stages of experimentation as the effects achieved with various combinations of temperature and time will come in useful later.

It is possible that using the concept of heat work will not be sufficient to achieve the desired results. Then you need to consider placing your design in the centre of a larger piece. Fire this to the lowest possible temperature to achieve your results and then cut the fired piece to size. You will need to fire polish or cold work the edges to get a suitable finish on the edges.


The central white piece shows the results of single layer firing that could be altered by the above technique


If you are going to re-fire any of these single-layer pieces, you need to clean them very well. Any dust or other contamination will be incorporated into the final piece. This is especially true if you are combining a flip and fire technique with this single-layer firing.

Sunday, 10 February 2013

Slump Point Test


A slump point test is useful when you wish to determine the approximate annealing point of an unknown glass. The methodology follows:

Prepare a strip of the glass 305mm x 25mm. Suspend this strip above the shelf on 25mm pieces of kiln furniture. Leave a 275mm span between the kiln furniture. A piece of kiln furniture also needs to be placed on top of the glass to keep it in place.

Example of an extreme case of testing for slump point

Fire at 200C per hour to ca. 550C, then fire at 50C/hour to about 700C. Observe frequently from 600C. Record the temperature when the middle of span touches the shelf.  This is also the slumping temperature of the glass when fired this way. 

Subtract 40C from the “touch down” temperature for the approximate annealing point temperature.


Tuesday, 5 February 2013

Ceramic vs. Glass Kilns


The purposes of these two types of kiln differ, so insulation properties differ too. Ceramic kilns have high density brick insulation to retain the heat and slowly cool the contents from the top temperature to avoid breakage. Glass kilns have light weight insulation – whether brick or fibre - to cool quickly from the top temperature to avoid devitrification.


Considerations


Controllers are necessary for controlled soaks and cooling on glass kilns. Much simpler controls are sufficient for ceramics firings. So a ceramics kiln needs to have a controller added. This is a significant cost. If buying a ceramics kiln new for glass work, ensure it has a controller that can be used for glass.


A bathtub or coffin type kiln with controller


Heat distribution is different in the two. Glass kilns are shallow to get even heat distribution to the surface of the glass. Ceramic kilns have elements around the sides and frequently in the top, but may not have any in the door, if it is not top loading. This means the heat distribution in a ceramic kiln is not as even as in a glass kiln, which is not a problem for ceramics as so much heat is retained at the target temperature, it equalises as the kiln cools.


Ceramic kilns with elements on sides rather than top

Loading
Ceramic kilns up to 450 mm deep tend to be top loading, the ones with greater depth tend to have doors. Glass kilns are shallower and tend to have top – just the lid opens - , clamshell – the lid is the whole chamber which opens giving direct access to the floor of the kiln - or bell type – where the lid also forming the chamber is lifted from the base of the kiln and often the base is on wheels so another base of prepared work can be wheeled into place for firing before the kiln has completely cooled.


Large top hat kiln showing direct access to the kiln floor

Baffles are required in ceramic kilns because the heat is greater nearer the elements on the initial advance in temperature. These baffles avoid premature sealing of the edges of pieces causing large bubbles.

Firing on multiple levels is possible in ceramic once you have built up the experience.

Schedules have to take into account the greater mass of insulation in ceramic kilns.


Kiln with fibre insulation all around

Annealing and cooling tends to require different strategies to encourage the ceramics kiln to cool fast enough in the devitrification range, but can have the power turned off earlier after the annealing soak, because of the slower cooling.


Large front loading ceramic kiln

Ceramic kilns are ideal for casting.

Cost – ceramic kilns tend to cost less than glass ones and second hand ones have been more widely available. That may be changing now with the increasing popularity of glass fusing. 

The electricity costs are marginally higher in ceramic kilns than glass, because the mass of brick to be heated up is greater..

Space - Ceramic kilns tend to take up less floor space because they are deep or tall rather than broad.

Small top loading kiln with combination brick and fibre insulation

Wednesday, 30 January 2013

Removing Kiln Wash

Kiln wash can get stuck on items for a variety of reasons

A variety of ways to remove the kiln wash are:


Grind the kiln wash off with diamond hand pads, or small rotary tool with wet sandpaper. You can then proceed to continue to grind with successively fine grits until a polish is achieved, or you can fire polish after a thorough cleaning.


Example of scrubbing kiln wash off


You can sandblast off the kiln wash and then proceed in either of the fashions above.


You can soak small pieces in tri-sodium citrate and then if necessary scrub with a wire brush – a brass wire brush is preferable to steel one to avoid scratching the glass.

Another solution is to place small items in an ultrasonic cleaner basket with water and a little soap or proprietary cleaner. Leave for an hour or two and they should be free of the kiln wash.

A link to some methods of cleaning shelves is here.

Friday, 25 January 2013

Grinder Chipping Glass


There are a number of reasons that may cause the grinder to chip the glass surface. Some of the things to check are:

Too much pressure
It may be that you are pressing the glass into the grinder head too hard. The grinder head should do the work. Firm rather than hard pressure should be applied. If the grinder slows, it is an indication that far too much pressure is being applied.

Insufficient water supply
There may be too little water reaching the head to lubricate the diamonds and keep the glass cool. If you are getting a white paste or a powder on or near the glass, you need to increase the water supply.

Worn or damaged grinder bit/head
Inspect your bit carefully for smooth areas showing that the diamonds have been worn away. Also look for dents, and other irregularities on the surface, indicating that the bit is damaged. Any dents or smooth places on the bit cause a vibration that is similar to a tiny hammer tapping the edge of the glass.

Grit size
It is possible that you may be using too coarse a grit on the grinder bit/head. The more coarse the grit is the larger the chips will be taken off the edge surfaces. Smaller grits take smaller chips off the edges, and so are less obvious.

New bits
Examples of the range and grit differences in grinding bits
If it is a new bit that is causing the chipping, consider dressing it. New bits often need to be dressed – removing protruding diamonds, or cleaning and exposing new ones on a worn bit. To dress the bit you can grind some scrap glass, brick, or use a dressing stone to lightly grind some of the abrasive material away. This most often settles the bit and avoids chipping.

Sunday, 20 January 2013

Cutting thick glass

Use the correct angle of cutter wheel for the thickness. 

Use a similar pressure to cutting 3 or 6 mm glass. It is natural to think that as the glass is thicker, you need to use more pressure. The different angle of the cutter wheel is designed to transfer the standard pressure more directly downward.

Use cut runners made for thick glass to help break the glass. Run score from both ends of the score, especially on curved scores.
Example of cut runners for thick glass

Alternatively, turn the over and use hammer and rounded screw driver to run the score (similar to tapping method for thinner glass). Place the screw driver blade directly over the score line and tap it with a hammer. This will start the run. Continue it by placing the screw driver over the score at the end of the open score and tap again to continue the run.

Tuesday, 15 January 2013

Air Brushing on Glass

Raphael Schnepf Workshop

Air brushing onto glass is a little different than onto other slightly absorbent surfaces. As glass cannot absorb the moisture from the material being sprayed, the medium needs to be allowed evaporate. This means that each layer of paint must be allowed to dry before the next layer is applied. If too much liquid is applied to the glass, it will bead up giving a stippled appearance to the finished result.

There are some things that can help to give an even application of the paint or enamels to the glass.

Clean the glass very well. After thorough cleaning and drying, use some of the paint to rub the glass. As the paint is a slight abrasive, it cleans off anything the other cleaning methods could not get off.

Add a drop of washing up liquid to the mixture of paint and medium (liquid). This breaks the surface tension of the medium and reduces the tendency to bead up on the glass.

Use alcohol part or all of the medium. This reduces the evaporation time. Also apply in a warm rather than cold place. You can use a hair dryer on low speed and power to assist the drying.

Apply in thin even layers, allowing the paint to dry between applications.

Open the air brush trigger before reaching the edge of the area to be painted and close it after reaching the other edge. Any overspray can be cleaned up as in any other painting.

A slightly larger opening at the nozzle is required on the air brush than for other paints, but you have to be careful to avoid opening it so large that you get the spitting of large drops of paint onto your surface.

Because you are putting very small particles into the air you need to observe various precautions. You need to have a dust mask on at all times you are air brushing. You should do this in a spray booth with extraction if possible. If not, you need a well-ventilated area and very good clean up afterwards.

Thursday, 10 January 2013

Avoiding Large Bubbles


I tried small projects and they turned out fine. I have a 12" square with an emblem in the centre and a border set in slightly from the sides. Most of the glass is only the one layer. Both firings produced huge bubbles in the areas where the glass was only one thickness.”

Scale does matter. What can be done at a small scale does not always transfer to a larger scale without alteration.


The first problem this project created was using only one layer as the base. Glass has a surface tension which means that it tries to become 6-7 mm thick, which is twice the thickness of a single layer. As it thickens at the edges, it traps the air under other parts of the glass, and as the glass continues to soften the expanding air bubbles come up through the thin parts of the glass.  Using two layers of glass with the design on top will ease the problem.


The design is the second problem. The weight of the border makes it even more difficult for the air to get out from under the glass.  Although having two layers of glass will reduce the problem, think about ways to make the border incorporated with the second layer of glass, so the weight of the glass at the perimeter is not greater than the interior.


The third problem is that there is not a bubble squeeze in the schedule (indicated elsewhere in the query). The soak of 10 minutes at 538ºC/1000ºF is not necessary. You do need a soak at a point between 620ºC/1148ºF and 677ºC/1250ºF - this is the bubble squeeze temperature range. It is also the slump temperature, so you can determine what the bubble squeeze should be for your glass by what the upper slump temperature is.


The bubble squeeze can be accomplished by a half hour soak at the slump temperature, or by a slow rise from 50C below the slump temperature – taking an hour or so, depending on the size of the piece.


A fourth problem is the that the separator is kiln wash, and the edges of the glass conformed to the kiln wash, resisting the movement of air from under the glass.


You may need to change to fibre paper for single layer pieces, as that allows more air out. Shelf paper may be enough, but you can also put it over 0.5 mm fibre paper for greater air release. Alternatively, sprinkle powdered kiln wash over the fibre paper and smooth it if you don't want to use Thinfire.


Lastly, try to avoid the factory set schedules in your kiln's controller, as they are generally set for 6mm thick pieces.


Look at the glass manufacturer's website. Bullseye, Spectrum, Uroboros, and Wissmach give basic firing schedules that work with minimal adjustment. I don't understand why kin manufacturers don't simply refer to the manufacturers’ sites to give their customers good advice, instead of the pre-programmed stuff.

Saturday, 5 January 2013

Orientation of Cutter Heads


In addition to the alignment of the cutter, you need to be sure you are moving the cutter forward in the way it was designed. If you look at the cutter from the side you will see two things. The most obvious one is that the angles of the cutaway on the head are shallower at the front and steeper at the back. In addition if you look carefully, the axel for the wheel is slightly forward of the centre line of the whole cutter.

Cutters aligned to score to the left


So it does not matter where the fixing screw on the head is. It may be at the front or at the back. What matters is the cutaway at the back which allows the cutter to be used with a shallower angle, than if reversed. This is most obvious on wide cutter heads.

Cutters arranged to score to the right


Sunday, 30 December 2012

Repair of a Plastic Barrel Cutter


Generally, there are two parts that can break or be damaged – the wheel and the barrel.

Wheel
If the wheel is damaged or worn, you can replace the head. When considering that, look at the cost of the head and consider whether the small cost difference indicates you should buy a new cutter instead.

The most common damage is a flat spot on the wheel. You can check for this, immediately after dropping the cutter, by lightly moving the cutter across a smooth piece of glass. If you hear a regular ticking sound, the wheel is probably “flat spotted” and will need to be replaced.

A worn wheel is more difficult to detect and is also much less likely to occur. I have been using some of my cutters for 15 years without any sign of being worn.

Plastic barrel
Sometimes the plastic barrel cracks or breaks. This will mean that the oil in the cutter will leak out. So you can consider continuing to use the cutter without oil, or by dipping the head in an oil soaked bit of cotton wool or similar material before each cut.

If the break is at the threaded end and you want to continue to use the ball at the end for tapping purposes, you can glue the barrel back together with an epoxy resin. Make sure the pieces are free from oil. Then glue and allow to cure. After curing, sand down any excess resin to make the cutter comfortable to handle.

Then for additional strength you can wrap with dental floss or extremely fine wire. Start below the glued area and go to the end of the break and back again. You could coat this wrapping with epoxy again both to secure the wrapping and to further increase the strength.

Another solution is to cut the cracked end off and re-thread the remainder. It makes the cutter a little shorter, but will continue to hold oil and give good service.

Or, you could buy another cutter.


Tuesday, 25 December 2012

Gas Fired Kilns


Installing a Gas Fired Kiln

There are a number of considerations about the location of a gas kiln.

Air exchange
The kiln should be placed in an area where there is good air exchange. For a number of reasons, it is usually convenient to place the kiln near an outside wall – ventilation and canister storage are the two most important.

Ventilation
There should be a low level vent to the outside to allow air to rise for the use of the combusting gas. There needs to be high level vent for the gas to escape. Ideally a hood with powered extraction would be installed.

Space
As with any kiln, you need to have sufficient space around the kiln to avoid heating any flammable materials. In the case of a gas kiln you need to be careful to avoid storing any thing that might ignite above the kiln. You can put heat resistant materials around the kiln if desired.

Location and storage of gas canisters
The safest place to put the gas canisters is outside the building. This does mean going outside to turn the valve on the gas canister on and off. However this is the safest place, should any fire start in the building, because the fire brigade can find and remove it from the fire. This placing applies to both the in use canister and any other full or empty canisters.

Detectors
Finally, even with these precautions, you should install a carbon monoxide detector. Carbon monoxide has no smell and can overcome you very quickly. Even a few minutes of exposure can leave you feeling ill for days.  

Thursday, 20 December 2012

Paint and Cold Working

One of the difficult things in cold working is determining when it is time to move on to the next grit size.  You really cannot tell while the piece is wet, because the water disguises the minute scratches put into the glass by the grinding process.

After you have dried the piece, you can coat it with a white paint pen. It is not necessary to cover the piece completely in white pen.  The white marks will be taken away by the grinding to give evidence of where you have already ground the piece.


Piece prepared for the next stage of grinding

You must make sure the paint has completely dried, or it will wash off with the water used in the grinding.

I find I get best results from this "witness" by making the paint pen marks at right angles to the grinding direction.  When all traces of the paint have disappeared, you have thoroughly covered the piece with that grit size.  Being ever cautious, I tend to dry, paint and do a second pass at the same grit before going to the next finer grit.

Saturday, 15 December 2012

Cold Working Holes

If you have, or expose, holes while cold working a piece, you need to keep the glass waste from settling into them. Dry the piece and with a bar of hard soap rub over the area until the holes are filled with soap. Then polish off the excess with a cloth or paper towel. 

The filled hole in this piece is the white dot half way up on the right side


When finished cold working, you only need to wash out the soap, which is much easier than trying to get rid of powdered glass.


Based on comments from Cynthia Morgan, posting as Morganica

Monday, 10 December 2012

Diamond Quarries


Diamond quarry glazing appears to be simple. But because if its simplicity it must be both accurate and aesthetically pleasing. Diamond quarried windows look best if the individual pieces are taller than they are wide. The window also looks better if the lines forming the diamonds end in the corners of the window as it gives a pleasing wholeness.

Simple sketches to show the relative clutter of a 6x6 and a 4x4 pattern

You can try making a sketch and trying various options of numbers and angles. By this simple exercise, you can determine the amount of clutter (how many lines vs. how much glass shows) produced by various combinations. It is important that the proportions of your sketch should be the same as the that of the window for which you are designing. This sketching process lets you try out various numbers of quarries along the bottom and sides quickly as the lines do not have to be accurate. Once you have decided on a size that looks good on the sketch you can count up the number of divisions on the horizontal and vertical lines. This can then be translated into approximate sizes on the full sized cartoon.


Begin with the cut line cartoon. This seems obvious, but until you have measured the window and given the glazing and border leads allowance you are unable to design a damond quarry glazed window that will have its lines meeting the corners in the finished window.


Drawing the diagonals


Begin the designing process by drawing two diagonal lines from the corners of the panel to ensure the lines will finish in the corners. This will also determine the centre of the panel and show you the slope of the diagonals. If you have not already determined the size of the diamond quarries, you can try out different sizes of diamonds by drawing parallel lines to the diagonals. 

Centre point determined, trial sizes of quarry, and the sides divided

When you have a size you like, you can determine the number of diamonds horizontally and vertically across the panel. You need to measure the width and height – point to point – of the test diamond and divide the lengths of sides to determine the number of quarries up and across the window. 

In this example of a small window (380 mm x 280 mm), the quarry is about 50mm wide and 65 mm high.  The exact sizes are not too important.  Divide the length of the base and side lines to determine the number of divisions.  In this example it is five on the base and six on the side. To get the exact dimensions for the quarries, you can use the no-calculation method of dividing a line. [link]

The divisions are extended to the opposite vertical or horizontal line to provide points from which to draw the diagonals.

Lef to right diagonal lines drawn
In this example feint lines were drawn up and down across the panel.  This provides a check that the diagonals remain accurate.

Remaining diagonals drawn  and confirmed by horizontal and vertical check lines


Sometimes, however, the corner to corner diagonals are too steep or too shallow to make pleasing diamonds. Diamond quarries generally have slopes that fall in the range of 50 – 60 degrees (45 degrees gives square quarries and anything over 60 degrees gives such a narrow quarry as to be unplesant). In these cases you need to determine the approximate angle for the diamond shape before proceeding from the centre point. 

Centre found and test diagonal drawn
In this landscape format example the diamond is horizontal, but otherwise a suitable size, so the dimensions were taken of it to determine the number of quarries on each side.  In this case it was seven along the bottom and four along the side.

Normally a 55 degree angle is a suitable middle range slope for diamonds, so you can start with that to determine what number of pieces vertically and horizontally are appropriate.  

After marking off the equal number of spaces, you can determine which points will give you appropriately angled diagonals. 

Number of quarries determined and first diagonal drawn
It is important to count the same number of marks along on the base line as there are marks on the side.  You will see in the above picture - if you look closely - the effects of narrowing diamonds if you do not.

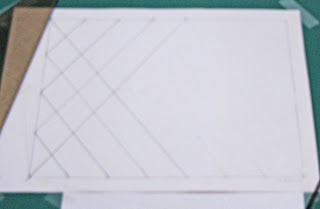
The second set of diagonals being added
After setting the diagonals on the first side and part of the base, continue with the parallel lines to the end.

Completed set of diagonals for a landscape window

This photo shows the completion of the diagonals.  It also shows the need for concentration.  I was interrupted and when I came back I drew a line from centre top to the next to last mark on the cartoon.  However, as you can see from the erasing, it should have been the corner mark that I drew to.  I point this out to emphasise how important it is to concentrate while doing this apparently simple task of joining the marks.

Wednesday, 5 December 2012

Dividing a Line

Dividing a Line into Equal Parts

There is a no-calculations method of dividing a line into equal parts. This describes how to divide a line into any number of equal parts without calculating and measuring the divisions.

The steps are:
Determine the number of divisions required across the base or perimeter line. Then draw a long line at a shallow angle to the line to be divided.

Angled line and dividers

Take a pair of dividers and open them to the approximate width of the individual division or piece.  In this example it was decided to have five divisions of about 50 mm.  The dividers are opened to 50 mm and marked off on the angled line from the corner the required number of times - in this case five.  

Then make a line from the last mark to the angled line to the end of the cartoon line with a right angle drawing square. 

Setting the angle

Place a long straight edge on the bottom of the drawing square and then mark the remaining divisions by maintaining the angle of the long straight edge while moving the drawing square from one mark to another. 

Moving the drawing square along the line and marking the base line


This process allows you to make equal divisions of a line without worrying about fractions of a centimetre or of an inch. It is simple and just as accurate as your skill in holding the straight edge steady while you run the drawing square along the edge and mark the base or vertical line.  In general it is more accurate than any calculations and measurements on the base or vertical lines.

Friday, 30 November 2012

Storing Moulds


Requirements

  • protection – some form of container is required to maintain the life of the mould. A container also prevents the kiln wash or other separator from being rubbed off.
  • ease of access – It should be easy to get to the moulds, especially as some can be heavy.
  • flat vs vertical – some like to store moulds in boxes vertically rather than horizontal with them stacked one above another.
  • In either case you need shelves of the right depth and height to store and support the moulds.
  • custom made vs bought in – Moulds you have purchased normally come in their own boxes which can be retained for storage for a number of years. You can also make light weight boxes either from old boxes or card cut to size and taped and glued together. More robust boxes can be made from thin plywood or thin pressed board.

Sunday, 25 November 2012

Quarry Glazing


For some reason that I have never learned, the regularly shaped pieces of glass that are leaded into a window are called quarries.  The derivation of the word relating to excavation comes from its middle English variant of medieval Latin quareria, from Old French quarriere, based on Latin quadrum 'a square'.   How it came to be applied to pieces of glass is unknown apparently.  However, in stained glass, "quarries" can relate to rectangles, diamonds, circles, etc., not only squares

These kinds of glazing are weak as there are long straight lines created with these designs. The best way of counteracting this weakness is to “weave” the lead joints within the panel combined with more frequent than usual glazing bars.

It may be wise to use a glazing bar at every second set of joints rather than merely consider the distance between bars.